HP 4500 HP Color LaserJet 4500, 4500 N, 4500 DN Printer - Initial Toner Instal - Page 1
HP 4500 - DesignJet Color Inkjet Printer Manual
 |
View all HP 4500 manuals
Add to My Manuals
Save this manual to your list of manuals |
Page 1 highlights
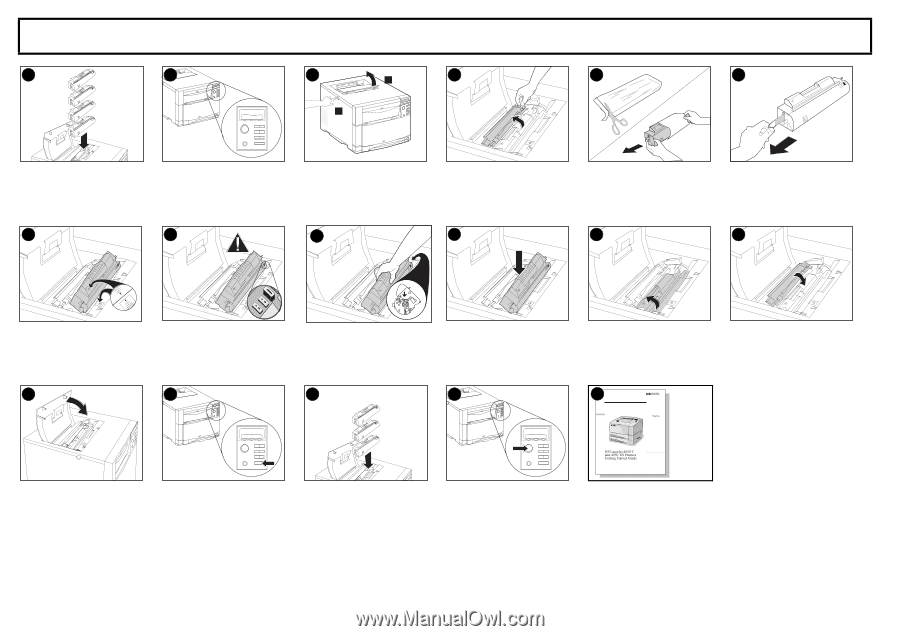
1 C M Y K [IMPORTANT[TIMESAVING[INSTRUCTIONS] Hewlett-Packard Color LaserJet 4500 Initial Toner Installation Instructions 2 3 2 4 5 6 1 XXXXXXXXXXXXX XXXXXXXXX 1. Locate the toner cartridges packaged 2. If the printer is not already turned on, 3. Push the dark gray release button in the printer box. The printer uses turn it on and close all doors. Wait for on the left side of the printer (1) and four different toner colors and has a the printer to warm up. When it is open the printer's top cover (2). different toner cartridge for each ready, the control panel displays: color: C = Cyan; M = Magenta; TONER POSITION Y = Yellow; and B = Black. CYAN = MISSING 4. The cartridge slot for the cyan toner cartridge is visible. Lift up the flap that partially covers the cartridge slot. 5. Remove the cyan toner cartridge from the bag. 6. Locate the orange tab on the end of the toner cartridge. Pull the tab firmly to remove the inside sealing tape. (If the tab breaks off, pull on the tape.) Discard the tape. 7 8 9 10 11 12 7. Position the toner cartridge over the cartridge slot so that the blue arrow on the toner cartridge points to the blue arrow on the printer. 8. Be sure that the tab on the other end 9. Hold the toner cartridge as shown. of the toner cartridge aligns with the The arrow on the right (control panel notch on the cartridge slot. If the tab side of the printer) should point does not fit in the notch when you straight down. insert the toner cartridge, the toner is the wrong color for that cartridge slot. 10. Slide the toner cartridge down into the slot until the cartridge stops. 13 14 15 16 11. Rotate the toner cartridge toward the back of the printer (within the cartridge slot) until the cartridge stops. The cartridge shutter opens to reveal the developer sleeve. 12. Lower the flap to partially cover the toner cartridge. 17 M Y XXXXXXXXXXXXX XXXXXXXXX K XXXXXXXXXXXXX XXXXXXXXX 13. Close the printer's top cover. Note: Close the top cover before installing the next toner cartridge. 14. On the printer control panel, press [VALUE +] once to prepare the printer for the next toner cartridge. When the printer is ready, the control panel displays: TONER POSITION: (color) = MISSING 15. Install the other three toner cartridges by repeating steps 4 through 15. Install them in the following order: 1. Magenta (M) 2. Yellow (Y) 3. Black (K) 16. After installing the fourth toner cartridge and closing the toner door, press [GO]. Wait while the printer runs an internal color calibration. The calibration takes a few minutes. When the printer is ready, the control panel displays READY. 17. For complete instructions on installing the printer, see the HP LaserJet 4500 Printer Getting Started Guide. For additional assistance, please check the following sources and locations: • The HP Color LaserJet 4500 Printer Getting Started Guide • HP Web Site: http://www2.hp.com:80/cposupport/prodhome/hpcolorlas7857.html • The online HP Color LaserJet 4500 User Guide that came on the printer CD-ROM Copyright© 1999 Hewlett-Packard Co. Printed in Japan *C4084-91012* *C4084-91012* C4084-91012
-
 1
1 -
 2
2
 |
 |