HP 5550dtn HP Color LaserJet 5550 series - User Guide - Page 101
X SIZE= *<SIZE>, Setting saved, To change the type, press
 |
UPC - 829160127255
View all HP 5550dtn manuals
Add to My Manuals
Save this manual to your list of manuals |
Page 101 highlights
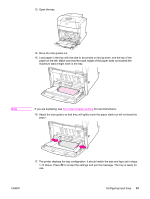
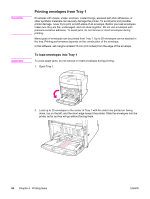
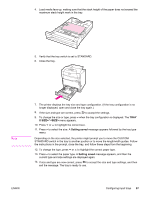
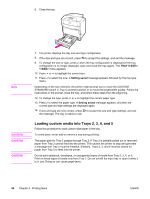
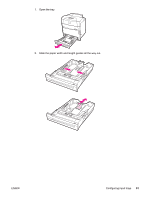
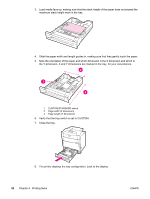
4. Load media face-up, making sure that the stack height of the paper does not exceed the maximum stack height mark in the tray. 5. Verify that the tray switch is set to STANDARD. 6. Close the tray. Note 7. The printer displays the tray size and type configuration. (If the tray configuration is no longer displayed, open and close the tray again.) 8. If the size and type are correct, press to accept the settings. 9. To change the size or type, press when the tray configuration is displayed. The TRAY X SIZE= * menu appears. 10. Press or to highlight the correct size. 11. Press to select the size. A Setting saved message appears followed by the tray type menu. Depending on the size selected, the printer might prompt you to move the CUSTOM/ STANDARD switch in the tray to another position or to move the length/width guides. Follow the instructions in the prompt, close the tray, and follow these steps from the beginning. 12. To change the type, press or to highlight the correct paper type. 13. Press to select the paper type. A Setting saved message appears, and then the current type and size settings are displayed again. 14. If size and type are now correct, press to accept the size and type settings, and then exit the message. The tray is ready to use. ENWW Configuring input trays 87
-
 1
1 -
2
-
3
-
4
-
5
-
6
-
7
-
8
-
9
-
10
-
11
-
12
-
13
-
14
-
15
-
16
-
17
-
18
-
19
-
20
-
21
-
22
-
23
-
24
-
25
-
26
-
27
-
28
-
29
-
30
-
31
-
32
-
33
-
34
-
35
-
36
-
37
-
38
-
39
-
40
-
41
-
42
-
43
-
44
-
45
-
46
-
47
-
48
-
49
-
50
-
51
-
52
-
53
-
54
-
55
-
56
-
57
-
58
-
59
-
60
-
61
-
62
-
63
-
64
-
65
-
66
-
67
-
68
-
69
-
70
-
71
-
72
-
73
-
74
-
75
-
76
-
77
-
78
-
79
-
80
-
81
-
82
-
83
-
84
-
85
-
86
-
87
-
88
-
89
-
90
-
91
-
92
-
93
-
94
-
95
-
 96
96 -
 97
97 -
 98
98 -
 99
99 -
 100
100 -
 101
101 -
 102
102 -
 103
103 -
 104
104 -
 105
105 -
 106
106 -
107
-
108
-
109
-
110
-
111
-
112
-
113
-
114
-
115
-
116
-
117
-
118
-
119
-
120
-
121
-
122
-
123
-
124
-
125
-
126
-
127
-
128
-
129
-
130
-
131
-
132
-
133
-
134
-
135
-
136
-
137
-
138
-
139
-
140
-
141
-
142
-
143
-
144
-
145
-
146
-
147
-
148
-
149
-
150
-
151
-
152
-
153
-
154
-
155
-
156
-
157
-
158
-
159
-
160
-
161
-
162
-
163
-
164
-
165
-
166
-
167
-
168
-
169
-
170
-
171
-
172
-
173
-
174
-
175
-
176
-
177
-
178
-
179
-
180
-
181
-
182
-
183
-
184
-
185
-
186
-
187
-
188
-
189
-
190
-
191
-
192
-
193
-
194
-
195
-
196
-
197
-
198
-
199
-
200
-
201
-
202
-
203
-
204
-
205
-
206
-
207
-
208
-
209
-
210
-
211
-
212
-
213
-
214
-
215
-
216
-
217
-
218
-
219
-
220
-
221
-
222
-
223
-
224
-
225
-
226
-
227
-
228
-
229
-
230
-
231
-
232
-
233
-
234
-
235
-
236
-
237
-
238
-
239
-
240
-
241
-
242
-
243
-
244
-
245
-
246
-
247
-
248
-
249
-
250
-
251
-
252
-
253
-
254
-
255
-
256
-
257
-
258
-
259
-
260
-
261
-
262
-
263
-
264
-
265
-
266
-
267
-
268
-
269
-
270
-
271
-
272
-
273
-
274
-
275
-
276
-
277
-
278
-
279
-
280
-
281
-
282
-
283
-
284
-
285
-
286
-
287
-
288
-
289
-
290
-
291
-
292
-
293
-
294
 |
 |
