HP 5600 TFT5600 Rackmount Keyboard and Monitor (RKM) User Guide - Page 23
Accessing the TFT5600 RKM Tray, Removing the TFT5600 RKM, Installation Instructions
 |
UPC - 720591607586
View all HP 5600 manuals
Add to My Manuals
Save this manual to your list of manuals |
Page 23 highlights
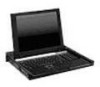
Installation Accessing the TFT5600 RKM Tray 1. Gently push in on the tray (1) to release lock, and then fully extend the unit until the slides lock. 2. Lift up the display release latch (2) then rotate the display (3). 3 3 2 1 1 Figure 2-8: Accessing the TFT5600 RKM Removing the TFT5600 RKM To remove the TFT5600 RKM, reverse the order of the steps listed in the "Installation Instructions" section. 2-8 HP TFT5600 Rackmount Keyboard and Monitor (RKM) User Guide
-
 1
1 -
2
-
3
-
4
-
5
-
6
-
7
-
8
-
9
-
10
-
11
-
12
-
13
-
14
-
15
-
16
-
17
-
 18
18 -
 19
19 -
 20
20 -
 21
21 -
 22
22 -
 23
23 -
 24
24 -
 25
25 -
 26
26 -
 27
27 -
 28
28 -
29
-
30
-
31
-
32
-
33
-
34
-
35
-
36
-
37
-
38
-
39
-
40
-
41
-
42
-
43
-
44
-
45
-
46
-
47
-
48
-
49
-
50
-
51
-
52
-
53
-
54
-
55
-
56
-
57
-
58
-
59
-
60
-
61
-
62
-
63
 |
 |

Installation
2-8
HP TFT5600 Rackmount Keyboard and Monitor (RKM) User Guide
Accessing the TFT5600 RKM Tray
1.
Gently push in on the tray (1) to release lock, and then fully extend the unit until
the slides lock.
2.
Lift up the display release latch (2) then rotate the display (3).
3
1
1
3
2
Figure 2-8:
Accessing the TFT5600 RKM
Removing the TFT5600 RKM
To remove the TFT5600 RKM, reverse the order of the steps listed in the
“Installation Instructions” section.