HP 5610 Setup Guide - Page 3
Press the On button and configure, Open the access door, Connect the supplied phone cord, Connect - power supply
 |
UPC - 829160964140
View all HP 5610 manuals
Add to My Manuals
Save this manual to your list of manuals |
Page 3 highlights
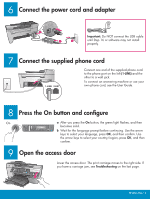
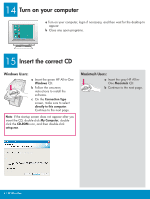
6 Connect the power cord and adapter Important: Do NOT connect the USB cable until Step 16 or software may not install properly. 7 Connect the supplied phone cord Connect one end of the supplied phone cord to the phone port on the left (1-LINE) and the other to a wall jack. To connect an answering machine or use your own phone cord, see the User Guide. 8 Press the On button and configure On a After you press the On button, the green light flashes, and then becomes solid. b Wait for the language prompt before continuing. Use the arrow keys to select your language, press OK, and then confirm. Use the arrow keys to select your country/region, press OK, and then confirm. 9 Open the access door Lower the access door. The print carriage moves to the right side. If you have a carriage jam, see Troubleshooting on the last page. HP All-in-One • 3
-
 1
1 -
 2
2 -
 3
3 -
 4
4 -
 5
5 -
 6
6 -
 7
7 -
 8
8
 |
 |
