HP 6120XG HP ProCurve 6120XG Blade Switch Installation Instructions - Page 3
Installing the HP ProCurve 6120XG, Blade Switch, Accessing the blade switch from, the HP BladeSystem - blade switch user guide
 |
View all HP 6120XG manuals
Add to My Manuals
Save this manual to your list of manuals |
Page 3 highlights
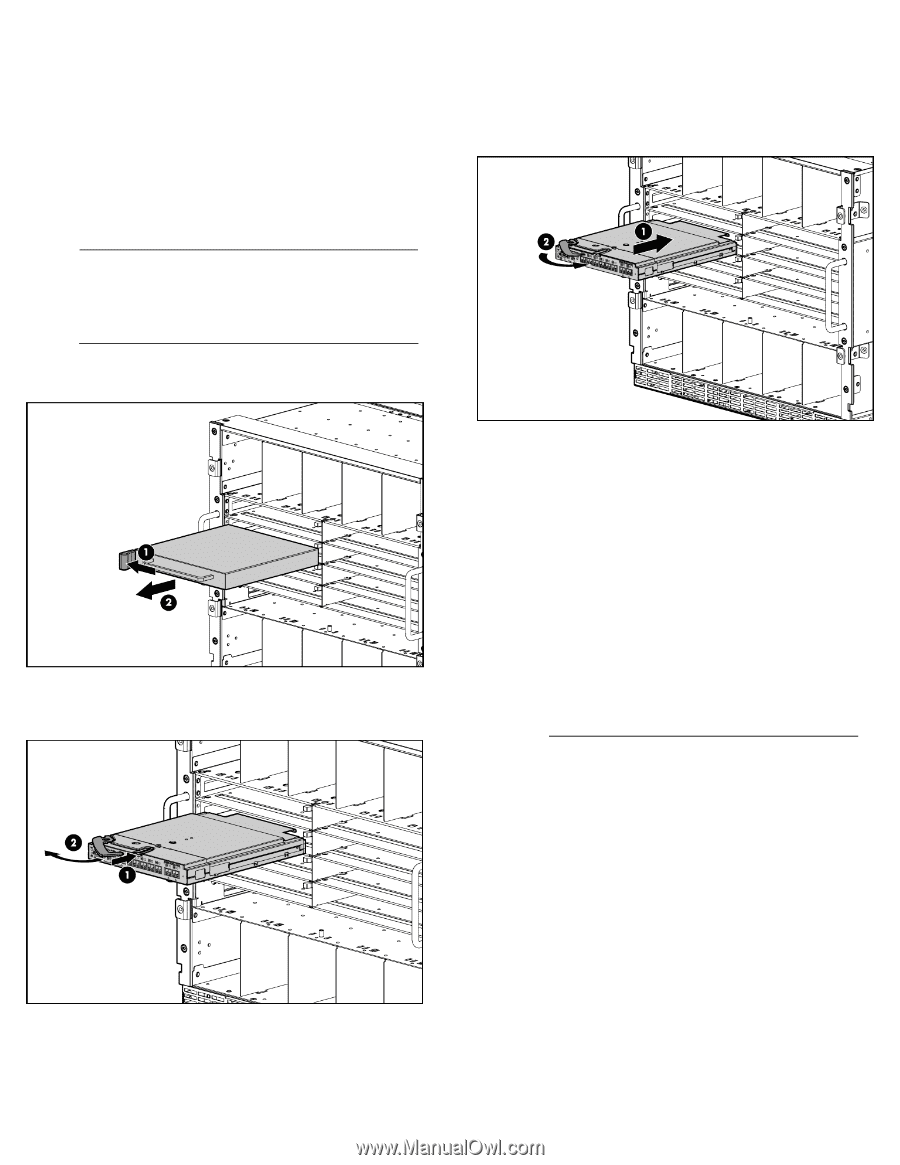
Installing the HP ProCurve 6120XG Blade Switch If there is only one blade switch in the chassis, it must occupy a slot on the left-hand side of the chassis (as you face the back of the chassis). If there is more than one blade switch in the chassis, the configuration rules can be somewhat complex; refer to the Installation and Getting Started Guide for the blade switch for more detail. Follow these steps to install a blade switch module in your chassis: NOTE: The HP ProCurve 6120XG Blade Switch module can be used in an HP BladeSystem c7000 Enclosure or an HP BladeSystem c3000 Enclosure. The illustrations in this document show the blade switch being installed in a c7000 enclosure. 1. Remove the interconnect blank. 3. Install the blade switch into the interconnect bay. A green Module Status ("health") LED indicates a successful installation. If the Module Status LED is amber or is off, see the "Troubleshooting" section of the HP BladeSystem enclosure setup and installation guide for more information. 2. Prepare the HP ProCurve 6120XG Blade Switch for installation. 4. Connect network cables to the blade switch as desired. Accessing the blade switch from the HP BladeSystem Onboard Administrator These instructions assume that you have already set up the HP BladeSystem Onboard Administrator (OA) using the First Time Setup Wizard. See the HP BladeSystem Onboard Administrator User Guide for details on OA setup. For information on OA command line interface (CLI) commands, see the HP BladeSystem Onboard Administrator Command Line Interface User Guide. Both guides are available at http://www.hp.com/go/bladesystem/documentation. 1. Connect a workstation or laptop computer to the serial port on the c3000/c7000 OA module using a null-modem serial cable (RS-232). 2. Using a terminal program (such as HyperTerminal or TeraTerm), open a connection to the serial port using connection parameters of 9600, 8, N, 1. 3. Press Enter. OA prompts you for login information. 4. Enter a valid username and password. The OA system prompt appears. 5. Enter the command: connect interconnect where is the number of the bay containing the blade switch. OA connects you to the initial screen of the blade switch CLI. 6. Press Enter. The blade switch CLI prompt appears. You are now ready to enter blade switch CLI commands. See the paragraphs below for instructions for assigning an IP address to the blade switch. Refer to the Management and Configuration Guide for HP ProCurve 6120 Blade Switches for more
-
 1
1 -
 2
2 -
 3
3 -
 4
4
 |
 |