HP 6210 HP Officejet 6200 series all-in-one - (English) Setup Poster - Page 3
Press the On button, Open access door, Remove tape from both cartridges, Connect the supplied phone
 |
View all HP 6210 manuals
Add to My Manuals
Save this manual to your list of manuals |
Page 3 highlights
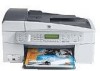
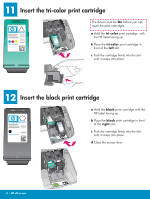
7 Connect the supplied phone cord Connect one end of the supplied phone cord to the phone port on the left (1-LINE) and the other to a wall jack. To connect an answering machine or use a different phone cord, see the User Guide. Make sure to remove the orange shipping lock from inside the device before you press the On button. 8 Press the On button a After you press the On button, the green light flashes, and then becomes solid. On This may take up to a minute. b Wait for the print cartridge prompt before continuing. 9 Open access door Lift the access door until it stops. Make sure the print carriage moves to the right side. 10 Remove tape from both cartridges Pull the pink tab to remove the tape from both print cartridges. 3 • HP all-in-one Do not touch the copper-colored contacts or retape the cartridges.
-
 1
1 -
 2
2 -
 3
3 -
 4
4 -
 5
5 -
 6
6 -
 7
7 -
 8
8
 |
 |
