HP 8180 Maintenance and Service Guide: HP Compaq 8100 and 8180 Elite Business - Page 99
CAUTION, Changing from a Desktop to a Minitower Configuration
 |
View all HP 8180 manuals
Add to My Manuals
Save this manual to your list of manuals |
Page 99 highlights
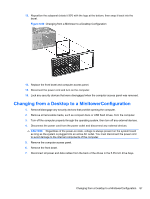
CAUTION: Hold the subpanel straight when you pull it away from the front bezel. Pulling the subpanel away at an angle could damage the pins that align it within the front bezel. 12. Reposition the bezel blanks within the subpanel in the proper orientation for the minitower configuration. 13. Reposition the subpanel (rotate it 90º) with the logo at the bottom, then snap it back into the bezel. Figure 6-63 Changing from a Desktop to a Minitower Configuration 14. Replace the front bezel and computer access panel. 15. Reconnect the power cord and turn on the computer. 16. Lock any security devices that were disengaged when the computer access panel was removed. Changing from a Desktop to a MinitowerConfiguration 89
-
 1
1 -
2
-
3
-
4
-
5
-
6
-
7
-
8
-
9
-
10
-
11
-
12
-
13
-
14
-
15
-
16
-
17
-
18
-
19
-
20
-
21
-
22
-
23
-
24
-
25
-
26
-
27
-
28
-
29
-
30
-
31
-
32
-
33
-
34
-
35
-
36
-
37
-
38
-
39
-
40
-
41
-
42
-
43
-
44
-
45
-
46
-
47
-
48
-
49
-
50
-
51
-
52
-
53
-
54
-
55
-
56
-
57
-
58
-
59
-
60
-
61
-
62
-
63
-
64
-
65
-
66
-
67
-
68
-
69
-
70
-
71
-
72
-
73
-
74
-
75
-
76
-
77
-
78
-
79
-
80
-
81
-
82
-
83
-
84
-
85
-
86
-
87
-
88
-
89
-
90
-
91
-
92
-
93
-
 94
94 -
 95
95 -
 96
96 -
 97
97 -
 98
98 -
 99
99 -
 100
100 -
 101
101 -
 102
102 -
 103
103 -
 104
104 -
105
-
106
-
107
-
108
-
109
-
110
-
111
-
112
-
113
-
114
-
115
-
116
-
117
-
118
-
119
-
120
-
121
-
122
-
123
-
124
-
125
-
126
-
127
-
128
-
129
-
130
-
131
-
132
-
133
-
134
-
135
-
136
-
137
-
138
-
139
-
140
-
141
-
142
-
143
-
144
-
145
-
146
-
147
-
148
-
149
-
150
-
151
-
152
-
153
-
154
-
155
-
156
-
157
-
158
-
159
-
160
-
161
-
162
-
163
-
164
-
165
-
166
-
167
-
168
-
169
-
170
-
171
-
172
-
173
-
174
-
175
-
176
-
177
-
178
-
179
-
180
-
181
-
182
-
183
-
184
-
185
-
186
-
187
-
188
-
189
-
190
-
191
-
192
-
193
-
194
-
195
-
196
-
197
-
198
-
199
-
200
-
201
-
202
-
203
-
204
-
205
-
206
-
207
-
208
-
209
-
210
-
211
-
212
-
213
-
214
-
215
-
216
-
217
-
218
-
219
-
220
-
221
-
222
-
223
-
224
-
225
-
226
-
227
-
228
-
229
-
230
-
231
-
232
-
233
-
234
-
235
-
236
-
237
-
238
-
239
-
240
-
241
-
242
-
243
-
244
-
245
-
246
-
247
-
248
 |
 |
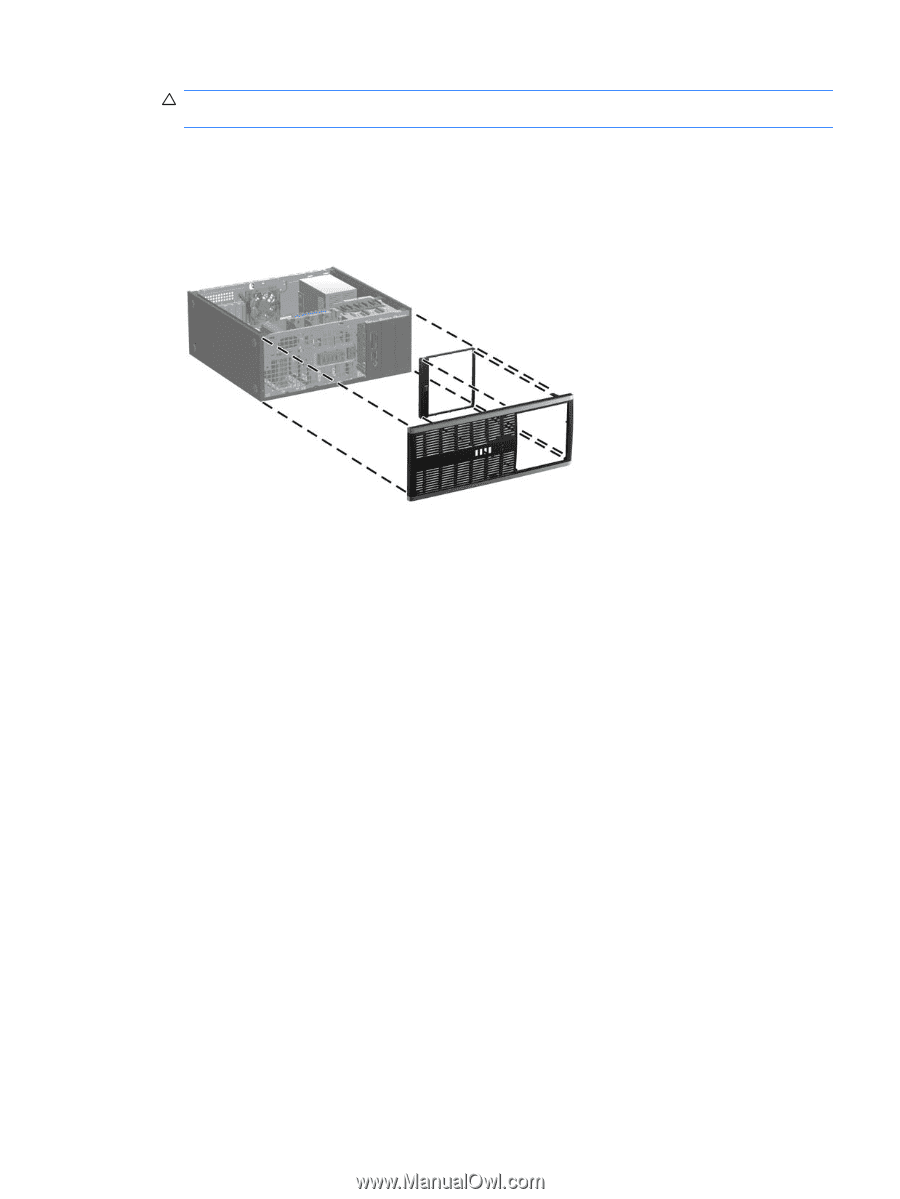
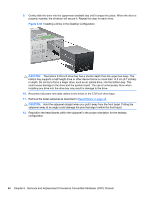
CAUTION:
Hold the subpanel straight when you pull it away from the front bezel. Pulling the
subpanel away at an angle could damage the pins that align it within the front bezel.
12.
Reposition the bezel blanks within the subpanel in the proper orientation for the minitower
configuration.
13.
Reposition the subpanel (rotate it 90º) with the logo at the bottom, then snap it back into the
bezel.
Figure 6-63
Changing from a Desktop to a Minitower Configuration
14.
Replace the front bezel and computer access panel.
15.
Reconnect the power cord and turn on the computer.
16.
Lock any security devices that were disengaged when the computer access panel was removed.
Changing from a Desktop to a MinitowerConfiguration
89