HP 8250 Reference Guide - Page 9
Paper-width guide, Output tray, Output tray extender, Main tray, Main tray release, Paper-length - photosmart
 |
View all HP 8250 manuals
Add to My Manuals
Save this manual to your list of manuals |
Page 9 highlights
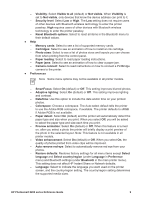
Main and Output trays 1 Paper-width guide: Adjust this guide to fit close to the edge of the paper in the Main tray. 2 Output tray: Use this tray to catch your printouts. Remove this tray to access the Photo tray. 3 Output tray extender: Pull towards you to extend the Output tray to catch your printouts. 4 Main tray: Pull out this tray and load plain paper, transparencies, envelopes, or other media for printing. 5 Main tray release: Pull toward you to extend the Main tray. 6 Paper-length guide: Adjust this guide to fit close to the end of the paper in the Main tray. 7 Tray grips: Pull on the tray grips to extend the Main tray. Photo tray 1 Paper-width guide: Adjust this guide to fit close to the edge of the paper in the Photo tray. 2 Paper-length guide: Adjust this guide to fit close to the end of the paper in the Photo tray. HP Photosmart 8200 series Reference Guide 5
-
 1
1 -
2
-
3
-
 4
4 -
 5
5 -
 6
6 -
 7
7 -
 8
8 -
 9
9 -
 10
10 -
 11
11 -
 12
12 -
 13
13 -
 14
14 -
15
-
16
-
17
-
18
-
19
-
20
-
21
-
22
-
23
-
24
-
25
-
26
-
27
-
28
-
29
-
30
-
31
-
32
-
33
 |
 |
