HP 9124 Cisco MDS 9124e Fabric Switch for HP c-Class BladeSystem installation - Page 2
Set the Ethernet IP address - fibre channel
 |
UPC - 808736835008
View all HP 9124 manuals
Add to My Manuals
Save this manual to your list of manuals |
Page 2 highlights
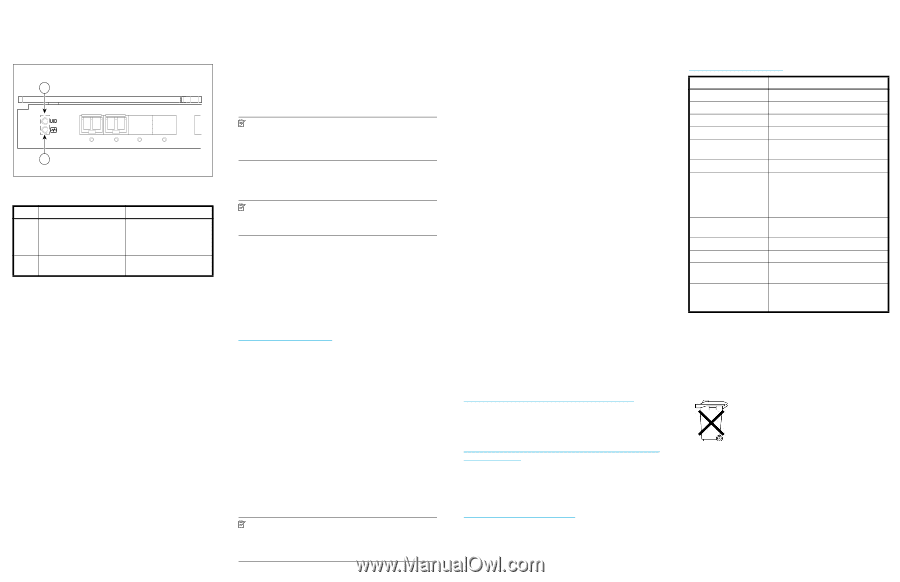
If the switch does not power up, check the enclosure and switch status using the OA web interface. Refer to the HP BladeSystem Onboard Administrator user guide for troubleshooting tips. Locate the LEDs as shown in Figure 5. Figure 5 Identifying LEDs 181738 1 ! 2 EXT 1 EXT 2 EXT 3 EXT 4 : Check the LEDs per the indicators described in the following table. Item Description Indicators 1 UID LED - used to help the Off user locate a specific module in the BladeSystem for replacement 2 Health LED - indicates normal operation Steady green light Set the Ethernet IP address Obtain the following items to set the IP address via a serial connection: • Computer with a terminal application (such as HyperTerminal in a Windows environment or TERM in a UNIX environment) • Null modem serial cable Set the IP address: 1. Verify that the enclosure is powered on. 2. Identify the active OA in the BladeSystem. 3. Connect a Null modem serial cable from your computer to the serial port of the active OA. 4. Configure the terminal application as follows: • In a Windows environment: • Baud rate-9600 bits per second • 8 data bits • None (No parity) • 1 stop bit • No flow control • In a UNIX environment, type: tip /dev/ttyb -9600 5. Log into the OA. 6. Identify the interconnect bay number where the switch is installed. 7. Type the following at the command line: OA> connect interconnect x where x is the interconnect bay number where the switch is installed. If you are using the switch for the first time, the switch setup utility starts automatically. If this is not the first time the switch has been used, enter the setup command at the system prompt. 8. Enter a password for the system administrator. (There is no default password.) NOTE: Be sure to use a strong password. You must explicitly configure a password that meets the requirements listed in the "Configuring User Accounts" section in the Cisco MDS 9000 Family CLI Configuration Guide. 9. Follow the instructions in the switch setup utility to configure the IP address, the netmask, and other parameters for the switch. NOTE: Refer to the Cisco MDS 9000 Family CLI Configuration Guide for complete information about the switch setup utility. 10.When you have finished with the switch setup utility, log out and disconnect the serial cable. SAN-OS update To achieve best performance, HP recommends running the latest SAN-OS release. You can update the Cisco MDS 9124e Fabric Switch without any disruptions using the install all command. Obtain the most current SAN-OS firmware from the following HP web site: www.hp.com/go/cisco9124e Follow these instructions (links subject to change): 1. Go to the Support section, located on the far right side of the web page. 2. Click Support & drivers. 3. Locate the Tasks for Cisco MDS 9124e Fabric Switch for HP c-Class BladeSystem section. 4. Click Download drivers and software. 5. Select the applicable switch model. 6. Go to the Select Operating System section and click Cross operating system (BIOS, Firmware, Diagnostics, etc.) 7. Scroll down to the firmware section of the web page and locate the Firmware - Storage Fibre Channel table. 8. Click Firmware and release notes for Cisco MDS 9124e Fabric Switch for HP c-Class BladeSystem. 9. Click Download button>> in the last column and follow the prompts in the File Download dialog box. NOTE: During the upgrade, the control plane is down, typically for about 80 seconds. When the control plane is down, you can not add new hosts or disks. However, the data plane remains up. Existing traffic will transmit normally. Before you upgrade, follow these guidelines: • Stabilize your fabric. • Set the FSPF (Fabric Shortest Path First) timers to a default value of 20 seconds. • Ensure that there are no CFS (Cisco Fabric Services) commits pending. • Ensure that there are no zone server merges in progress. • Ensure that there is sufficient space in the system to load the new image. To view the effect of updating the system before performing an upgrade, type the following at the command line: switch# show install all impact kickstart bootflash:boot-xxx system bootflash:isan-xxx To perform the update, type the following at the command line: switch# install all kickstart bootflash:boot-xxx system bootflash:isan-xxx Follow the instructions to perform the update. If the update is aborted due to a service not being ready for the update, type the following at the command line: switch# show install all failure-reason To view the status of an update once it is complete, type the following at the command line: switch# show install all status Configure the switch Set Cisco MDS 9124e Fabric Switch parameters via the following management tools: • Command Line Interface (CLI) • Cisco Fabric Manager/Device Manager Related documentation The most current documentation for interconnects and other HP BladeSystem c-Class components is available at the following web site: http://www.hp.com/go/bladesystem/documentation In addition, refer to the HP StorageWorks SAN Design reference guide for HP Storage Area Network (SAN) configuration guidelines: http://h18000.www1.hp.com/products/storageworks/san/d ocumentation.html Access future product updates HP strongly recommends that customers sign up online using the Subscriber's choice web site: http://www.hp.com/go/e-updates Subscribing to this service provides you with e-mail updates on the latest product enhancements, newest versions of drivers, and firmware documentation updates as well as instant access to numerous other product resources. Specifications The following table lists Cisco MDS 9124e Fabric Switch technical specifications. For a complete list, please access the QuickSpecs document: www.hp.com/go/cisco9124e Specification Description Height 28.7 mm (1.13 in) Depth 279 mm (11 in.), with handle protrusion Width 193 mm (7.63 in) Weight 1.28 kg (2.83 lb) without media Temperature range during 10° to 35°C operation (50° to 95°F) Air flow Normal: provided by enclosure Media types SFP laser, 1/2/4Gb short wave up to 500 m (1,640 ft.), 1/2/4Gb medium wave up to 4 km (2.4 miles), and 1/2/4Gb long wave up to 10 km (6.2 miles) Configurable port types F_Port, FL_Port, E_Port, FX_Ports and SD_Ports System architecture Non-blocking shared memory switch Modes of operation FC Class 2, Class 3, Class F Port-to-port latency Less than 2 microseconds with no contention (destination port is free) Power 55 Watts; Provided by the HP BladeSystem enclosure. No other power requirement or provision exists. Waste Electrical and Electronic Equipment (WEEE) Recycling Notice Disposal of waste equipment by users in private households in the European Union This symbol on the product or on its packaging indicates that this product must not be disposed of with your other household waste. Instead, it is your responsibility to dispose of your waste equipment by handing it over to a designated collection point for the recycling of waste electrical and electronic equipment. The separate collection and recycling of your waste equipment at the time of disposal will help to conserve natural resources and ensure that it is recycled in a manner that protects human health and the environment. For more information about where you can drop off your waste equipment for recycling, please contact your local city office, your household waste disposal service or the shop where you purchased the product.
-
 1
1 -
 2
2
 |
 |