HP 952c (English) Macintosh Connect * User's Guide - C6428-90068 - Page 20
Printing on different types of paper and media
 |
View all HP 952c manuals
Add to My Manuals
Save this manual to your list of manuals |
Page 20 highlights
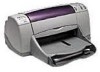
2 Using Your Printer Software Printing on Different Types of Paper and Media The HP DeskJet 950C Series printer is designed to encompass so many different types of print media that you're practically set up as a small print shop. This chapter explains how to use the different printing materials. Printing Photographs I want to print... 4 x 6 in., 102 x 152 mm Photo Paper I should... 1 Raise the OUT tray to the up position. 2 Insert up to 24 sheets of HP Premium Plus Photo Paper, Glossy 4 x 6 in., 102 x 152 mm (with tear-off tab) into the Photo Tray, glossy side down. Place paper with the tear-off tab away from the printer. 3 Lower the OUT tray. 4 Press the Photo Tray Button and slide it toward the printer so that the Photo Tray is engaged. 5 Choose the appropriate print settings. 6 Print the photo. Note: The first time you use the Photo Tray, the printer will calibrate the tray by feeding through a blank sheet. 7 When you have finished printing, press down on the Photo Tray Button, and slide it away from the printer to disengage the Photo Tray. HP print settings to choose Page Setup - Paper Size: Choose appropriate paper size - Orientation: Choose appropriate orientation Paper Type/Quality - Paper Type: Choose photo paper type - Print Quality: Choose Best Layout - Pages per Sheet: 1 - Print Both Sides: Unchecked Guidelines to remember • The Photo Tray is specifically designed to use HP Premium Plus Photo Paper, Glossy 4 x 6 in., 102 x 152 mm (with tear-off tab). • Remember to lower the OUT tray once the photo paper is loaded. • After selecting your paper type, choose the appropriate paper size from the pull-down menu. • If you get an out of paper message make sure that the Photo Tray is engaged. • After you have finished printing, disengage the Photo Tray by sliding the Photo Tray Button away from the printer. 13
-
 1
1 -
2
-
3
-
4
-
5
-
6
-
7
-
8
-
9
-
10
-
11
-
12
-
13
-
14
-
 15
15 -
 16
16 -
 17
17 -
 18
18 -
 19
19 -
 20
20 -
 21
21 -
 22
22 -
 23
23 -
 24
24 -
 25
25 -
26
-
27
-
28
-
29
-
30
-
31
-
32
-
33
-
34
-
35
-
36
-
37
-
38
-
39
-
40
-
41
-
42
-
43
-
44
-
45
-
46
-
47
-
48
-
49
-
50
-
51
-
52
-
53
-
54
-
55
-
56
-
57
-
58
-
59
-
60
-
61
-
62
-
63
-
64
-
65
-
66
-
67
-
68
-
69
-
70
-
71
-
72
-
73
 |
 |