HP A6500f Getting Started - Page 196
Printing Pictures in Windows Media Center, Copying Pictures to CDs and DVDs in Windows Media Center
 |
UPC - 883585957347
View all HP A6500f manuals
Add to My Manuals
Save this manual to your list of manuals |
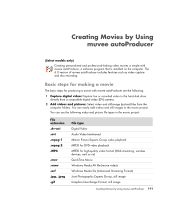
Page 196 highlights
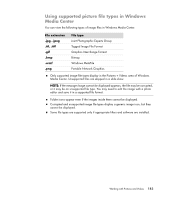
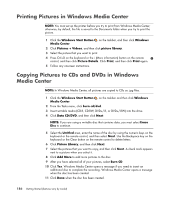
Printing Pictures in Windows Media Center NOTE: You must set up the printer before you try to print from Windows Media Center; otherwise, by default, the file is saved to the Documents folder when you try to print the picture. 1 Click the Windows Start Button on the taskbar, and then click Windows Media Center. 2 Click Pictures + Videos, and then click picture library. 3 Select the picture that you want to print. 4 Press Ctrl+D on the keyboard or the i (More information) button on the remote control, and then click Picture Details. Click Print, and then click Print again. 5 Follow any onscreen instructions. Copying Pictures to CDs and DVDs in Windows Media Center NOTE: In Windows Media Center, all pictures are copied to CDs as .jpg files. 1 Click the Windows Start Button on the taskbar and then click Windows Media Center. 2 From the Tasks menu, click burn cd/dvd. 3 Insert writable media (CD-R, CD-RW, DVD+/-R, or DVD+/-RW) into the drive. 4 Click Data CD/DVD, and then click Next. NOTE: If you are using a writable disc that contains data, you must select Erase Disc to continue. 5 Select the Untitled area, enter the name of the disc by using the numeric keys on the keyboard or the remote control, and then select Next. Use the Backspace key on the keyboard or the Clear button on the remote control to delete letters. 6 Click Picture Library, and then click Next. 7 Select the pictures that you want to copy, and then click Next. A check mark appears next to a picture when you select it. 8 Click Add More to add more pictures to the disc. 9 After you have selected all of your pictures, select Burn CD. 10 Click Yes. Windows Media Center opens a message if you need to insert an additional disc to complete the recording. Windows Media Center opens a message when the disc has been created. 11 Click Done when the disc has been created. 186 Getting Started (features vary by model)
-
 1
1 -
2
-
3
-
4
-
5
-
6
-
7
-
8
-
9
-
10
-
11
-
12
-
13
-
14
-
15
-
16
-
17
-
18
-
19
-
20
-
21
-
22
-
23
-
24
-
25
-
26
-
27
-
28
-
29
-
30
-
31
-
32
-
33
-
34
-
35
-
36
-
37
-
38
-
39
-
40
-
41
-
42
-
43
-
44
-
45
-
46
-
47
-
48
-
49
-
50
-
51
-
52
-
53
-
54
-
55
-
56
-
57
-
58
-
59
-
60
-
61
-
62
-
63
-
64
-
65
-
66
-
67
-
68
-
69
-
70
-
71
-
72
-
73
-
74
-
75
-
76
-
77
-
78
-
79
-
80
-
81
-
82
-
83
-
84
-
85
-
86
-
87
-
88
-
89
-
90
-
91
-
92
-
93
-
94
-
95
-
96
-
97
-
98
-
99
-
100
-
101
-
102
-
103
-
104
-
105
-
106
-
107
-
108
-
109
-
110
-
111
-
112
-
113
-
114
-
115
-
116
-
117
-
118
-
119
-
120
-
121
-
122
-
123
-
124
-
125
-
126
-
127
-
128
-
129
-
130
-
131
-
132
-
133
-
134
-
135
-
136
-
137
-
138
-
139
-
140
-
141
-
142
-
143
-
144
-
145
-
146
-
147
-
148
-
149
-
150
-
151
-
152
-
153
-
154
-
155
-
156
-
157
-
158
-
159
-
160
-
161
-
162
-
163
-
164
-
165
-
166
-
167
-
168
-
169
-
170
-
171
-
172
-
173
-
174
-
175
-
176
-
177
-
178
-
179
-
180
-
181
-
182
-
183
-
184
-
185
-
186
-
187
-
188
-
189
-
190
-
 191
191 -
 192
192 -
 193
193 -
 194
194 -
 195
195 -
 196
196 -
 197
197 -
 198
198 -
 199
199 -
 200
200 -
 201
201 -
202
-
203
-
204
-
205
-
206
-
207
-
208
-
209
-
210
-
211
-
212
-
213
-
214
-
215
-
216
-
217
-
218
-
219
-
220
-
221
-
222
 |
 |