HP B9180 Quick Start Guides - Page 20
Carga de una sola hoja de papel en la bandeja de soportes especiales - printer
 |
UPC - 882780360518
View all HP B9180 manuals
Add to My Manuals
Save this manual to your list of manuals |
Page 20 highlights
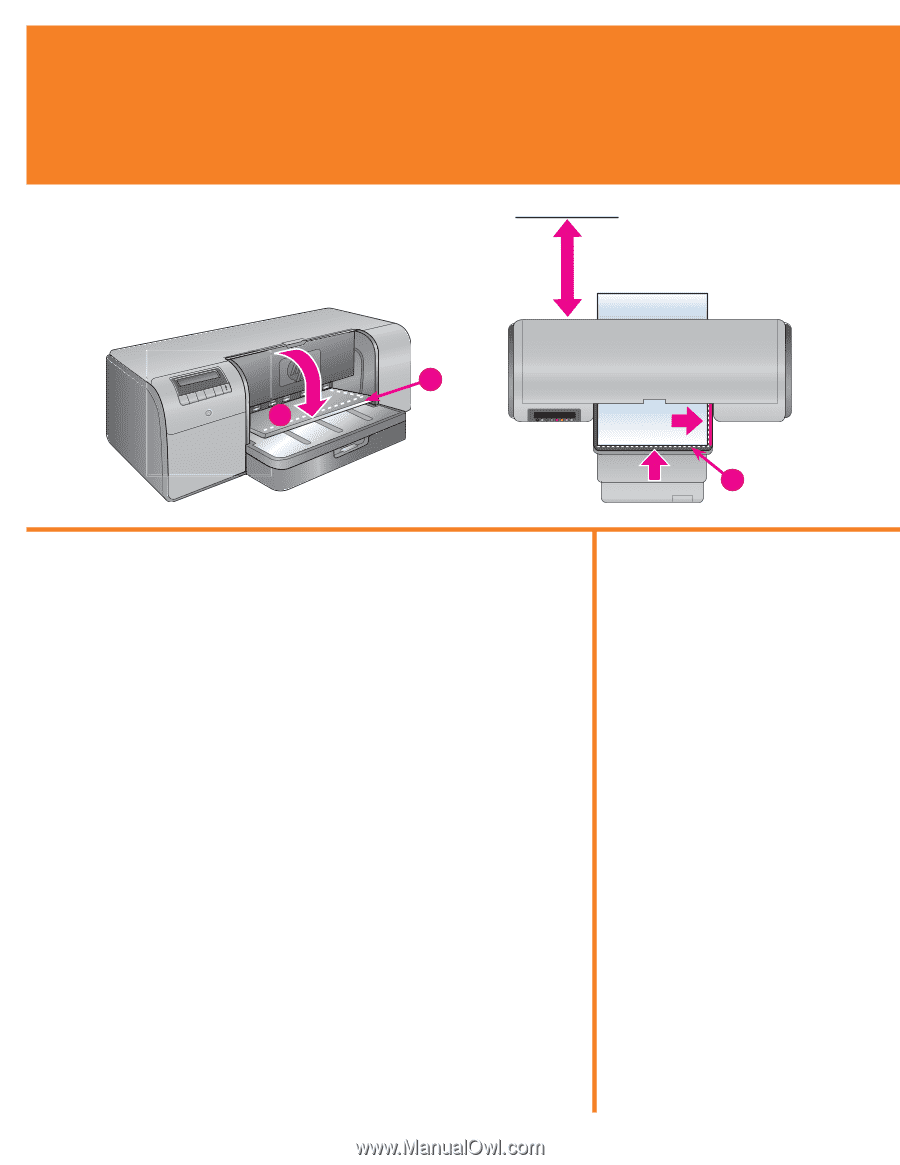
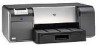
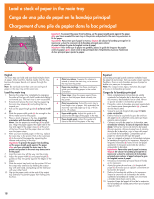
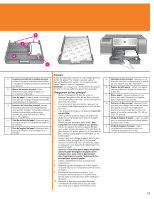
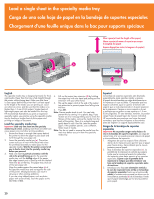
Load a single sheet in the specialty media tray Carga de una sola hoja de papel en la bandeja de soportes especiales Chargement d'une feuille unique dans le bac pour supports spéciaux Clear space (at least the length of the paper) Libere espacio (al menos el espacio que ocupa la longitud del papel) Espace dégagé (au moins la longueur du papier) b a b English The specialty media tray is designed primarily for thick, rigid media. Paper from this tray is fed straight through the printer without being bent. Make sure that there is clear space behind the printer that is at least equal to the length of the media you are printing on. Load one sheet at a time, and be sure that the media is no thicker than 1.5 mm (0.06 inches). Single sheets of lightweight paper can also be loaded into this tray. HP recommends that before you print on expensive specialty media, you practice using the specialty media tray by loading a single sheet of plain paper and printing an image or document. Load the specialty media tray Important! Load only one sheet into the specialty media tray at a time. Loading more than one sheet can cause paper jams and other printing problems. 1. Ensure that there is enough clear space behind the printer to allow the paper to pass back and forth through the rear paper slot. 2. Lower the specialty media tray (a). The printer screen asks you to wait while the printer raises the printhead assembly to make space for the specialty media. Wait for the printer screen to tell you to feed a sheet into the specialty media tray before you proceed. 3. Feed one sheet in portrait orientation with the side to be printed facing up into the specialty media tray until the trailing edge of the paper (the edge nearest you) is lined up with the dashed white line (b) on the tray. The paper may stick out of the rear paper slot. Align the media against the raised edge (c) of the specialty media tray and not against the side of the printer. Misaligned media can result in skewing or other printing problems. If you are using tabbed paper, such as photo paper with a tear-off tab, insert the paper so the tab feeds in first. 4. Pull out the output tray extension (d) by holding the output tray with one hand and pulling out the extension with your other hand. 5. Flip up the paper catch at the end of the output tray extension to prevent paper from falling onto the floor. 6. Press OK. Note: Canvas media tends to curl. You can help prevent this by storing it in a plastic bag. If you receive an error message telling you to check the flatness of the media, remove the media from the back of the printer. Place it in a plastic bag and gently bend it until it lies flat. Load the media again. If the problem persists, use a different, flatter sheet of media. Note: You do not need to remove the media from the main tray before you print from the specialty media tray. Español La bandeja de soportes especiales está diseñada, especialmente, para soportes rígidos y gruesos. El papel de esta bandeja se carga directamente en la impresora sin que se doble. Compruebe que hay espacio suficiente, igual o superior al tamaño del soporte que se está imprimiendo en la parte posterior de la impresora. Cargue un único soporte a la vez y verifique que su grosor no sea superior a 1,5 mm (0,06 pulgadas). En esta bandeja, también, se pueden cargar hojas de papel ligero de manera individual. HP recomienda que practique con hojas de papel normales y que imprima imágenes o documentos antes de imprimir un soporte especialmente caro. Carga de la bandeja de soportes especiales Importante No se pueden cargar varias hojas a la vez en la bandeja de soportes especiales. La carga de varias hojas a la vez puede provocar atascos de papel u otros problemas de impresión. 1. Asegúrese de que hay espacio libre suficiente detrás de la impresora para permitir que el papel pase hacia atrás y hacia delante por la ranura posterior para el papel. 2. Baje la bandeja de soportes especiales (a). La pantalla de la impresora le solicita que espere hasta que la impresora levante los cabezales de impresión para dejar espacio a los soportes especiales. Espere a que la pantalla de la impresora le indique que debe introducir una hoja en la bandeja de soportes especiales antes de continuar. 3. Introduzca una hoja con orientación vertical y la cara de impresión hacia arriba en la bandeja de soportes especiales hasta que el extremo de salida (el extremo más cercano) se alinee con la línea blanca punteada (b) de la bandeja. Puede que el papel sobresalga por la ranura posterior para papel. 20
-
 1
1 -
2
-
3
-
4
-
5
-
6
-
7
-
8
-
9
-
10
-
11
-
12
-
13
-
14
-
 15
15 -
 16
16 -
 17
17 -
 18
18 -
 19
19 -
 20
20 -
 21
21 -
 22
22 -
 23
23 -
 24
24
 |
 |