HP BL45p HP 10000 Series Rack Airflow Optimization Kit Installation Instructio - Page 2
Installing the floor gasket - specifications
 |
UPC - 829160877020
View all HP BL45p manuals
Add to My Manuals
Save this manual to your list of manuals |
Page 2 highlights
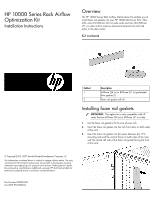
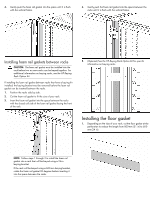
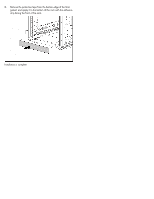
4. Gently push the foam rail gasket into the space until it is flush with the vertical frame. 4. Gently push the foam rail gasket into the space between the racks until it is flush with the vertical frame. Installing foam rail gaskets between racks CAUTION: The foam rail gasket must be installed into the rack before two or more racks can be bayed together. For additional information on baying racks, see the HP Baying Rack Option Kit. If installing the foam rail gasket between racks that have a baying kit installed, the baying bracket must be removed before the foam rail gasket can be inserted between the racks. 1. Position the racks side by side. 2. Cut the foam rail gasket to fit the size of your rack. 3. Insert the foam rail gasket into the space between the racks with the closed cell side of the foam rail gasket facing the front of the rack. 5. (Optional) See the HP Baying Rack Option Kit for specific information on baying racks. Installing the floor gasket 1. Depending on the size of your rack, cut the floor gasket at the perforation to reduce the length from 800-mm (31 in) to 600mm (24 in). NOTE: Follow steps 1 through 3 to install the foam rail gasket into a rack that will be bayed using a 24-in. baying bracket. If the rack will be bayed using a 600-mm baying bracket, rotate the foam rail gasket 90 degrees before inserting it into the space between the racks.
-
 1
1 -
 2
2 -
 3
3
 |
 |
