HP Brio 84XX hp brio 84xx, getting started guide - Page 2
Connecting to Your Telephone Socket
 |
View all HP Brio 84XX manuals
Add to My Manuals
Save this manual to your list of manuals |
Page 2 highlights
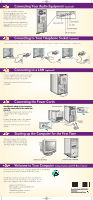
dep_tatu.qxd 16-07-98 2:01 PM Page 2 5 Connecting Your Audio Equipment (optional) If you have amplified computer speakers, plug one end of the cable into the LINE OUT socket of your sound card, and the other end into the Input socket of your speakers. If your speakers are not amplified or if you want to use a headset, use the SPEAKER socket of your sound card. MIDI/GAME PORT LINE IN (BLUE) MIC (RED) SPEAKER (GREEN) LINE OUT (BLACK) 6 Connecting to Your Telephone Socket (optional) Connect the telephone cable to the modem on the back of your computer, using the most appropriate configuration. 7 Connecting to a LAN (optional) Connect the LAN cable to the back of your computer. The exact position of the LAN card may differ from the one shown. Connect the other end of the LAN cable to your LAN. TO LAN 8 Connecting the Power Cords Check that the voltage of your computer is set to the correct value for the country that you are in. The voltage is displayed on the back of the computer, above the computer power socket. Connect the power cords to the computer and display as shown in the illustration. Plug both cords into grounded electrical outlets. VOLTAGE SWITCH 9 Starting up the Computer for the First Time Turn on the display first, and then the computer. This is to ensure that the computer can detect the display and adjust itself to the best settings. 1. TURN ON THE DISPLAY 2. TURN ON THE COMPUTER 10 Welcome to Your Computer (only models with HP Brio Center) Once you have started up your computer, double-click on the HP Brio shortcut on the desktop to launch the HP Brio Center. The HP Brio Center lets you get the most out of your PC, quickly and efficiently. Depending on your region, here are some of the things you can do from your HP Brio Center: register your HP Brio PC take a guided tour of your HP Brio PC view on-line help communicate & share resources perform troubleshooting Manual Part Number 5967-0376-EN V1 Printed in E.U. Paper not bleached with Chlorine
-
 1
1 -
 2
2
 |
 |
