HP Brocade 8/12c Brocade Access Gateway Administrator's Guide v6.2.0 (53-10011 - Page 44
Trunk group creation, Setting up F_Port trunking, Enable F_Port trunking.
 |
View all HP Brocade 8/12c manuals
Add to My Manuals
Save this manual to your list of manuals |
Page 44 highlights
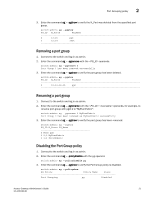
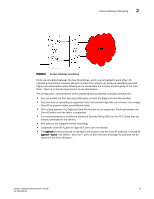
2 Access Gateway trunking The following table describes the PWWN format for F_Port and N_Port trunk ports. TABLE 7 PWWN format for F_Port and N_Port trunk ports NAA = 2 2f:xx:nn:nn:nn:nn:nn:nn (1) Port WWNs for: switch's FX_Ports. The valid range of xx is [0 - FF], for maximum of 256. NAA = 2 25:xx:nn:nn:nn:nn:nn:nn (1) Port WWNs for: switch's FX_Ports The valid range of xx is [0 - FF], for maximum of 256. Trunk group creation Port trunking is enabled between two separate Fabric OS switches that support trunking and where all the ports on each switch reside in the same quad and are running the same speed. Trunk groups form when you connect two or more cables on one Fabric OS switch to another Fabric OS switch with ports in the same port group or quad. A port group or a quad is a set of sequential ports, for example ports 0-3. The Brocade 300 switch supports a trunk group with up to eight ports. The trunking groups are based on the user port number, with contiguous eight ports as one group, such as 0 - 7, 8- 15, 16-23 and up to the number of ports on the switch. Setting up F_Port trunking F_Port trunking is enabled between two separate Fabric OS switches that support trunking and where all the ports on each switch reside in the same quad and are running the same speed. Trunk groups form when you connect two or more cables on one Fabric OS switch to another Fabric OS switch with ports in the same port group or quad. A port group or a quad is a set of sequential ports, for example ports 0-3 in the figure shown below. The Brocade 300 platform supports a trunk group with up to eight ports. The trunking groups are based on the user port number, with contiguous eight ports as one group, such as 0 - 7, 8- 15, 16-23 and up to the number of ports on the switch. 1. Connect to the switch and log in as admin. 2. Ensure that both modules (Edge switch and the switch running in AG mode) have the trunking licenses enabled. 3. Ensure that the ports have trunking enabled by issuing the portcfgshow command. If Trunking is not enabled, issue the portcfgtrunkport , 1 command. 4. Ensure that ports will become the same speed within the trunk. 5. Ensure that Edge switch F_Port trunk ports are connected within the asic supported trunk group on AG switch. 6. Ensure that both modules are running the same Fabric OS versions. 7. Configure the trunk on the Edge switch by assigning the Trunk Area (TA) using the "Assigning a Trunk Area" procedure. 8. Enable F_Port trunking. 26 Access Gateway Administrator's Guide 53-1001189-01
-
 1
1 -
2
-
3
-
4
-
5
-
6
-
7
-
8
-
9
-
10
-
11
-
12
-
13
-
14
-
15
-
16
-
17
-
18
-
19
-
20
-
21
-
22
-
23
-
24
-
25
-
26
-
27
-
28
-
29
-
30
-
31
-
32
-
33
-
34
-
35
-
36
-
37
-
38
-
 39
39 -
 40
40 -
 41
41 -
 42
42 -
 43
43 -
 44
44 -
 45
45 -
 46
46 -
 47
47 -
 48
48 -
 49
49 -
50
-
51
-
52
-
53
-
54
-
55
-
56
-
57
-
58
-
59
-
60
-
61
-
62
-
63
-
64
-
65
-
66
-
67
-
68
-
69
-
70
-
71
-
72
-
73
-
74
-
75
-
76
-
77
-
78
-
79
-
80
 |
 |
