HP C6350 User Guide - Page 44
To access the Embedded Web Server
 |
UPC - 884420772392
View all HP C6350 manuals
Add to My Manuals
Save this manual to your list of manuals |
Page 44 highlights
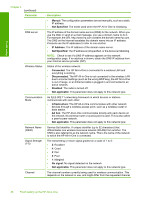
Finish setup Related topics • "View and print network settings" on page 37 • "Network configuration page definitions" on page 42 Use the Embedded Web Server If your computer is connected to an HP All-in-One on a network, you can access the Embedded Web Server that resides in the HP All-in-One. The Embedded Web Server is a Web-based user interface that provides some options not available on the HP All-inOne control panel like advanced network security options. The Embedded Web Server also enables you to monitor status, change product preferences, and order supplies. NOTE: Use the Embedded Web Server to change network settings not available on the control panel. This section contains the following topics: • Access the Embedded Web Server • Use the Embedded Web Server to modify network settings Access the Embedded Web Server The computer you use to access the Embedded Web Server on the HP All-in-One must be connected to the same network as the HP All-in-One. To access the Embedded Web Server 1. Print a network configuration page to find the IP address for the product. 2. In the Address box in your Web browser on your computer, type the IP address of the product, as shown on the network settings page. For example, http:// 192.168.1.101. The Embedded Web Server Home page appears, showing information for the product. NOTE: If you are using a proxy server in your browser, you might need to disable it to access the Embedded Web Server. 3. If you need to change the language displayed in the Embedded Web Server, do the following: a. Click the Settings tab. b. Click Select Language in the Settings navigation menu. c. In the Select Language list, click the appropriate language. d. Click Apply. 4. Click the Home tab to access the product and network information, or click the Networking tab to access more network information or to modify network information. 5. Make any configuration changes. 6. Close the Embedded Web Server. Related topics "View and print network settings" on page 37 Connect to a computer 41
-
 1
1 -
2
-
3
-
4
-
5
-
6
-
7
-
8
-
9
-
10
-
11
-
12
-
13
-
14
-
15
-
16
-
17
-
18
-
19
-
20
-
21
-
22
-
23
-
24
-
25
-
26
-
27
-
28
-
29
-
30
-
31
-
32
-
33
-
34
-
35
-
36
-
37
-
38
-
 39
39 -
 40
40 -
 41
41 -
 42
42 -
 43
43 -
 44
44 -
 45
45 -
 46
46 -
 47
47 -
 48
48 -
 49
49 -
50
-
51
-
52
-
53
-
54
-
55
-
56
-
57
-
58
-
59
-
60
-
61
-
62
-
63
-
64
-
65
-
66
-
67
-
68
-
69
-
70
-
71
-
72
-
73
-
74
-
75
-
76
-
77
-
78
-
79
-
80
-
81
-
82
-
83
-
84
-
85
-
86
-
87
-
88
-
89
-
90
-
91
-
92
-
93
-
94
-
95
-
96
-
97
-
98
-
99
-
100
-
101
-
102
-
103
-
104
-
105
-
106
-
107
-
108
-
109
-
110
-
111
-
112
-
113
-
114
-
115
-
116
-
117
-
118
-
119
-
120
-
121
-
122
-
123
-
124
-
125
-
126
-
127
-
128
-
129
-
130
-
131
-
132
-
133
-
134
-
135
-
136
-
137
-
138
-
139
-
140
-
141
-
142
-
143
-
144
-
145
-
146
-
147
-
148
-
149
-
150
-
151
-
152
-
153
-
154
-
155
-
156
-
157
-
158
-
159
-
160
-
161
-
162
-
163
-
164
-
165
-
166
-
167
-
168
-
169
-
170
-
171
-
172
-
173
-
174
-
175
-
176
-
177
-
178
-
179
-
180
-
181
-
182
-
183
-
184
-
185
-
186
-
187
-
188
-
189
-
190
-
191
-
192
-
193
-
194
-
195
-
196
-
197
-
198
-
199
-
200
-
201
-
202
-
203
-
204
-
205
-
206
-
207
-
208
-
209
-
210
-
211
-
212
-
213
-
214
-
215
-
216
-
217
-
218
-
219
-
220
-
221
-
222
-
223
-
224
-
225
-
226
-
227
-
228
-
229
-
230
-
231
-
232
-
233
-
234
-
235
-
236
-
237
-
238
-
239
-
240
-
241
-
242
-
243
-
244
-
245
-
246
-
247
-
248
-
249
-
250
-
251
-
252
-
253
-
254
-
255
-
256
-
257
-
258
-
259
-
260
-
261
-
262
-
263
-
264
-
265
-
266
-
267
-
268
-
269
-
270
-
271
-
272
-
273
-
274
-
275
-
276
-
277
-
278
-
279
-
280
-
281
-
282
-
283
-
284
-
285
-
286
-
287
-
288
-
289
-
290
-
291
-
292
-
293
-
294
-
295
-
296
-
297
-
298
-
299
-
300
-
301
-
302
-
303
-
304
-
305
-
306
-
307
-
308
-
309
-
310
-
311
-
312
-
313
-
314
-
315
-
316
-
317
-
318
-
319
-
320
-
321
-
322
-
323
-
324
-
325
-
326
-
327
-
328
-
329
-
330
-
331
 |
 |
