HP CQ2200 Upgrade and Service - Page 7
back of the optical drive., Disconnect the power cable and data cable from
 |
View all HP CQ2200 manuals
Add to My Manuals
Save this manual to your list of manuals |
Page 7 highlights
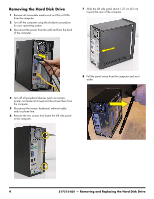
9 Release the two latching tabs on the left side of the front bezel by pulling them slightly outward. When the left side of the front bezel is released, pull it away from the computer. 12 Lift the front edge of the optical drive and cage assembly (1), and then slide the tabs (2) out of the notches at the rear of the computer. 1 2 10 Spread a towel or soft cloth on your working surface. Then lay the computer on its side, with the open side up. NOTE: You must remove the optical drive before you can remove the hard drive. 11 Remove the two screws that secure the optical drive cage to the front of the computer. 13 Disconnect the power cable and data cable from the back of the optical drive. Press the release button on the end of the power cable and the data cable while disconnecting these cables from the drive. NOTE: The location of the cable connections may vary with the optical drive model in your computer. 14 Carefully set the optical drive aside. 517212-001 - Removing and Replacing the Hard Disk Drive 5
-
 1
1 -
 2
2 -
 3
3 -
 4
4 -
 5
5 -
 6
6 -
 7
7 -
 8
8 -
 9
9 -
 10
10 -
 11
11 -
 12
12 -
13
-
14
-
15
-
16
-
17
-
18
-
19
-
20
-
21
-
22
-
23
-
24
-
25
-
26
 |
 |
