HP Carrier-grade cc2300 Software & Setup Reference Guide - cc3310 Carr - Page 1
HP Carrier-grade cc2300 Manual
 |
View all HP Carrier-grade cc2300 manuals
Add to My Manuals
Save this manual to your list of manuals |
Page 1 highlights
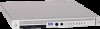
cc3310 Carrier Grade Server Software & Setup Reference Guide Start Here Thank you for buying a Hewlett Packard cc3310 Carrier Grade Server. The following information will help you set up your server. Expanded installation instructions and complete product information are available on the hp server cc3310 user information diagnostics and utilities resource CD, which has been provided with your cc3310 server. Before you Begin You will need the following tools and equipment: Box Contents Supplied by Customer Server AC Power Cable (DC Cable Optional) PS/2 'Y' Cable Monitor Keyboard Mouse Serial Adapter Cable Additional I/O Cards 1 Setting up the Hardware A) Carefully unpack the server. Save all packing materials in case the server needs to be shipped at a later time. B) Add additional hardware/cards, if desired. Refer to the cc3310 Product Guide for further information. C) Connect the keyboard/mouse PS/2 'Y' cable to the server. D) Connect the keyboard and mouse cables to the PS/2 'Y' cable. E) Connect the video monitor cable. F) If you are using a serial console, connect the serial adapter cable to the rear RJ-45 port and turn on console redirect. Refer to the cc3310 Product Guide for further information. G) Connect AC or DC power. Make sure that the power service connection is through a properly grounded outlet. Refer to the hp server cc3310 user information diagnostics and utilities resource CD for additional information. H) You are now ready to apply power and install the Operating System (OS). 2 Installing an Operating System What's Needed - hp server cc3310 user information diagnostics and utilities resource CD. - Operating System (OS) Media for the OS to be installed. - OS Support Notes for the selected OS. OS Support Notes can be found at http://www.docs.hp.com (search for cc3310) and on the hp server cc3310 user information diagnostics and utilities resource CD. Note: Microsoft® Windows® 2000 Advanced Server (AS) and Windows 2003 AS will require a unique "user developed and customized " installation CD. What to Do Install the OS as instructed in the Support Notes for your OS. Specific actions will vary, depending on the selected OS. Resource CD Documentation Operating System Front View cc3310 Server Adobe and Acrobat are trademarks of Adobe Systems Incorporated. Linux is a registered trademark of Linus Torvalds. UNIX is a registered trademark of The Open Group. Microsoft® and Windows® are U.S. registered trademarks of Microsoft Corporation. © Copyright 2006 Hewlett-Packard Development Company, L.P. January 2006 v3 Mfg. P/N: A9862-96005 *A9862-96005* Needle-nose Pliers Phillips Screwdriver Flat Blade Screwdriver Antistatic Wrist Strap Attach wrist strap to chassis ground (any unpainted metal surface) on the server If you are not familiar with ESD (Electrostatic Discharge) procedures to be used during system configuration, complete ESD procedures are described in your cc3310 Product Guide. Resource CD Contents HP Server cc3310 User Information Diagnostics and Utilities Resource CD The resource CD is a dual-boot CD. CD contents for each boot option are listed below: 1. Online Boot: Insert CD while the operating system (OS) is running. After the CD loads, the following tabs are available: Server: Brief description of the cc3310 Utilities: Floppy creation utilities for SSU and diagnostics Management SW: ISM/TAM loader software/documentation Documentation: Related product information plus Acrobat® Reader I/O Information: Add-on I/O documentation Training: Product training Help: Navigation help for the resource CD 2. Offline Boot: Boot from CD after hardware reset. After the CD boots, a wizard is launched that allows access to the following utilities: Service Partition Administration Utility System Setup Utility (SSU) FRU/SDR Loader Utility Diagnostics Power Switch Peripheral Bay Drive Bay 2 Low Profile PCI Card Slots Reset Switch Front Panel Control Switches and Status LEDs RJ45 COM2 and Dual USB Connectors Drive Bay 2 SCSI Connector Engagement Lever Drive Bay 1 Drive Bay 1 SCSI Connector Engagement Lever B Full Height PCI Card Slots DC Power Supply G Front View cc3310 Server with Bezel Removed Optional Power Supply Rear View cc3310 with DC Power Supply 12 3 45 6 7 89 C D F To Serial Console E Optional Power Supply Rear View cc3310 with AC Power Supply Monitor Keyboard Mouse Rear Panel Connectors 1 USB 1 4 RJ-45 NIC 2 7 RJ-45 Serial 2 2 Video 5 RJ-45 NIC 1 8 USB 2 3 U-320 SCSI 6 PS/2 mouse/keyboard 9 DB15 Alarm Important Product Information Hardware Information 1. The system Sensor Data Records (SDR) must be reprogrammed every time a configuration change is made to the hardware (memory, hard drives, power supplies, field replaceable units, etc.). Failure to reprogram the SDR could result in NO alarms when a critical system failure occurs or invalid alarms when NO failure occurs. 2. When installing memory, you must adhere to the memory configuration requirements and to the proper loading sequence. Refer to the cc3310 Product Guide for additional information. 3. Systems are shipped with the service partition installed on the internal boot drive. The service partition contains utilities, diagnostics, and other support software. 4. Installing a service partition will remove any previously installed OS. 5. The fault lights of the TAM display are factoryconfigured with North American settings. Refer to the cc3310 Product Guide for instructions to reconfigure this display. 6. Only the NIC 1 port (lower port at rear) can be used with the Intel Service Manager (ISM). 7. One RJ-45 to DB9 serial connector is shipped with each server. Use this connector for the rear RJ-45 port. A different and unique interface (pin-out) is required for use with the front RJ-45 port. Linux Information 1. If you will be using a USB floppy drive, install the drive before installing Linux. 2. Install all SCSI controllers before installing a Linux OS. 3. Linux will change the boot order when a new SCSI controller is installed. 4. Linux must always be installed on the first hard drive of the system (first drive, channel b, internal SCSI interface). Windows Information 1. A "user developed and customized" CD is required before Windows 2000 AS and Windows 2003 AS can be installed. Instructions on how to build this CD can be found at "Operating System (OS) Support Notes for Windows 2000 Advanced Server on hp cc3310" or "Operating System (OS) Support Notes for Windows 2003 Advanced Server on hp cc3310" at http://www.docs.hp.com (search for cc3310) and on the hp server cc3310 user information diagnostics and utilities resource CD. Need More Info? Memory Loading Requirements and unique SCSI Addressing are described in the cc3310 Product Guide. The cc3310 Product Guide is provided on the resource CD. The following web sites provide additional information and documentation about this server along with the latest downloadable firmware. Perform a keyword search on cc3310 at the following URLs: http://www.hp.com/ for product information http://docs.hp.com/ for additional documentation http://www.software.hp.com/ for any available downloadable drivers, firmware or BIOS updates You can also search HP's Support web site for information about the server or supported operating systems. http://www.itrc.com/
-
 1
1
 |
 |
