HP Chromebook 14 G3 Chromebook model numbers 14- x000 through 14-x099 Maintena - Page 52
HP Chromebook 14 G3, Disconnect the display panel cable
 |
View all HP Chromebook 14 G3 manuals
Add to My Manuals
Save this manual to your list of manuals |
Page 52 highlights
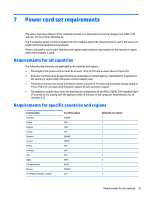
a. Remove the display bezel. b. Remove the four Phillips PM2.0×2.2 broad head screws (1) that secure the display panel to the display enclosure. CAUTION: Before turning the display panel upside down, make sure the work surface is clear of tools, screws, and any other foreign objects. Failure to follow this caution can result in damage to the display panel. c. Lift the top edge of the display panel (2) and swing it up and forward until it rests upside down in front of the display enclosure. d. Release the adhesive strip (1) that secures the display panel cable connector to the display panel. e. Disconnect the display panel cable (2) from the display panel. f. Remove the display panel (3). The non-TouchScreen display assembly display panel is available using the following spare part numbers: ● 787719-001-For use on computer models in ocean turquoise finish for use only on HP Chromebook 14 PC ● 787717-001-For use on computer models in ocean turquoise finish for use only on HP Chromebook 14 PC ● 787720-001-For use on computer models in ocean turquoise finish for use only on HP Chromebook 14 PC ● 787718-001-For use on computer models in ocean turquoise finish for use only on HP Chromebook 14 PC ● 788508-001-For use on TouchScreen computer models in Jack black finish for use only on HP Chromebook 14 G3 ● 788509-001-For use on non-TouchScreen computer models in Jack black finish for use on HP Chromebook 14 PC, and for use on HP Chromebook 14 G3 46 Chapter 5 Removal and replacement procedures
-
 1
1 -
2
-
3
-
4
-
5
-
6
-
7
-
8
-
9
-
10
-
11
-
12
-
13
-
14
-
15
-
16
-
17
-
18
-
19
-
20
-
21
-
22
-
23
-
24
-
25
-
26
-
27
-
28
-
29
-
30
-
31
-
32
-
33
-
34
-
35
-
36
-
37
-
38
-
39
-
40
-
41
-
42
-
43
-
44
-
45
-
46
-
 47
47 -
 48
48 -
 49
49 -
 50
50 -
 51
51 -
 52
52 -
 53
53 -
 54
54 -
 55
55 -
 56
56 -
 57
57 -
58
-
59
-
60
-
61
-
62
-
63
-
64
-
65
-
66
-
67
 |
 |
