HP Color LaserJet CM4730 HP Color LaserJet CM4730 MFP Embedded Web Server - Us - Page 36
Using the menus on the Con Device screen, Settings
 |
View all HP Color LaserJet CM4730 manuals
Add to My Manuals
Save this manual to your list of manuals |
Page 36 highlights
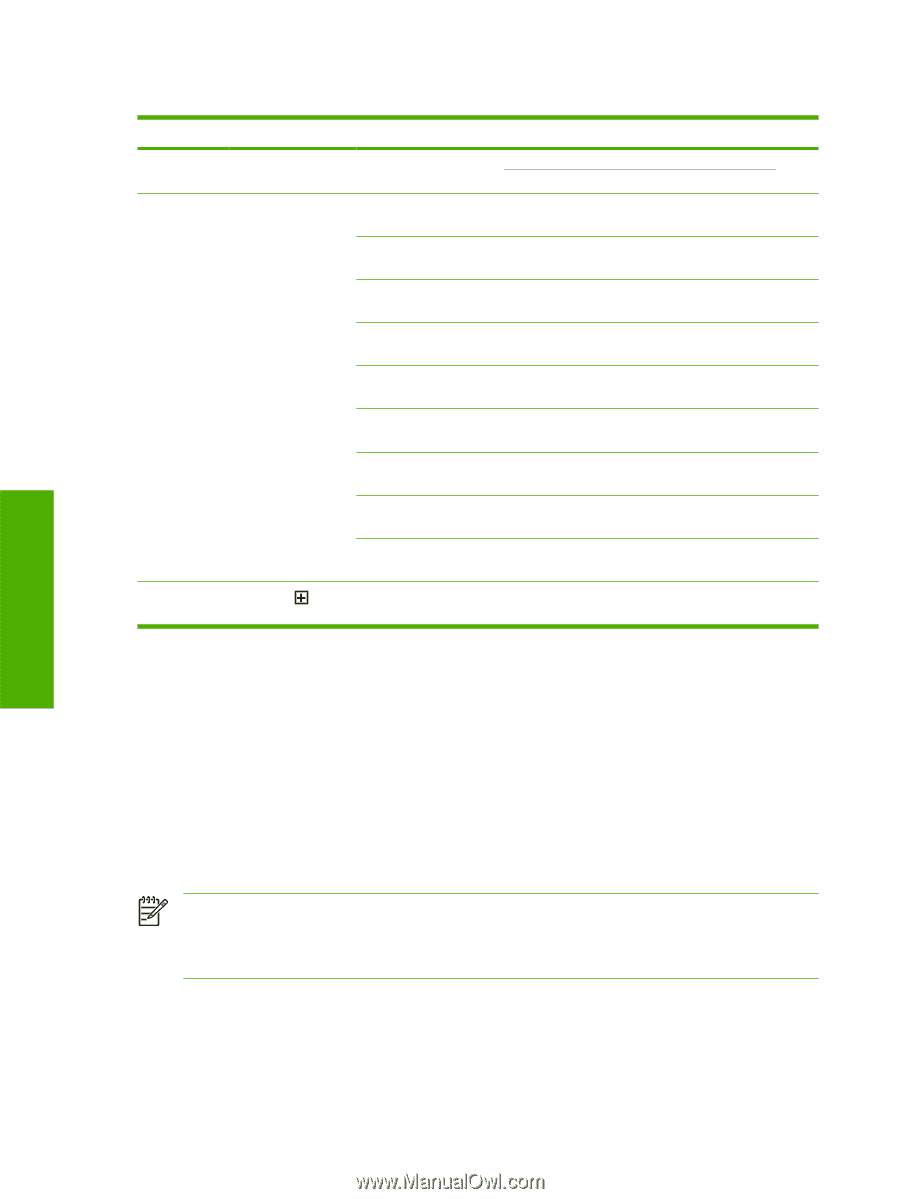
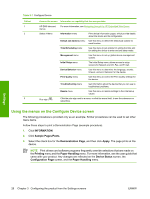
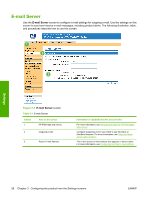
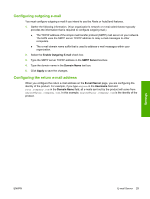
Table 3-1 Configure Device Callout 1 2 3 Area on the screen Information or capability that the area provides HP EWS tabs and menus For more information, see Navigating through the HP Embedded Web Server. Select A Menu Information menu Print device information pages, which provide details about the device and its configuration. Default Job Options menu Use this menu to define the default job options for each function. Time/Scheduling menu Use this menu to set options for setting the time and for setting the device to enter and exit sleep mode. Management menu Use this menu to set up global device-management options. Initial Setup menu The Initial Setup menu allows access to setup screens for Network and I/O, Fax, and E-mail. Device Behavior menu Use this menu to determine the language, sounds, timeout, and error behavior for the device. Print Quality menu Use this menu to control the Print Quality settings for the device. Troubleshooting menu Get information about the device that you can use to troubleshoot problems. Resets menu Use this menu to restore settings to the intial setup values. Plus sign ( ) Click the plus sign next to a menu, or click the menu itself, to see the submenus or subentries. Using the menus on the Configure Device screen The following procedure is provided only as an example. Similar procedures can be used to set other menu items. Follow these steps to print a Demonstration Page (example procedure). 1. Click INFORMATION. 2. Click Sample Pages/Fonts. 3. Select the check box for the Demonstration Page, and then click Apply. The page prints at the device. NOTE Print drivers and software programs frequently override selections that are made on the Printing menu and the Paper Handling menu. For more information, see the user guide that came with your product. Any changes are reflected on the Device Status screen, the Configuration Page screen, and the Paper Handling menu. Settings 26 Chapter 3 Configuring the product from the Settings screens ENWW
-
 1
1 -
2
-
3
-
4
-
5
-
6
-
7
-
8
-
9
-
10
-
11
-
12
-
13
-
14
-
15
-
16
-
17
-
18
-
19
-
20
-
21
-
22
-
23
-
24
-
25
-
26
-
27
-
28
-
29
-
30
-
 31
31 -
 32
32 -
 33
33 -
 34
34 -
 35
35 -
 36
36 -
 37
37 -
 38
38 -
 39
39 -
 40
40 -
 41
41 -
42
-
43
-
44
-
45
-
46
-
47
-
48
-
49
-
50
-
51
-
52
-
53
-
54
-
55
-
56
-
57
-
58
-
59
-
60
-
61
-
62
-
63
-
64
-
65
-
66
-
67
-
68
-
69
-
70
-
71
-
72
-
73
-
74
-
75
-
76
-
77
-
78
-
79
-
80
-
81
-
82
-
83
-
84
-
85
-
86
-
87
-
88
-
89
-
90
-
91
-
92
-
93
-
94
-
95
-
96
-
97
-
98
-
99
-
100
-
101
-
102
-
103
-
104
-
105
-
106
-
107
-
108
-
109
-
110
-
111
-
112
-
113
-
114
-
115
-
116
 |
 |