HP Color LaserJet CM6030/CM6040 HP Color LaserJet CM6040/CM6030 MFP Series - U - Page 246
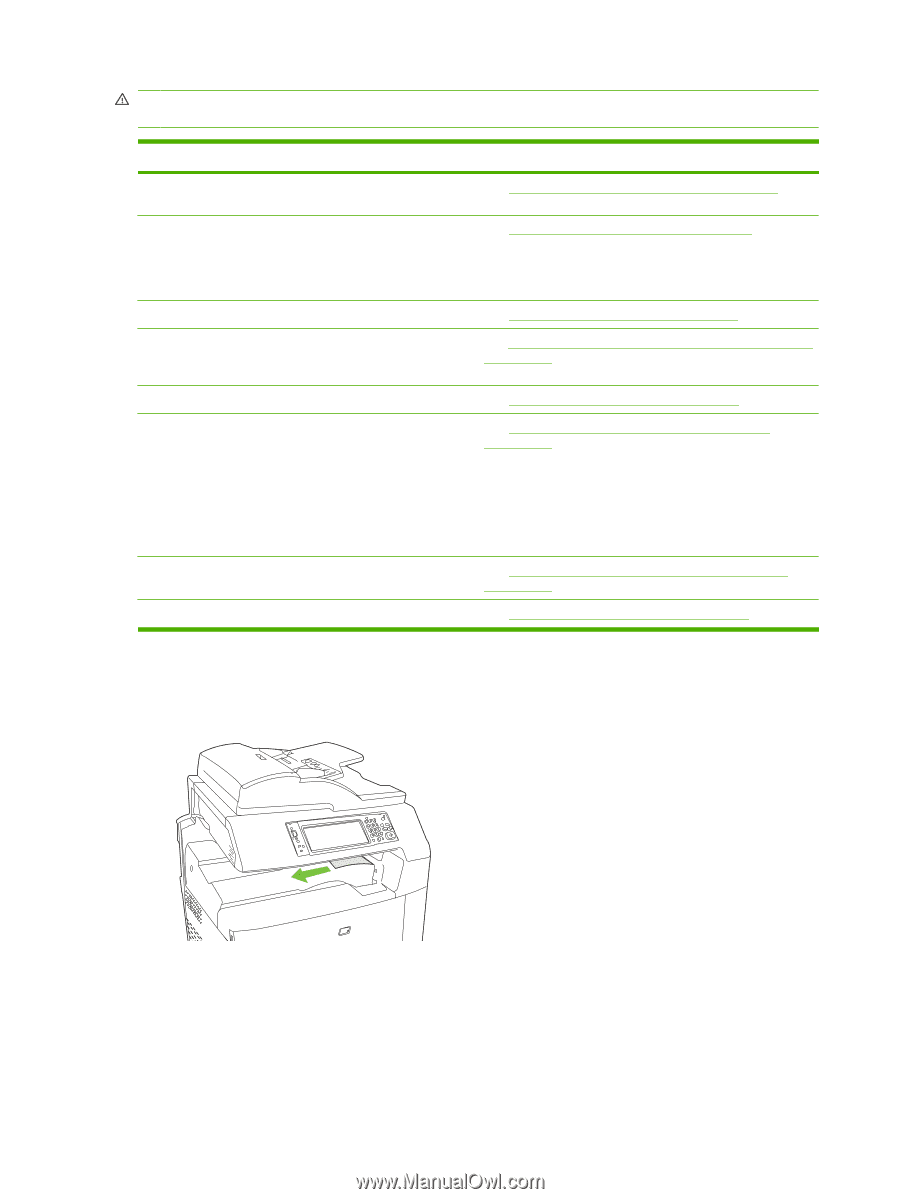
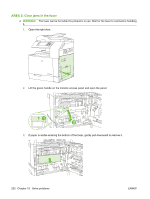
AREA 1: Clear jams in the output bin, WARNING
 |
View all HP Color LaserJet CM6030/CM6040 manuals
Add to My Manuals
Save this manual to your list of manuals |
Page 246 highlights
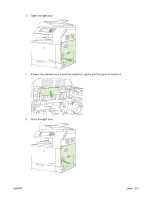
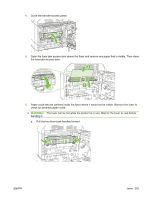
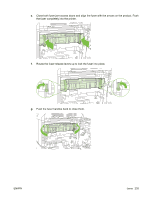
WARNING! To avoid electrical shock, remove any necklaces, bracelets, or other metal items before reaching into the inside of the product. Type of jam 13.JJ.NT Jam below control panel Procedure See AREA 1: Clear jams in the output bin on page 230. 13.JJ.NT Fuser Area Jam 13.JJ.NT Fuser Wrap Jam 13.JJ.NT Transfer And Fuser Jam 13.JJ.NT Jam Inside Right Door 13.JJ.NT Jam In Tray 2 13.JJ.NT Transfer Area Jam 13.JJ.NT Jam In Tray 1 13.JJ.NT Jam In Tray 3 13.JJ.NT Jam In Tray 4 13.JJ.NT Jam In Tray 5 13.JJ.NT Jam Inside Lower Right Door 13.JJ.NT Jam In Input Accessory 13.JJ.NT Jam In Left Accessory Jam in document feeder See AREA 2: Clear jams in the fuser on page 232. See Clear jams in the duplex area on page 236. See AREA 5: Clear jams in Tray 2 and the internal paper path on page 239. See AREA 6: Clear jams in Tray 1 on page 242. See AREA 7: Clear jams in optional Trays 3, 4, and 5 on page 245 See AREA 8: Clear jams in the optional finishing devices on page 248. See AREA 9: Clear jams in the ADF on page 252. AREA 1: Clear jams in the output bin 1. If jammed paper is visible in the output bin, gently pull the paper to remove it. 230 Chapter 15 Solve problems ENWW
-
 1
1 -
2
-
3
-
4
-
5
-
6
-
7
-
8
-
9
-
10
-
11
-
12
-
13
-
14
-
15
-
16
-
17
-
18
-
19
-
20
-
21
-
22
-
23
-
24
-
25
-
26
-
27
-
28
-
29
-
30
-
31
-
32
-
33
-
34
-
35
-
36
-
37
-
38
-
39
-
40
-
41
-
42
-
43
-
44
-
45
-
46
-
47
-
48
-
49
-
50
-
51
-
52
-
53
-
54
-
55
-
56
-
57
-
58
-
59
-
60
-
61
-
62
-
63
-
64
-
65
-
66
-
67
-
68
-
69
-
70
-
71
-
72
-
73
-
74
-
75
-
76
-
77
-
78
-
79
-
80
-
81
-
82
-
83
-
84
-
85
-
86
-
87
-
88
-
89
-
90
-
91
-
92
-
93
-
94
-
95
-
96
-
97
-
98
-
99
-
100
-
101
-
102
-
103
-
104
-
105
-
106
-
107
-
108
-
109
-
110
-
111
-
112
-
113
-
114
-
115
-
116
-
117
-
118
-
119
-
120
-
121
-
122
-
123
-
124
-
125
-
126
-
127
-
128
-
129
-
130
-
131
-
132
-
133
-
134
-
135
-
136
-
137
-
138
-
139
-
140
-
141
-
142
-
143
-
144
-
145
-
146
-
147
-
148
-
149
-
150
-
151
-
152
-
153
-
154
-
155
-
156
-
157
-
158
-
159
-
160
-
161
-
162
-
163
-
164
-
165
-
166
-
167
-
168
-
169
-
170
-
171
-
172
-
173
-
174
-
175
-
176
-
177
-
178
-
179
-
180
-
181
-
182
-
183
-
184
-
185
-
186
-
187
-
188
-
189
-
190
-
191
-
192
-
193
-
194
-
195
-
196
-
197
-
198
-
199
-
200
-
201
-
202
-
203
-
204
-
205
-
206
-
207
-
208
-
209
-
210
-
211
-
212
-
213
-
214
-
215
-
216
-
217
-
218
-
219
-
220
-
221
-
222
-
223
-
224
-
225
-
226
-
227
-
228
-
229
-
230
-
231
-
232
-
233
-
234
-
235
-
236
-
237
-
238
-
239
-
240
-
 241
241 -
 242
242 -
 243
243 -
 244
244 -
 245
245 -
 246
246 -
 247
247 -
 248
248 -
 249
249 -
 250
250 -
 251
251 -
252
-
253
-
254
-
255
-
256
-
257
-
258
-
259
-
260
-
261
-
262
-
263
-
264
-
265
-
266
-
267
-
268
-
269
-
270
-
271
-
272
-
273
-
274
-
275
-
276
-
277
-
278
-
279
-
280
-
281
-
282
-
283
-
284
-
285
-
286
-
287
-
288
-
289
-
290
-
291
-
292
-
293
-
294
-
295
-
296
-
297
-
298
-
299
-
300
-
301
-
302
-
303
-
304
-
305
-
306
-
307
-
308
-
309
-
310
-
311
-
312
-
313
-
314
-
315
-
316
-
317
-
318
-
319
-
320
-
321
-
322
-
323
-
324
-
325
-
326
-
327
-
328
-
329
-
330
-
331
-
332
-
333
-
334
-
335
-
336
-
337
-
338
 |
 |