HP D2D HP StorageWorks D2D Backup System HP D2D2502 and 2504 G2 Installation p - Page 2
Web Management Interface - default password
 |
View all HP D2D manuals
Add to My Manuals
Save this manual to your list of manuals |
Page 2 highlights
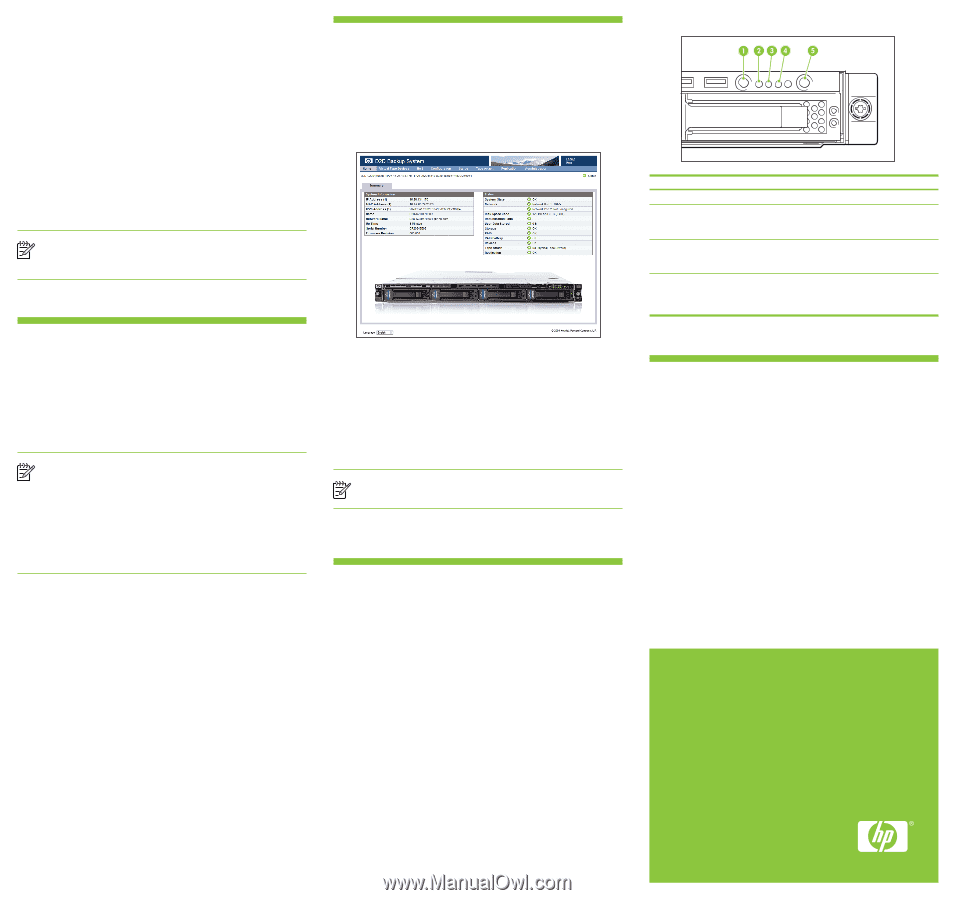
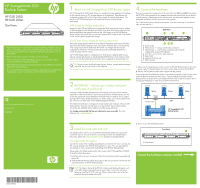
Further information about networks The two physical network ports provide three network configuration modes: • Single Port Configuration: The HP D2D is connected to one network; only one network port is used (Port 3). • Dual Port Configuration: The HP D2D is connected to two different networks. Both network ports are used. • High Availability (Port Failover) Configuration: Both network ports are used, but the two ports are bound together to provide port failover. • High Availability (Link Aggregation): This creates a bonded network port and provides load balancing across the two network ports. Single port configuration is the default mode, but it may easily be changed during the software installation, discovery and configuration process or subsequently from the Web Management Interface. If dual port configuration is required, the networks must be on different sub-nets. The High Availability mode is the recommended option, because it provides port failover and increased bandwidth, but both network ports must be connected to the same switch and it must support port bonding. For further information please refer to the "User Guide" on the CD-ROM. NOTE: The HP D2D supports the IPv6 protocol, but it is factory-configured to recognize both IPv4 and IPv6 protocols and use either, for example if the internet service provider (ISP) uses an IPv4 network. No further user configuration is required. 5 Software installation, discovery and configuration There are three possible stages to installation. You may not need to complete all of them. 1 Optional: If you will be configuring Virtual Tape Devices, install all the required drivers. This step is not required if you intend to use only NAS shares. 2 Mandatory: Discover and configure the HP D2D Backup System on the network. 3 Optional: Create a base iSCSI library configuration to get started. This step is not required if you intend to use only NAS shares or only FC devices on the HP D2D. NOTE: For networks using the IPv4 protocol (most networks), Dynamic (DHCP) network addressing is enabled by default on the HP D2D. If your network supports DHCP, all the required network parameters will be set automatically. If your network uses static IP addressing, you will need to manually assign network settings - IP address, subnet mask and gateway. Make sure that you have these ready before you start installation. If you are on an IPv6-only network, simply enter the MAC address of the HP D2D into the wizard when requested, which can then be used to find the IP address and required network parameters automatically. You will find the MAC address on the label on the top of the unit. Windows users: The recommended way to set up your HP D2D Backup System network is to run the Installation wizard from the HP StorageWorks CD-ROM supplied with your product. The Installation wizard should be run on all hosts that are to be backed up to the HP D2D Backup System. 1. Insert the CD-ROM into the host machine and the Installation wizard will auto run. In most instances the installation completes all three stages detailed above successfully. For more detailed information about what happens during each stage and about iSCSI, please refer to the "User Guide" on the HP StorageWorks CD-ROM. 2. Run the Installation wizard on the other hosts that are to be backed up. Linux and UNIX users: Download the latest patches for your operating system. For configuration instructions, please refer to the "Linux and UNIX Configuration Guide" on the HP StorageWorks CD-ROM. 6 Web Management Interface To run the Web Management Interface: • From a Windows host server or PC: Use the desktop shortcut created by the Installation wizard or • From any machine connected to the network: Enter https: followed by the IPv4 IPv6 address or name (fully qualified domain name) of the HP D2D Backup System into the web browser. The default Sign On is Administrator with a password of Admin. Both names are case sensitive. (The password can be changed after installation.) The device created during installation will appear to the backup software on your host server or PC as a locally-attached backup device. This backup device can be seen only by the host and not by any other devices on the network. Use the Web Management Interface to: • Monitor the status and health of the HP D2D Backup System and all configured backup devices. • Create NAS Shares as targets for disk backup. • Create slot mappings and configure replication, if required. • If you have created a Virtual Tape device as the backup target, change the number of cartridge slots or create additional library devices for a host. NOTE: To power off your HP D2D Backup System always use the Web Management Interface, as described in the "User Guide" on the HP StorageWorks CD-ROM. 7 Using your D2D Backup Software If you are backing up to NAS shares on the HP D2D Backup System you need software that supports backup to disk. You must configure a new backup job in your application. If you are backing up to Virtual Tape Libraries on the HP D2D, you need software that supports backup to HP Tape libraries. You can incorporate the HP D2D into your existing tape rotation schemes. For example scenarios see the "User Guide" on the HP StorageWorks CD-ROM. Always refer to www.hp.com/go/connect, to ensure that you are running supported software and install any recommended updates. Data deduplication The HP D2D incorporates data deduplication technology. Deduplication is applied on a per device basis; it is always enabled for NAS shares, but may be disabled for Virtual Tape devices. As data is backed up to a device, the HP D2D analyzes the data at block (not file) level and stores only data that is unique, creating pointers to blocks that are already stored on that device. (It does not reference data stored on other devices.) This is an extremely efficient way of using the available storage space. See the "User Guide" for more information. Replication Replication allows users to replicate data from cartridges on one HP D2D to mapped slots on another HP D2D on a remote site. Once configured (using the simple-to-use wizard), replication occurs automatically, ensuring data is mirrored on source and target HP D2Ds. Deduplication ensures that network traffic is minimized. Understanding the LEDs Item Description Status 1 HP D2D beacon LED Steady blue identifies the HP D2D in the rack. 2 System health LED Green = Normal operation Flashing amber = Degraded condition Flashing red = Critical condition 3&4 Network port 5 Power button LED Off = no network connection or network not configured Flashing green - network connection Off = no power connected Steady green = power connected, device ready for use Steady amber = device switched off or in hibernation with power connected 8 Troubleshooting Detailed help is available while running the Installation wizard. If you encounter problems during any of the the installation phases, it will advise you what steps to take. For more troubleshooting information, refer to the "User Guide" on the HP StorageWorks CD-ROM. This guide also contains reference information about iSCSI and RAID. If you cannot resolve problems, contact HP Support at www.hp.com/support. For the latest information about computer, OS and software compatibility, see www.hp.com/go/connect.
-
 1
1 -
 2
2
 |
 |