HP D2D HP StorageWorks D2D Backup System HP D2D4106 and 4112 G2 Installation p - Page 1
HP D2D Manual
 |
View all HP D2D manuals
Add to My Manuals
Save this manual to your list of manuals |
Page 1 highlights
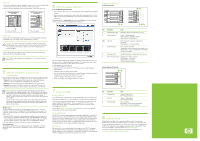
HP StorageWorks D2D Backup System HP D2D4100 Backup System (12-disk model) HP D2D4100 Capacity Upgrade Kit (12-disk expansion model) Start here • Follow the instructions on this poster to connect the the HP D2D4106f and HP D2D4106i (12 x 500 GB disk) Backup System and the HP D2D4112 (12 x 1TB disk) Backup System. • Windows users can then run the Installation wizard from the HP StorageWorks CD-ROM on each host machine. Linux and UNIX users should refer to the "Linux and UNIX Configuration Guide" on the CD-ROM. • The host is the network server that you wish to back up. • The host machine on which the Installation wizard is run should have Internet access for installation to complete successfully. • The HP D2D Backup System should be connected to Gigabit Ethernet. 100 Base-T Ethernet will limit performance. • For more detailed information about installing, configuring and using the HP D2D Backup System, see the "User Guide" on the HP StorageWorks CD-ROM. © 2010 Hewlett-Packard Development Company, L.P. Printed in the EU www.hp.com EH996-90901 1 About your HP StorageWorks D2D Backup System The HP StorageWorks D2D Backup System is a disk-based storage appliance for backing up host network servers or PCs to target devices on the appliance. These devices are configured as either NAS or Virtual Tape Library targets for backup applications. This allows the HP D2D Backup System to fit seamlessly into your network backup environment. NAS targets for backup applications Support for both CIFS and NFS protocols means that NAS target devices may be created as backup targets for both Windows and UNIX /Linux hosts, and may be used with most backup applications that support backup to disk. NAS targets on an HP D2D Backup System provide network file share access that is optimized for backup to disk. They should not be used for general purpose file storage. Virtual Tape Library targets for backup applications The backup target appears to the host as an Ultrium Tape Library and requires a backup application that supports backup to tape. Tape Library emulation type is selected during initial configuration and this determines the number of cartridge slots and embedded tape drives that may be configured for the device. Virtual Tape Libraries provide considerable flexibility for a variety of backup rotation schemes. The HP D2D Backup System may be configured as an iSCSI or a Fibre Channel (FC) device. Libraries on the HP D2D Backup System may be configured as iSCSI or Fibre Channel (FC) target devices. (Note: The HP D2D4106i model does not support FC.) TIP: To find out more about NAS target devicess, libraries, example backup strategies, FC and iSCSI, see the "User Guide" on the CD-ROM. HP D2D4100 Series 12-disk Capacity Upgrade Kit The Capacity Upgrade Kit is an optional 12-disk expansion model. It may be installed at the same time as the HP D2D Backup System or added later. A license is always required for the Capacity Upgrade and is included with the kit. Be sure to order the correct kit for your system: • HP StorageWorks D2D4106 Backup System Capacity Upgrade Kit - (12 x 500GB Disks). • HP StorageWorks D2D4112/D2D4312 Backup System Capacity Upgrade Kit (12 x 1TB Disks). 2 IMPORTANT - Retrieve your license entitlement certificates (if purchased) Licensing is used to enable optional product functionality, such as extra disk capacity, replication or other future features. If you have purchased any of these features, you will receive the appropriate License Entitlement Certificate with your product. This is a paper document that contains all the information you need to obtain your unique License To Use key, which you can then enter into the Web Management Interface. The Entitlement Certificates are shipped in clearly marked card envelopes with your D2D Backup System. These are valuable items so, to prevent them becoming lost, please ensure they are identified and put safely to one side during unpacking. It is strongly recommended that they are redeemed as soon as possible. Go to the Webware site - webware.hp.com. 3 Install the rack rails and unit(s) The supplied rail kits allow you to install the HP D2D Backup System and Capacity Upgrade Kit into square and round hole racks for 1U and 2U servers. If mounting the server into threaded hole or telco racks, please see www.racksolutions.com to purchase mounting hardware. Important Safety Information Use extreme caution when installing and pulling the unit out from the rack; it can slip and fall, causing damage to the HP D2D Backup System or injury. HP is not responsible for any damage or injury caused by the mishandling of the HP D2D Backup System. Always refer to the Safety Guide and the User Guide on the HP StorageWorks CD-ROM for detailed safety information. 1. Install the rails in the rack, as required. Follow the instructions provided separately with the rail kits. 2. Slide the HP D2D Backup System into position in the rack and secure it to the rack rails using thumbscrews on the HP D2D front bezel. NOTE: The label on the top of the HP D2D contains useful identity information, such as the MAC address and default network name. Make a note of this information before you install the HP D2D in the rack. There is also a label with login information for the iLO2 management port. 3. If you have purchased the Capacity Upgrade Kit, it should be installed directly below or above the HP D2D Backup System. Use the thumbscrews on the front of the chassis to secure the Capacity Upgrade Kit to the rack. (Remove the small side panels secured with blue tape to access the thumbscrew.) 4 Connect the hardware 1. Always use the supplied power cords to connect the HP D2D Backup System to the mains power supply. For detailed safety information, see the Safety Guide on the CD-ROM. 2. Use any CAT-5E network cable (also supplied with the product) to connect the LAN port(s) to a Gigabit Ethernet network. There are two LAN ports on the rear of the unit, Port 1 and Port 2; this allows the HP D2D to be connected to two separate Ethernet networks and used to back up host devices on both networks. Alternatively, the two network ports may be bonded together to gain bandwidth and failover benefits when on a single network. LAN Port 1 (the lower port) must always be connected, because the Web Management Interface requires an Ethernet connection to set up devices. Back Panel 1 Power sockets 2 LAN port 1 - always used for data connection 3 LAN port 2 - used for data connection only if network configured for dual port IP addresses 4 iLO2 port - do NOT use for data connection 5 RAID controller 6 Fibre Channel card 7 (reserved for future use) To ensure that the HP D2D Backup System is discovered successfully, install it on the same subnet as the host machine that will access it. Typical installations have the HP D2D Backup System connected to the same Gigabit network switch as the host machine that is carrying out the backups in order to gain optimum performance. Server Ethernet switch Supplied cable Server LAN Server HP StorageWorks D2D Backup System Further information about networks The two physical network ports provide three network configuration modes: • Single Port Configuration: The HP D2D is connected to one network; only one network port is used (Port 3). • Dual Port Configuration: The HP D2D is connected to two different networks. Both network ports are used. • High Availability (Port Failover) Configuration: Both network ports are used, but the two ports are bound together to provide port failover. • High Availability (Link Aggregation): This creates a bonded network port and provides load balancing across the two network ports. Single port configuration is the default mode, but it may easily be changed during the software installation, discovery and configuration process or subsequently from the Web Management Interface. If dual port configuration is required, the networks must be on different sub-nets. The High Availability mode is the recommended option, because it provides port failover, but both network ports must be connected to the same switch and it must support port bonding. For further information please refer to the "User Guide" on the CD-ROM. NOTE: The HP D2D supports the IPv6 protocol, but it is factory-configured to recognize both IPv4 and IPv6 protocols and use either, for example if the internet service provider (ISP) uses an IPv4 network. No further user configuration is required. Connecting to a Fibre Channel SAN The HP D2D4112 and HP D2D4106f are supplied with the correct FC card pre-installed (the HP D2D4106i does not support FC). However, you must still connect the HP D2D to an Ethernet network in order to run the Installation Wizard and use the Web Management Interface, as described over the page. The main differences to be aware of are: • The wizard cannot create library devices for you on the HP D2D; you must do that after installation from the Web Management Interface. • Devices created on the HP D2D can be accessed by all hosts on the SAN unless you configure zones on the Fibre Channel Fabric/Switch. Connecting to the Capacity Upgrade Kit (optional) Install the rail kit and expansion model immediately below or above the HP D2D Backup System, as described in Section 3. 1. To ensure correct keying, first connect the supplied cable to the IN connector on the rear of the Capacity Upgrade Kit. 2. Connect the other end of the cable to the port labeled "Port 1E" on the RAID P212 PCI-e card on the rear of the HP D2D Backup System. 3. Use the supplied power cords to connect the Capacity Upgrade Kit to the mains power supply. 1 IN connector 2 Port 1E 3 Power connector Connect the hardware continues overleaf
-
 1
1 -
 2
2
 |
 |