HP Dc5850 Illustrated Parts & Service Map: HP Compaq dc5850 Microtower Bus - Page 4
HP Insight Diagnostics - drivers
 |
UPC - 884962022993
View all HP Dc5850 manuals
Add to My Manuals
Save this manual to your list of manuals |
Page 4 highlights
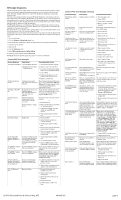
HP Insight Diagnostics The HP Insight Diagnostics utility allows you to view information about the hardware configuration of the computer and perform hardware diagnostic tests on the subsystems of the computer. The utility simplifies the process of effectively identifying, diagnosing, and isolating hardware issues. The Survey tab is displayed when you invoke HP Insight Diagnostics. This tab shows the current configuration of the computer. From the Survey tab, there is access to several categories of information about the computer. Other tabs provide additional information, including diagnostic test options and test results. The information in each screen of the utility can be saved as an html file and stored on a diskette or USB HP flash drive. Use HP Insight Diagnostics to determine if all the devices installed on the computer are recognized by the system and functioning properly. Running tests is optional but recommended after installing or connecting a new device. You should run tests, save the test results, and print them so that you have printed reports available before placing a call to the Customer Support Center. Insight Diagnostics may be found on the Documentation and Diagnostics CD that shipped with the computer. The tool may also be downloaded from the HP Web site using the following procedure: 1. Go to www.hp.com 2. Click the Software & Download driver link. 3. Enter the product number (for example, dc5800) in the text box and press the Enter key. 4. Select the specific product. 5. Select the OS. 6. Click the Diagnostics link. 7. Select HP Insight Diagnostics Offline Edition. 8. Select the proper language and click Download. NOTE: The download includes instructions on how to create a bootable CD. Common POST Error Messages Screen Message Description Recommended Action 101-Option ROM Error 1. System ROM checksum. 2. Expansion board option ROM checksum. 1. Verify ROM, reflash if required 2. Remove suspected card, reboot 3. If expansion board recently added, remove to see if problem remains. 4. Clear CMOS. 5. If message disappears, may be problem with expansion card. 6. Replace system board. 162-System Options Not Set Configuration incorrect. RTC battery may need to be replaced. Run Computer Setup and check configuration in Advanced > Onboard Devices. Reset date and time in Control Panel. If problem persists, replace RTC battery. 163-Time & Date Not Set Invalid time or date in configuration memory. RTC (real-time clock) battery may need to be replaced. Reset the date and time under Control Panel (Computer Setup can also be used). If the problem persists, replace the RTC battery. 164-Memory Size Error Memory amount has changed since the last boot (memory added or removed). Incorrect memory configuration. Press the F1 key to save the memory changes. -or- 1. Run Setup (F10). 2. Make sure the memory module(s) are installed properly. 3. If third-party memory has been added, test using HP-only memory. 4. Verify proper memory module type. 201-Memory Error RAM failure. 1. Run Setup (F10). 2. Ensure memory modules are correctly installed. 3. Verify proper memory module type. 4. Remove and replace the identified faulty memory module(s). 5. If the error persists after replacing memory modules, replace the system board. 213-Incompatible Memory Module in Memory Socket(s) X, X, ... A memory module in memory socket identified in the error message is missing critical SPD information, or is incompatible with the chipset. 1. Verify proper memory module type. 2. Try another memory socket. 3. Replace DIMM with a module conforming to the SPD standard. 214-DIMM Configura- Populated DIMM configura- Rearrange the DIMMs so that each tion Warning tion is not optimized. channel has the same amount of memory. 215-DIMM Configuration Warning Populated DIMM configuration is not optimized. Remove power from the system and reinstall memory modules. Populate modules starting with slot XMM4, then XMM3, followed by slots XMM2 and XMM1. 219-ECC Memory Recently added memory Module Detected ECC module(s) support ECC Modules not supported memory error correction. on this Platform 1. If additional memory was recently added, remove it to see if the problem remains. 2. Check product documentation for memory support information. 301, 304-Keyboard error Keyboard failure. 1. Reconnect keyboard with computer turned off. 2. Check connector for bent of missing pins. 3. Ensure that none of the keys are depressed. 4. Replace keyboard. 5. If 304 possible system board issue. Common POST Error Messages (continued) Screen Message Description Recommended Action 501-Display Adapter Failure Graphics display controller. 1. Reseat graphics card. 2. Clear CMOS. 3. Check monitor connection. 4. Replace graphics card (if possible). 510-Flash Screen Image Corrupted Flash Screen image has errors. Reflash the system ROM with the latest BIOS image. 511-CPU, CPUA, or CPUB Fan not Detected CPU fan is not connected or may have malfunctioned. 1. Reseat CPU fan. 2. Reseat fan cable. 3. Replace CPU fan. 512-Chassis, Rear Chassis, rear chassis, or Chassis, or Front Chas- front chassis fan is not con- sis Fan not Detected nected or may have mal- functioned. 1. Reseat chassis, rear chassis, or front chassis fan. 2. Reseat fan cable. 3. Replace chassis, rear chassis, or front chassis fan. 601-Diskette Controller Error Diskette controller circuitry or floppy drive circuitry incorrect. 1. Run Computer Setup. 2. Check and/or replace cables. 3. Clear CMOS. 4. Replace diskette drive. 5. Replace the system board. 605-Diskette Drive Type Error Mismatch in drive type. 1. Run Computer Setup. 2. Disconnect any other diskette controller devices (tape drives). 3. Clear CMOS. 917-Front Audio Not Connected Front audio harness has been detached or unseated from motherboard. Reconnect or replace front audio harness. 918-Front USB Not Connected Front USB harness has been Reconnect or replace front USB har- detached or ness. unseated from motherboard. 921-Device in PCI Express slot failed to initialize There is an incompatibility/ problem with this device and the system or PCI Express Link could not be retrained to an x1. Try rebooting the system. If the error reoccurs, the device may not work with this system 1720-SMART Hard Drive Detects Imminent Failure Hard drive is about to fail. (Some hard drives have a hard drive firmware patch that will fix an erroneous error message.) 1. Determine if hard drive is giving correct error message. Enter Computer Setup and run the Drive Protection System test under Storage > DPS Self-test. 2. Apply hard drive firmware patch if applicable. 3. Back up contents and replace hard drive. 1796-SATA Cabling Error One or more SATA devices are improperly attached. For optimal performance, the SATA 0 and SATA 1 connectors must be used before SATA 4 and SATA 5. Ensure SATA connectors are used in ascending order. For one device, use SATA 0. For two devices, use SATA 0 and SATA 1. For three devices, use SATA 0, SATA1, and SATA 4. 1797-SATA Drivelock is not supported in RAID mode. Drivelock is enabled on one or more SATA hard drives, and they cannot be accessed while the system is configured for RAID mode. Either remove the Drivelocked SATA device or disable the Drivelock feature. To disable the Drivelock feature, enter Computer Setup, change Storage > Storage Options > SATA Emulation to IDE, and select File > Save Changes and Exit. Re-enter Computer Setup and select Security > Drivelock. For each listed Drivelock-capable SATA device, ensure Drivelock is Disabled. Lastly, change Storage > Storage Options > SATA Emulation back to RAID and select File > Save Changes and Exit. 1801-Microcode Patch Processor not supported by 1. Upgrade BIOS to proper version. Error ROM BIOS. 2. Change the processor. Invalid Electronic Serial Number Electronic serial number is Enter the correct serial number in missing. Computer Setup. Memory Parity Error Parity RAM failure. Third-party graphics card may be causing a problem. Run Computer Setup and Diagnostic utilities. Remove third-party graphics card to see if the problem goes away. Network Server Mode Active and No Keyboard Attached Keyboard failure while Network Server Mode enabled. 1. Reconnect keyboard with computer turned off. 2. Check connector for bent or missing pins. 3. Ensure that none of the keys are depressed. 4. Replace keyboard. Parity Check 2 Parity RAM failure. Third-party graphics card may be causing a problem. Run Computer Setup and Diagnostic utilities. Remove third-party graphics card to see if problem goes away. dc5850 Illustrated Parts & Service Map, MT 481406-001 page 4
-
 1
1 -
 2
2 -
 3
3 -
 4
4
 |
 |
