HP Designjet 10000s HP Designjet High Speed Dryer 104 Inch - Users Guide - Page 11
When the stands are attached to the dryer unit, lift the whole dryer into the upright position
 |
View all HP Designjet 10000s manuals
Add to My Manuals
Save this manual to your list of manuals |
Page 11 highlights
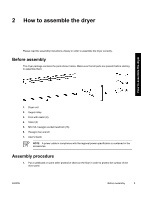
5. Secure the stands (1) to the dryer unit (2) with the knobs (3) (two at each side) as shown below. NOTE Attach the stands in such a way that the operation panel (4) on the dryer unit will be face up when the dryer is raised into its standing position. Attach the stands in such a way that the holes in the stands face inwards; they will be used to attach the support stay. 6. When the stands are attached to the dryer unit, lift the whole dryer into the upright position, standing on its feet. How to assemble the dryer ENWW Assembly procedure 7
-
 1
1 -
2
-
3
-
4
-
5
-
 6
6 -
 7
7 -
 8
8 -
 9
9 -
 10
10 -
 11
11 -
 12
12 -
 13
13 -
 14
14 -
 15
15 -
 16
16 -
17
-
18
-
19
-
20
-
21
-
22
-
23
-
24
-
25
-
26
-
27
-
28
-
29
-
30
-
31
-
32
-
33
-
34
 |
 |

5.
Secure the stands (1) to the dryer unit (2) with the knobs (3) (two at each side) as shown below.
NOTE
Attach the stands in such a way that the operation panel (4) on the dryer unit will
be face up when the dryer is raised into its standing position.
Attach the stands in such a way that the holes in the stands face inwards; they will be
used to attach the support stay.
6.
When the stands are attached to the dryer unit, lift the whole dryer into the upright position,
standing on its feet.
ENWW
Assembly procedure
7
How to assemble the dryer