HP Designjet 4500 HP Designjet 45XX mfp/45XX HD Scanner series - Quick Referen - Page 29
Use the auto-naming feature, Scan the documents - scanner series
 |
View all HP Designjet 4500 manuals
Add to My Manuals
Save this manual to your list of manuals |
Page 29 highlights
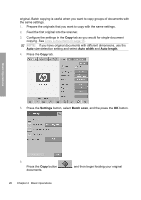
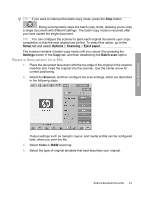
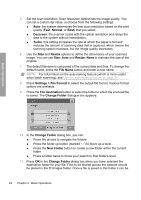
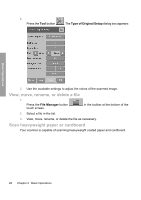
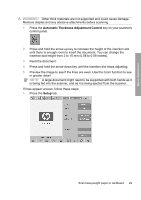
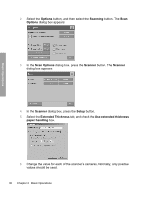
Basic Operations 4. Select the destination folder that you want to access. 5. Press the OK button. NOTE: The scanner system provides a shared folder (D:\images) that can be accessed from other computers on the network. For security reasons, no other folders in the scanner system can be accessed by a computer on the network. Therefore, if you want scanned files to be accessible from other computers on the network, you must save them in D:\images. For more information on accessing the shared folder, see Access the shared folder from my computer on page 34. Perform a batch scan Batch scanning means processing more than one original document in one session, without adjusting any settings and without having to press the Scan button for each original. Batch scanning is useful when you want to scan groups of documents with the same settings. Use the auto-naming feature When you batch scan documents, the scanner saves each document as an individual file and names each file according to the default naming convention, which is composed of the current date and time. However, the auto-naming feature allows you to define how the documents are named when they are scanned to file. To configure the auto-naming feature, press the File name button in the Scan tab before starting to scan, and then enter a filename followed by the suffix: "". This suffix tells the system to add a number to the end of each filename, and to increase the number by an increment of one for each document scanned. The amount of characters in the number is equal to the number of "#" characters you have in the suffix. For example, if you enter the file name "new_image", the system creates files new_image001, new_image002, new_image003, and so on, for each original document scanned. Use the Insert counter button to insert the suffix: "". NOTE: The system examines the file-destination folder and begins numbering after the last number in a series of file names, to avoid overwriting any files already in the folder. For example, if you enter the file name "new_image", and the file-destination folder already contains files named "new_image001" and "new_image002", the system saves the new files starting at "new_image003". Scan the documents 1. Prepare the originals that you want to scan with the same settings. 2. Feed the first original into the scanner. 3. Configure the settings in the Scan tab as you would for single-document scanning. See Scan a document to a file on page 21. NOTE: If you have original documents with different dimensions, use the Auto size-detection setting and select Auto width and Auto length. Perform a batch scan 25
-
 1
1 -
2
-
3
-
4
-
5
-
6
-
7
-
8
-
9
-
10
-
11
-
12
-
13
-
14
-
15
-
16
-
17
-
18
-
19
-
20
-
21
-
22
-
23
-
 24
24 -
 25
25 -
 26
26 -
 27
27 -
 28
28 -
 29
29 -
 30
30 -
 31
31 -
 32
32 -
 33
33 -
 34
34 -
35
-
36
-
37
-
38
-
39
-
40
-
41
-
42
-
43
-
44
-
45
-
46
-
47
-
48
-
49
-
50
-
51
-
52
-
53
-
54
-
55
-
56
-
57
-
58
-
59
-
60
-
61
-
62
-
63
-
64
 |
 |