HP DeskJet Ink Advantage 4670 Getting Started Guide - Page 19
Solve fax problems
 |
View all HP DeskJet Ink Advantage 4670 manuals
Add to My Manuals
Save this manual to your list of manuals |
Page 19 highlights
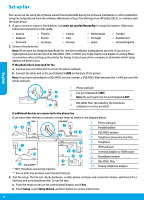
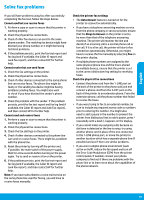
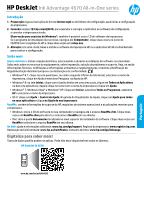
English Solve fax problems If you still have problems using fax after successfully completing the fax test, follow the steps below: Cannot send but can receive faxes 1. Perform a copy or scan to ensure that the printer is working properly. 2. Check the physical fax connections. 3. Check if other fax devices can send to the same phone number. The receiving fax device might have blocked your phone number, or it might be having technical problems. 4. If the problem persists, print the fax test report and fax log (and if available, the Caller ID report and Junk Fax report), and then contact HP for further help. Cannot receive but can send faxes 1. Check the fax settings on the printer. 2. Check the physical fax connections. 3. Check if other devices connected to the same phone line can receive faxes. The phone line might be faulty or the sending fax device might be having problems sending faxes. You might also want to check if you have blocked the sender's phone number. 4. Check the problem with the sender. If the problem persists, print the fax test report and fax log (and if available, the Caller ID report and Junk Fax report), and then contact HP for further help. Cannot send and receive faxes 1. Perform a copy or scan to ensure that the printer is working properly. 2. Check the physical fax connections. 3. Check the fax settings on the printer. 4. Check if other devices connected to this phone line can send or receive faxes. There might be a problem with the phone line. 5. Reset the printer by turning off the printer and, if possible, the main switch of the power supply. Wait for a few seconds before turning on the power again. Try to send or receive a fax on the printer. 6. If the problem persists, print the fax test report and fax log (and if available, the Caller ID report and Junk Fax report), and then contact HP for further help. Note: If you have subscribed to a voice mail service on the same phone line used for faxing, you will have to receive faxes manually. Check the printer fax settings •• The Auto Answer feature is turned on for the printer to receive fax automatically. •• If you have a telephone answering machine service from the phone company or service provider, ensure that the Rings to Answer on the printer is set to be more than that of the telephone answering machine. The printer will monitor the line and decide if an incoming call is a normal phone call or fax call. If it is a fax call, the printer will start a fax connection automatically. Otherwise, you might have to receive the fax manually by selecting Fax on the printer display. •• If multiple phone numbers are assigned to the same physical phone line and the line is shared by multiple devices, ensure that the printer is set to the correct distinctive ring setting for receiving faxes. Check the physical fax connections •• Connect the phone cord from the 1-LINE port on the back of the printer to the phone wall jack and connect a phone cord from the 2-EXT port on the back of the printer to an extension phone. From the extension phone, call the phone number that failed to receive the faxes. •• If you were trying to fax to an external number, be sure to include any required access code or numbers prior to entering the number. You might also need to add a pause in the number to prevent the printer from dialing too fast; to add a pause, press * repeatedly until a dash (-) appears on the display. •• If you cannot make any outgoing calls because no dial tone is detected or the line is noisy, try using another phone cord in place of the one connected to the 1-LINE phone port, or move the printer to another location which has a separate phone line (if possible) and see if there are similar problems. •• If you are in a digital phone environment (such as fax on VoIP), reduce the fax speed and turn off the Error Code Modulation (ECM) from the printer control panel. If needed, contact your phone company to find out if there are problems with the phone line or to learn more about the capabilities of the phone network. 19
-
 1
1 -
2
-
3
-
4
-
5
-
6
-
7
-
8
-
9
-
10
-
11
-
12
-
13
-
 14
14 -
 15
15 -
 16
16 -
 17
17 -
 18
18 -
 19
19 -
 20
20 -
 21
21 -
 22
22 -
 23
23 -
 24
24 -
25
-
26
-
27
-
28
-
29
-
30
 |
 |
