HP Deskjet 970c (English) Windows Network * User's Guide - C6429-90070 - Page 16
Installing the Printer Software on Windows 3.11 Clients, Program Manager File
 |
View all HP Deskjet 970c manuals
Add to My Manuals
Save this manual to your list of manuals |
Page 16 highlights
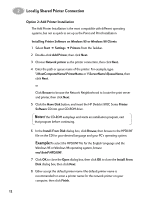
2 Locally Shared Printer Connection Installing the Printer Software on Windows 3.11 Clients If you copied the Windows 3.11 printer software to your network: (You should have copied your Windows 3.11 printer software to a network location. See page 21 for details.) 1 Select Run from the Program Manager File menu. 2 Navigate to the Windows 3.11 printer software directory on your server. 3 Double-click setup.exe and follow the on-screen instructions. or If you did not copy the Windows 3.11 printer software to your network: 1 Insert the HP DeskJet 970C Series Printer Software CD into your CD-ROM drive and select Run from the Program Manager File menu. 2 If your CD-ROM drive is drive D, enter D:\setup.exe, and click OK. If your CD- ROM drive is not drive D, enter [Your drive letter]:\setup.exe, and click OK. Then: 1 When prompted for the printer name and port, select the LPT1 port. 2 Click OK and complete the installation. 3 If prompted, restart Windows. 4 Double-click Printers from the Control Panel. 5 Select the HP DeskJet 970C Series printer and click Connect. 6 Choose the port to which the printer is connected. 7 Click Network, then browse to the queue name or share name of the server. To set up the printer as a permanent network printer on your system, check the Permanent box. 8 Click Connect. 14
-
 1
1 -
2
-
3
-
4
-
5
-
6
-
7
-
8
-
9
-
10
-
 11
11 -
 12
12 -
 13
13 -
 14
14 -
 15
15 -
 16
16 -
 17
17 -
 18
18 -
 19
19 -
 20
20 -
 21
21 -
22
-
23
-
24
 |
 |
