HP Dx2300 Hardware Reference Guide - dx 2300 MT - Page 10
Removing the Front Bezel,
 |
UPC - 883585669479
View all HP Dx2300 manuals
Add to My Manuals
Save this manual to your list of manuals |
Page 10 highlights
5. To remove the front bezel, pull outward on all three tabs on the left side of the bezel (1) then rotate the bezel off the chassis (2), beginning with the left side then the right side. Figure 2-2 Removing the Front Bezel NOTE: To replace the front bezel, insert the three hooks on the right side of the bezel into the rectangular holes on the chassis then rotate the bezel into place so that the catches on the three tabs on the left side of the bezel snap into place on the chassis. 4 Chapter 2 Hardware Upgrades ENWW
-
 1
1 -
2
-
3
-
4
-
 5
5 -
 6
6 -
 7
7 -
 8
8 -
 9
9 -
 10
10 -
 11
11 -
 12
12 -
 13
13 -
 14
14 -
 15
15 -
16
-
17
-
18
-
19
-
20
-
21
-
22
-
23
-
24
-
25
-
26
-
27
-
28
-
29
-
30
 |
 |

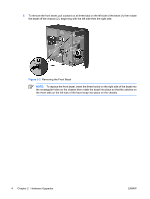
5.
To remove the front bezel, pull outward on all three tabs on the left side of the bezel (1) then rotate
the bezel off the chassis (2), beginning with the left side then the right side.
Figure 2-2
Removing the Front Bezel
NOTE:
To replace the front bezel, insert the three hooks on the right side of the bezel into
the rectangular holes on the chassis then rotate the bezel into place so that the catches on
the three tabs on the left side of the bezel snap into place on the chassis.
4
Chapter 2
Hardware Upgrades
ENWW