HP ENVY 750-400 Memory Module Replacement Instructions - Page 3
Replacing the memory module
 |
View all HP ENVY 750-400 manuals
Add to My Manuals
Save this manual to your list of manuals |
Page 3 highlights
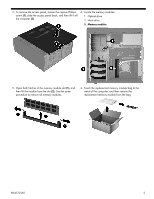
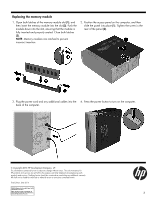
Replacing the memory module 1. Open both latches of the memory module slot (1), and then insert the memory module into the slot (2). Push the module down into the slot, ensuring that the module is fully inserted and properly seated. Close both latches (3). NOTE: Memory modules are notched to prevent incorrect insertion. 2. Position the access panel on the computer, and then slide the panel into place (1). Tighten the screw in the rear of the panel (2). 3. Plug the power cord and any additional cables into the 4. Press the power button to turn on the computer. back of the computer. © Copyright 2016 HP Development Company, L.P. The information contained herein is subject to change without notice. The only warranties for HP products and services are set forth in the express warranty statements accompanying such products and services. Nothing herein should be construed as constituting an additional warranty. HP shall not be liable for technical or editorial errors or omissions contained herein. First Edition: June 2016 PRINTER: Replace this bo x with Pr inted- In (PI) Statement(s) as p er sp ec. 863070-001 NOTE: This box is simply a placeholder. PI Statement(s) do n ot ha ve to fit insid e the b ox but sh ould be placed in this area . 3
-
 1
1 -
 2
2 -
 3
3
 |
 |
