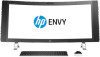
HP ENVY Curved 34-a100 Setup Instructions - Page 1
HP ENVY Curved 34-a100 Manual
 |
View all HP ENVY Curved 34-a100 manuals
Add to My Manuals
Save this manual to your list of manuals |
Page 1 highlights
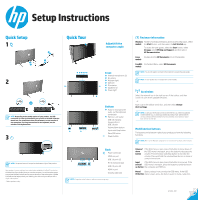
Setup Instructions Quick Setup 1 3 3 2 1 Quick Tour Adjust/tilt the computer angle 2 6 OR NOTE: Depending on the model number of your product, the USB transceiver is either preinstalled in your product or located inside the mouse box. For setup instructions for the mouse, see the outside of the mouse box. For setup instructions for the keyboard, see the outside of the keyboard box. 8 3 1 23451 Front 1 Internal microphones (2) 2 IR camera 3 Webcam light 4 Webcam 6 5 IR projector 6 Speakers (2) 7 Power light 7 9 -q wer t Bottom 8 Audio-in (microphone)/ audio-out (headphone) combo jack 9 Memory card reader - USB 3.0 charging (powered) port q USB 3.0 port w Volume/down button e Input switch/up button r Menu/OK button t Power button NOTE: The power button is located on the bottom-right of the product. Your product is protected by a free subscription to McAfee LiveSafe™ service for a limited time from the first time you use the computer. You will have the option to purchase McAfee LiveSafe service upon expiration of the subscription. McAfee LiveSafe service helps protect your identity, your data, and your devices with a single subscription.* * Select products only. y u iop a s Back y Power connector u HDMI-out port i USB 3.0 ports (2) o RJ-45 (network) jack p USB 2.0 ports (2) a HDMI-in port s Security cable slot NOTE: Computer color, features, and accessories may vary. Find more information Windows To learn more about Windows and to access help topics, select models the Start button, and then select the Get Started app. To access the user guides, select the Start button, select All apps, select HP Help and Support, and then select HP Documentation. Linux Double-click the HP Documents icon on the desktop. models FreeDOS On the Boot Menu, select HP Documents. models NOTE: You do not need to connect to the Internet to access the user guides. NOTE: A User Guides disc is included with some models. Go wireless Select the network icon in the right corner of the taskbar, and then connect to one of the available networks. - or - Type wifi in the taskbar search box, and then select Change Wi-Fi settings. NOTE: To set up a WLAN and connect to the Internet, you need a broadband modem (either DSL or cable) (purchased separately), high-speed Internet service purchased from an Internet service provider, and a wireless router (purchased separately). Multifunction buttons The buttons on the bottom-right of your product perform the following functions: NOTE: Refer to the Bottom components section for the location of the buttons. Volume/ down button If the OSD menu is open, press the button to move down. If the OSD menu is not open, press the button to decrease the volume. Press the input switch/up button to increase the volume. Press and hold the volume/down button to mute or unmute the volume. Input If the OSD menu is open, press the button to move up. If the switch/ OSD menu is not open, press the button to switch between up button the computer and HDMI-in. Menu/ Opens, selects from, or exits the OSD menu. If the OSD OK button menu is open, press the button again to make a selection. 823851-002
-
 1
1 -
 2
2
 |
 |
