HP ENVY TouchSmart 17-j030us HP ENVY 17 Notebook PC HP ENVY TouchSmart m7 Note - Page 88
Reverse this procedure to install the WLAN antenna cables., from the left
 |
View all HP ENVY TouchSmart 17-j030us manuals
Add to My Manuals
Save this manual to your list of manuals |
Page 88 highlights
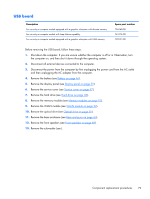
▲ Remove the WLAN antenna transceivers (1), and then remove the cables (2) from the left and right sides of the hinge. Reverse this procedure to install the WLAN antenna cables. 78 Chapter 6 Removal and replacement procedures for Authorized Service Provider parts
-
 1
1 -
2
-
3
-
4
-
5
-
6
-
7
-
8
-
9
-
10
-
11
-
12
-
13
-
14
-
15
-
16
-
17
-
18
-
19
-
20
-
21
-
22
-
23
-
24
-
25
-
26
-
27
-
28
-
29
-
30
-
31
-
32
-
33
-
34
-
35
-
36
-
37
-
38
-
39
-
40
-
41
-
42
-
43
-
44
-
45
-
46
-
47
-
48
-
49
-
50
-
51
-
52
-
53
-
54
-
55
-
56
-
57
-
58
-
59
-
60
-
61
-
62
-
63
-
64
-
65
-
66
-
67
-
68
-
69
-
70
-
71
-
72
-
73
-
74
-
75
-
76
-
77
-
78
-
79
-
80
-
81
-
82
-
 83
83 -
 84
84 -
 85
85 -
 86
86 -
 87
87 -
 88
88 -
 89
89 -
 90
90 -
 91
91 -
 92
92 -
 93
93 -
94
-
95
-
96
-
97
-
98
-
99
-
100
-
101
-
102
-
103
-
104
-
105
-
106
-
107
-
108
-
109
-
110
-
111
-
112
-
113
-
114
-
115
-
116
-
117
-
118
-
119
-
120
-
121
-
122
-
123
-
124
-
125
-
126
-
127
-
128
-
129
-
130
 |
 |

▲
Remove the WLAN antenna transceivers
(1)
, and then remove the cables
(2)
from the left and
right sides of the hinge.
Reverse this procedure to install the WLAN antenna cables.
78
Chapter 6
Removal and replacement procedures for Authorized Service Provider parts