HP G60-458DX Service Guide - Page 85
Processor
 |
View all HP G60-458DX manuals
Add to My Manuals
Save this manual to your list of manuals |
Page 85 highlights
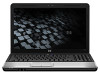
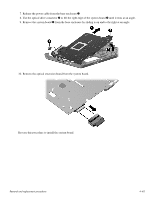
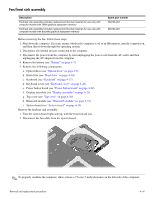
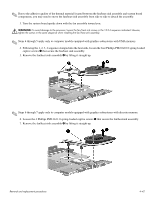
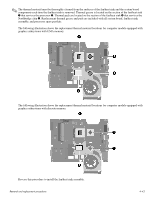
Processor ✎ The processor spare part kit includes replacement thermal material. Description Intel Core2 Duo (3-MB L2 cache) P8400, 2.26-GHz processor Intel Core2 Duo (3-MB L2 cache) P8600, 2.4-GHz processor Intel Core2 Duo (3-MB L2 cache) P7350, 2.0-GHz processor Intel Core2 Duo (6-MB L2 cache)T9400, 2.53-GHz processor Intel Pentium (1-MB L2 cache) T3200, 2.0-GHz processor Intel Pentium (1-MB L2 cache) T3400, 2.16-GHz processor Intel Pentium (2-MB L2 cache) T5800, 2.0-GHz processor Intel Pentium (2-MB L2 cache) T5900, 2.2-GHz processor Intel Celeron-M (1-MB L2 cache) 575, 2.0-GHz processor Intel Celeron-M (1-MB L2 cache) 585, 2.16-GHz processor Intel Celeron (1-MB L2 cache) T1600, 1.66-GHz processor Intel Celeron (1-MB L2 cache) T1700, 1.86-GHz processor AMD Turion Ultra Dual-Core (2-MB L2 cache) ZM-80 2.1-GHz processor AMD Turion Ultra Dual-Core (2-MB L2 cache) ZM-82 2.2-GHZ processor AMD Turion Dual-Core (1-MB L2 cache) RM-70 20-GHz processor AMD Turion Dual-Core (1-MB L2 cache) RM-72 2.1-GHz processor AMD Athlon X2 dual-Core (1-MB L2 cache) QL_60 1.9-GHz processor AMD Athlon X2 dual-Core (1-MB L2 cache) QL-62 2.0-GHz processor AMD Sempron Single Core (512-KB L2 cache) SI-42 2.1-GHz processor AMD Sempron Single Core (512-KB L2 cache) SI-40 2.0-GHz processor Spare part number 490111-001 490112-001 501520-001 490113-001 490115-001 501523-001 501521-001 501522-001 490116-001 490117-001 501524-001 501525-001 498465-001 498466-001 498467-001 498468-001 498469-001 498470-001 498471-001 498472-001 Before removing the processor, follow these steps: 1. Shut down the computer. If you are unsure whether the computer is off or in Hibernation, turn the computer on, and then shut it down through the operating system. 2. Disconnect all external devices connected to the computer. 3. Disconnect the power from the computer by first unplugging the power cord from the AC outlet and then unplugging the AC adapter from the computer. 4. Remove the following components: a. Remove the battery (see "Battery" on page 4-7). b. Optical drive (see "Optical drive" on page 4-8) c. Hard drive (see "Hard drive" on page 4-10) d. Keyboard (see "Keyboard" on page 4-17) e. Keyboard cover (see "Keyboard cover" on page 4-20) f. Power button board (see "Power button board" on page 4-22) Removal and replacement procedures 4-44
-
 1
1 -
2
-
3
-
4
-
5
-
6
-
7
-
8
-
9
-
10
-
11
-
12
-
13
-
14
-
15
-
16
-
17
-
18
-
19
-
20
-
21
-
22
-
23
-
24
-
25
-
26
-
27
-
28
-
29
-
30
-
31
-
32
-
33
-
34
-
35
-
36
-
37
-
38
-
39
-
40
-
41
-
42
-
43
-
44
-
45
-
46
-
47
-
48
-
49
-
50
-
51
-
52
-
53
-
54
-
55
-
56
-
57
-
58
-
59
-
60
-
61
-
62
-
63
-
64
-
65
-
66
-
67
-
68
-
69
-
70
-
71
-
72
-
73
-
74
-
75
-
76
-
77
-
78
-
79
-
 80
80 -
 81
81 -
 82
82 -
 83
83 -
 84
84 -
 85
85 -
 86
86 -
 87
87 -
 88
88 -
 89
89 -
 90
90 -
91
-
92
-
93
-
94
-
95
-
96
-
97
-
98
-
99
-
100
-
101
-
102
-
103
-
104
-
105
-
106
-
107
-
108
-
109
-
110
-
111
-
112
-
113
-
114
-
115
-
116
-
117
-
118
-
119
-
120
-
121
-
122
-
123
-
124
-
125
-
126
-
127
-
128
-
129
-
130
-
131
-
132
-
133
-
134
-
135
-
136
-
137
-
138
 |
 |