HP Indigo W7250 Electrometer Board Test
HP Indigo W7250 Manual
 |
View all HP Indigo W7250 manuals
Add to My Manuals
Save this manual to your list of manuals |
HP Indigo W7250 manual content summary:
- HP Indigo W7250 | Electrometer Board Test - Page 1
Digital Press, HP Indigo WS6000 Digital Press, HP Indigo WS6000p Digital Press, HP Indigo WS6600 Digital Press, HP Indigo WS6600p Digital Press, HP Indigo WS6800 Digital Press, HP Indigo 6r Digital Press, HP Indigo 6900 Digital Press, HP Indigo 8000 Digital Press, HP Indigo W7200 Digital Press, HP - HP Indigo W7250 | Electrometer Board Test - Page 2
Board Test...13 Probe Test Procedure ...14 End of Probe Test...25 3 Appendix A - Illustrations ...26 4 Revision history and confidentiality notice ...28 Revision history ...28 Printing instructions ...28 Confidentiality notice...28 ii - HP Indigo W7250 | Electrometer Board Test - Page 3
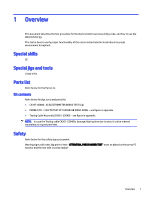
probe, and how to use the electrometer jig. This test is done to verify proper functionality of the electrometer board in stand-alone (no press environment disruption). Special skills CE Special jigs and tools Listed in kit. Parts list Refer below for the Parts List. Kit contents Refer below - HP Indigo W7250 | Electrometer Board Test - Page 4
2 Chapter 1 Overview - HP Indigo W7250 | Electrometer Board Test - Page 5
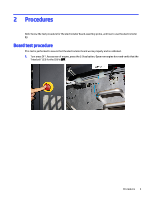
use the electrometer jig Board test procedure This test is performed to assure that the electrometer board works properly and is calibrated. 1. Turn press OFF. Access rear of engine, press the E-Stop button. Open rear engine door and verify that the "Interlock" LED for the CRU is OFF. Procedures 3 - HP Indigo W7250 | Electrometer Board Test - Page 6
2. Use a DC Voltmeter (Fluke) to verify a 0V (zero) in pins 1 and 3 of the electrometer board Molex connector CP2 (expected results = 0V). 4 Chapter 2 Procedures - HP Indigo W7250 | Electrometer Board Test - Page 7
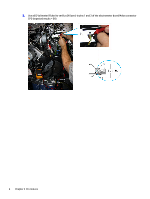
3. Disconnect the electrometer probe's CP1 D-Type plug and replace it with the testing jig. 4. In the CRU board, disconnect cable W101 from the J7 port and replace it with the testing cable (CA361-25040). IMPORTANT: Take precaution when disconnecting and connecting these cables. They can be damaged - HP Indigo W7250 | Electrometer Board Test - Page 8
a. Disconnect: b. Connect: 5. Use interlock cheater to keep the Utility Cabinet door open. Get the press to 'Stand-By' mode. 6 Chapter 2 Procedures - HP Indigo W7250 | Electrometer Board Test - Page 9
6. Connect the black banana plug of testing cable CA361-25040 to the testing jig. 7. Open the SysTab I/O Editor: Problem Handling > CE Applications > SysTab I/O Editor, at the SYSTAB-I/O find ECN_ELECTROMETER POWER, double-click to activate it and set it as 'Hard Override'. Board test procedure 7 - HP Indigo W7250 | Electrometer Board Test - Page 10
8. Set the electrometer board power to ON by typing [-1] in the Set field and press Set to activate it. 9. Use a DC Voltmeter (Fluke) to verify a 24V (twenty four) in pins 1 and 3 of the electrometer board Molex connector CP2 (expected results = - HP Indigo W7250 | Electrometer Board Test - Page 11
NOTE: If needed, adjust gauge at 'P1' using small flat screwdriver. 11. Set the electrometer board power to OFF by typing [0] at the Reset field and pressing Reset to activate it. 12. Disconnect the black banana plug from the testing jig. Board test procedure 9 - HP Indigo W7250 | Electrometer Board Test - Page 12
13. Connect the testing cable's (CA361-25040) red banana plug to the testing jig. 14. In Systab I/O, set the electrometer board power to ON by typing [-1] in the Set field and press Set to activate it. 10 Chapter 2 Procedures - HP Indigo W7250 | Electrometer Board Test - Page 13
15. From the press UI: Element Activation > Charge Roller, activate the charge roller voltage. 16. Check the 'Charge roller voltage' value as follows: ■ Use a DC Voltmeter (Fluke) to verify - HP Indigo W7250 | Electrometer Board Test - Page 14
17. From the press UI: Element Activation > Charge Roller, deactivate the charge roller voltage. 12 Chapter 2 Procedures - HP Indigo W7250 | Electrometer Board Test - Page 15
by typing [0] at the Reset field and pressing Reset to activate it. 19. Get the press to 'OFF' state and press the nearby E-Stop button. 20. In within specification, then board is calibrated and functioning properly. If not, replace the board. If electrometer board is in order, but problem remains, - HP Indigo W7250 | Electrometer Board Test - Page 16
probe. 1. Discharged PIP Test Procedure: Turn the electrometer board ON (Via Systab I/O) as follows: a. Get the press to 'Stand-By' mode. b. Open the SysTab I/O Editor: Problem Handling > CE Applications > SysTab I/O Editor. At the SYSTAB- I/O find: 'ECN_ELECTROMETER POWER', double-click to activate - HP Indigo W7250 | Electrometer Board Test - Page 17
Normal and then touch the Motor button to activate motor. e. Engage the PIP drum. From the press UI: (Element Activation > Drums Tab > PIP), select Engage. Do the following: i. From press UI: Element Activation > Motors Tab, touch the Cleaning station button to activate the cleaning station. ii - HP Indigo W7250 | Electrometer Board Test - Page 18
iii. In the Liquids tab, touch the CS Pump. iv. In the press UI: (Element activation -> Charge roller -> Electrometer), read the value in Electrometer field. Accepted results (Electrometer field): V≤ 50. 16 Chapter 2 Procedures - HP Indigo W7250 | Electrometer Board Test - Page 19
the Motors Tab, touch the Cleaning station button to deactivate the cleaning station. g. Disengage the PIP drum. From the press UI: (Element Activation > Drums Tab > PIP), press Disengage. h. Stop the motor by clicking the motor button. See step d above for reference. 2. Charged PIP Test Procedure - HP Indigo W7250 | Electrometer Board Test - Page 20
SysTab I/O Editor: Problem Handling > CE Applications > SysTab I/O Editor. At the SYSTABI/O find: 'ECN_ELECTROMETER POWER', double-click to activate it and set it as 'Hard Override'. c. In Systab I/O, set the electrometer board power to ON by typing [-1] in the Set field and press Set to activate - HP Indigo W7250 | Electrometer Board Test - Page 21
3. From the press UI: (Element Activation > Motors Tab > Main Motor), select Normal and then touch the Motor button to activate motor. 4. From the press UI: (Element Activation > Drums Tab > PIP), select Engage. 5. Activate the Cleaning station oil pump. Probe Test Procedure 19 - HP Indigo W7250 | Electrometer Board Test - Page 22
a. From press UI: Element Activation > Motors Tab, touch the Cleaning station button to activate the cleaning station. b. In the Liquids tab, touch the Pump, then touch the Filtered Oil Pump. Wait ~ 3 to 5 seconds, the cleaning station pump will be enabled. 20 Chapter 2 Procedures - HP Indigo W7250 | Electrometer Board Test - Page 23
c. In the Liquids tab, touch the CS Pump. 6. Turn ON the Charge Roller DC voltage as follows: a. From the press UI: (Element Activation > Charge Roller Tab), touch the Voltage button. b. Turn ON the Charge Roller AC voltage from the SYSTAB-I/O Editor. At the SYSTAB-I/O find: ' - HP Indigo W7250 | Electrometer Board Test - Page 24
● If CCR indicated on charge roller, then CR is CCR. ● If nothing indicated on charge roller, then CR is Hydrin. 7. In the press UI: (Element activation -> Charge roller -> Electrometer), read the value in Electrometer field. Accepted results: 950V ± 100V. 22 Chapter 2 Procedures - HP Indigo W7250 | Electrometer Board Test - Page 25
8. Stop the charge roller: a. Turn OFF the Charge Roller DC voltage as follows: From the press UI: (Element Activation > Charge Roller Tab), touch the Voltage button. b. Turn OFF the Charge Roller AC voltage from the SYSTAB-I/O Editor. At the SYSTAB-I/O find: ' - HP Indigo W7250 | Electrometer Board Test - Page 26
OFF (Via SYS-Tab). Set the electrometer board power to OFF by typing [0] at the Reset field and pressing Reset to activate it. 9. Deactivate the cleaning station oil pump. a. From press UI: Element Activation > Liquids tab, touch the CS Pump. b. In the Motors Tab, touch the Cleaning station button - HP Indigo W7250 | Electrometer Board Test - Page 27
motor. End of Probe Test If results of probe are within specification, then probe is functioning properly. ● If not, try cleaning the probe. ● If cleaning the probe did not help, replace the probe. Cleaning the probe: 1. Get press to OFF mode. 2. Disassemble/disconnect the probe and remove from the - HP Indigo W7250 | Electrometer Board Test - Page 28
3 Appendix A - Illustrations Refer below for the Illustrations. Figure 3-1 Figure 1: Power connector and calibration potentiometers 26 Chapter 3 Appendix A - Illustrations - HP Indigo W7250 | Electrometer Board Test - Page 29
Figure 3-2 Figure 2: Electrometer testing jig ASSY - 0960-4096 Figure 3-3 Figure 3: cable CA361-25040 Figure 3-4 Figure 4: Electrometer board ASSY - CA345-03702 Appendix A - Illustrations 27 - HP Indigo W7250 | Electrometer Board Test - Page 30
Responsible Engineer (TS) Press Group Manager DFE Group Manager Ziv Namer / Monica Dal Boni Printing instructions Follow these recommendations to achieve the best print 27 x 11.00 in (21 x 27.94 cm) Office printer Duplex Full color Staple at top-left corner Confidentiality notice The information - HP Indigo W7250 | Electrometer Board Test - Page 31
be copied, reproduced or distributed in any form or medium, or disclosed to any third party in any manner, without prior written authorization of HP. The copyright notice, which appears in this document, is purely precautionary and shall not be deemed to constitute publication or intent to publish
-
 1
1 -
 2
2 -
 3
3 -
 4
4 -
 5
5 -
 6
6 -
 7
7 -
8
-
9
-
10
-
11
-
12
-
13
-
14
-
15
-
16
-
17
-
18
-
19
-
20
-
21
-
22
-
23
-
24
-
25
-
26
-
27
-
28
-
29
-
30
-
31
 |
 |

Electrometer Board Test
Document details
Purpose
To describe the test procedure for the electrometer board assembly and probe, as well as the usage of
the electrometer jig.
Scope
HP Indigo 7000 Digital Press, HP Indigo 7500 Digital Press, HP Indigo 7600 Digital Press, HP Indigo
7800 Digital Press, HP Indigo 7r Digital Press, HP Indigo WS6000 Digital Press, HP Indigo WS6000p
Digital Press, HP Indigo WS6600 Digital Press, HP Indigo WS6600p Digital Press, HP Indigo WS6800
Digital Press, HP Indigo 6r Digital Press, HP Indigo 6900 Digital Press, HP Indigo 8000 Digital Press, HP
Indigo W7200 Digital Press, HP Indigo W7250 Digital Press.
Document number
CA393-10200
Revision number
02
Kit number
CA397-06880
Date
19 July 2018
Related ECO
N/A
Security level
HP Confidential
The information contained in this document is accurate at the date of release.
Check Knowledge Zone on PrintOS for the most recent version of this document.
i