HP Integrity rx1600 Smart Array (A9890A) Cable Routing - Page 1
HP Integrity rx1600 Manual
 |
View all HP Integrity rx1600 manuals
Add to My Manuals
Save this manual to your list of manuals |
Page 1 highlights
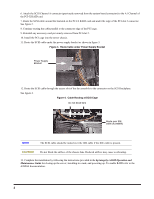
Smart Array (A9890A) Cable Routing The purpose of this document is to provide cable routing information when a Smart Array PCI-X RAID card (A9890A) is used to drive the embedded hard disk drives. The existing SCSI cable connected to the Channel A connector on the system board is relocated to the Channel A connector on the Smart Array PCI-X card installed in slot 1 (full-length slot) of the PCI cage. The SCSI cable is routed from the PCI cage under the power supply bracket and over the IDE cable, if installed, avoiding blocking the airflow of the chassis fans. Refer to the hp integrity rx1600 Operation and Maintenance Guide for detailed instructions on powering down the server, extending the server from a rack, and removing and replacing covers and components. 1. Disconnect the SCSI cable from the Channel A connector on the system board by pulling on the cable release strap. See figure 1. Figure 1. SCSI Channel A Connector on System Board Channel A connector NOTE If an optional management processor card is installed in the server, follow the instructions provided in the hp integrity rx1600 Operation and Maintenance Guide to remove the card, allowing access to the Channel A connector. Reinstall the card after the SCSI cable has been disconnected. 2. Remove the PCI cage from the server. 3. Remove any accessory card installed in PCI slot 2 (half-length slot). 4. Install the Smart Array PCI-X RAID card (A9890A) in PCI slot 1 (full-length slot). 5. Orient the PCI cage with the installed PCI-X RAID card component-side-up allowing routing of the SCSI cable. See figure 2. Figure 2. Cable Routing on Smart Array Card and PCI Cage Under slot 2 connector Exit parallel to connector Around heatsink v1 February 2004 Printed in the U.S.A. Channel A1
-
 1
1 -
 2
2
 |
 |
