HP Integrity rx8620 Installation (Smart Setup) Guide, Windows Server 2008, v6. - Page 45
Install from PXE, Install, Close, Start > Administrative Tools > Services, SNMP Service
 |
View all HP Integrity rx8620 manuals
Add to My Manuals
Save this manual to your list of manuals |
Page 45 highlights
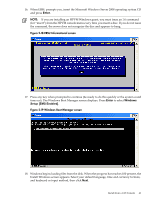
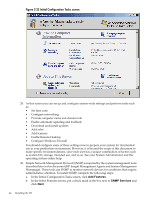
c. In the Confirm Selection screen, click Install. d. When the installation finishes, click Close to exit back to the Initial Configuration Tasks screen. Then click Close again. e. Restart the system. NOTE: Another way to install SNMP is from the command prompt, by entering: ServerManagerCmd.exe -install SNMP-Service, and then restarting the system. With this method you must still configure the service, as described in the next step. 31. After the system restarts, configure SNMP by completing the following steps: a. From the Windows Desktop, select Start > Administrative Tools > Services. b. In the Services window, right-click SNMP Service and click Properties. c. In the Properties window, click on the Security tab. d. In the Security tab, click Add to add a Community string. Name the string and assign it access rights depending on your system requirements. e. Click Apply, and then OK twice to apply the change. f. Exit the Services window. 32. Installation of the OS is complete. After installing the operating system, perform these tasks next: • "Install the Integrity Support Pack (ISP)" (page 61) • "Activate the OS" (page 50) • "Apply OS Updates Using the Smart Update Media" (page 53) • "Enable Windows Components" (page 54) • "Verify System Device Drivers and Register for Updates" (page 55) • See if you need to perform any additional tasks described here: "Miscellaneous Installation Issues" (page 56) Then go to the sections describing configuration of the management tools, and perform these tasks: • "Configure System Management Homepage" (page 64) • "Configure the Management Agents" (page 66) • "Verify Installation of the nPartition Management Tools" (page 72) Install from PXE When a PXE-enabled client connected to the network boots up, the computer initiates a network service request. A DHCP discover packet is sent to the network requesting the IP address of an available WDS server. The DHCP server responds to the request by providing an IP address to the client. Any available WDS server can respond with its IP address, and the name of the boot file the client should request if the client selects that WDS server for service. Support for PXE/WDS installations is limited to the HP Integrity servers listed in the following table. Table 2-1 Integrity servers supporting PXE/WDS installations Server rx2660, rx3600, rx6600, BL860c, BL870c, rx7620, rx7640, rx8620, rx8640 Superdome (sx1000 and sx2000) PXE/WDS support Yes Yes To install Windows Server 2008 from PXE, complete the following steps: 1. From EFI, select the Boot Manager. Install from PXE 45
-
 1
1 -
2
-
3
-
4
-
5
-
6
-
7
-
8
-
9
-
10
-
11
-
12
-
13
-
14
-
15
-
16
-
17
-
18
-
19
-
20
-
21
-
22
-
23
-
24
-
25
-
26
-
27
-
28
-
29
-
30
-
31
-
32
-
33
-
34
-
35
-
36
-
37
-
38
-
39
-
 40
40 -
 41
41 -
 42
42 -
 43
43 -
 44
44 -
 45
45 -
 46
46 -
 47
47 -
 48
48 -
 49
49 -
 50
50 -
51
-
52
-
53
-
54
-
55
-
56
-
57
-
58
-
59
-
60
-
61
-
62
-
63
-
64
-
65
-
66
-
67
-
68
-
69
-
70
-
71
-
72
-
73
-
74
-
75
-
76
-
77
-
78
-
79
-
80
-
81
-
82
-
83
-
84
-
85
-
86
-
87
-
88
-
89
-
90
-
91
-
92
-
93
-
94
-
95
-
96
-
97
-
98
-
99
-
100
-
101
-
102
-
103
-
104
-
105
-
106
-
107
-
108
-
109
-
110
-
111
-
112
-
113
-
114
 |
 |
