HP LH3000r HP Netserver LH Pro Installation Road Map - Page 4
Install Additional Mass Storage Devices, Con the HP NetServer and, Install Additional ISA
 |
View all HP LH3000r manuals
Add to My Manuals
Save this manual to your list of manuals |
Page 4 highlights
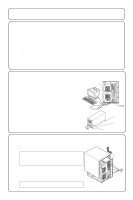
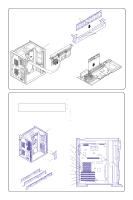
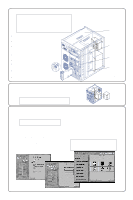
6 Install Additional Mass Storage Devices NOTE If you are installing an IDE drive or SCSI devices with certain configurations, you will need additional cables or adapters. For configuration information, see the Technical Information Label on the side of the chassis or Information Assistant on the HP Navigator CD-ROM. For part numbers for HP cables, adapters, and trays, see the technical information labels on the top and side of chassis. Shelf 3 ! A SCSI, IDE or flexible disk drive can be installed in Shelf 3. ! If you are installing a narrow (50-pin) SCSI device, it can be cabled with the CD-ROM in Shelf 2. ! If you are installing a SCSI device, set the jumpers on the device to an unused address (the CD-ROM drive is set to SCSI address 5.) Do not terminate device if using NetServer cable. ! All devices must be installed in mass storage trays. Hot Swap Subsystem ! All devices must be installed in mass storage trays. ! Unlock the hot swap subsystem using the same key used to unlock the NetServer cover. The key is located in the keybag attached to the rear of the HP NetServer. ! Cabling configuration diagrams of the hot swap subsystem are shown on the Technical Information Label on the side of the chassis and in Information Assistant. ! SCSI address setting information is in Information Assistant and the HP NetServer LH Pro User Guide. Technical Information Label (on top of chassis) Shelf 3 (No tray provided) Key Lock Technical Information Label with cabling configuration information 7 (Optional) Install Redundant Power Supply Install the redundant power supply by following the instructions included with the power supply. CAUTION To ensure proper cooling either two power supplies or one power supply and one fan must be installed at all times. 8 Configure the HP NetServer and Install Additional ISA Boards NOTE Do not install ISA boards until instructed by the Configuration Assistant program. 1. Reassemble the HP NetServer and connect the power cord. 2. Turn on the HP NetServer and monitor. 3. If the HP NetServer Navigator CD-ROM is not loaded in the CD-ROM drive, insert the CD-ROM into the CD-ROM drive now and press the Reset button on the front of the server. The HP NetServer automatically boots from the HP NetServer Navigator CD-ROM. If an error message appears, ignore it and press the F1 key. If an error message appears in Configuration Assistant, press F10 to continue. 4. Go to the HP NetServer Navigator Main Menu and select "Configuration Assistant." 5. Recommended: If you have installed all accessories except the ISA boards, go to the Express Configuration Menu. Follow the instructions on the screen to configure your HP NetServer. You are finished with the Installation Road Map. Follow the instructions in Configuration Assistant to continue your NetServer installation. NOTE If you are installing one accessory at a time, go to the Custom Configuration Menu and select the Help button. Follow the instructions on the screen to configure your HP NetServer. Repeat configuration process for each accessory.
-
 1
1 -
 2
2 -
 3
3 -
 4
4
 |
 |
