HP LH4r HP Netserver LCII NetRAID Installation Guide - Page 40
Reboot System B, Check and Assign Cluster Drive Letters
 |
View all HP LH4r manuals
Add to My Manuals
Save this manual to your list of manuals |
Page 40 highlights
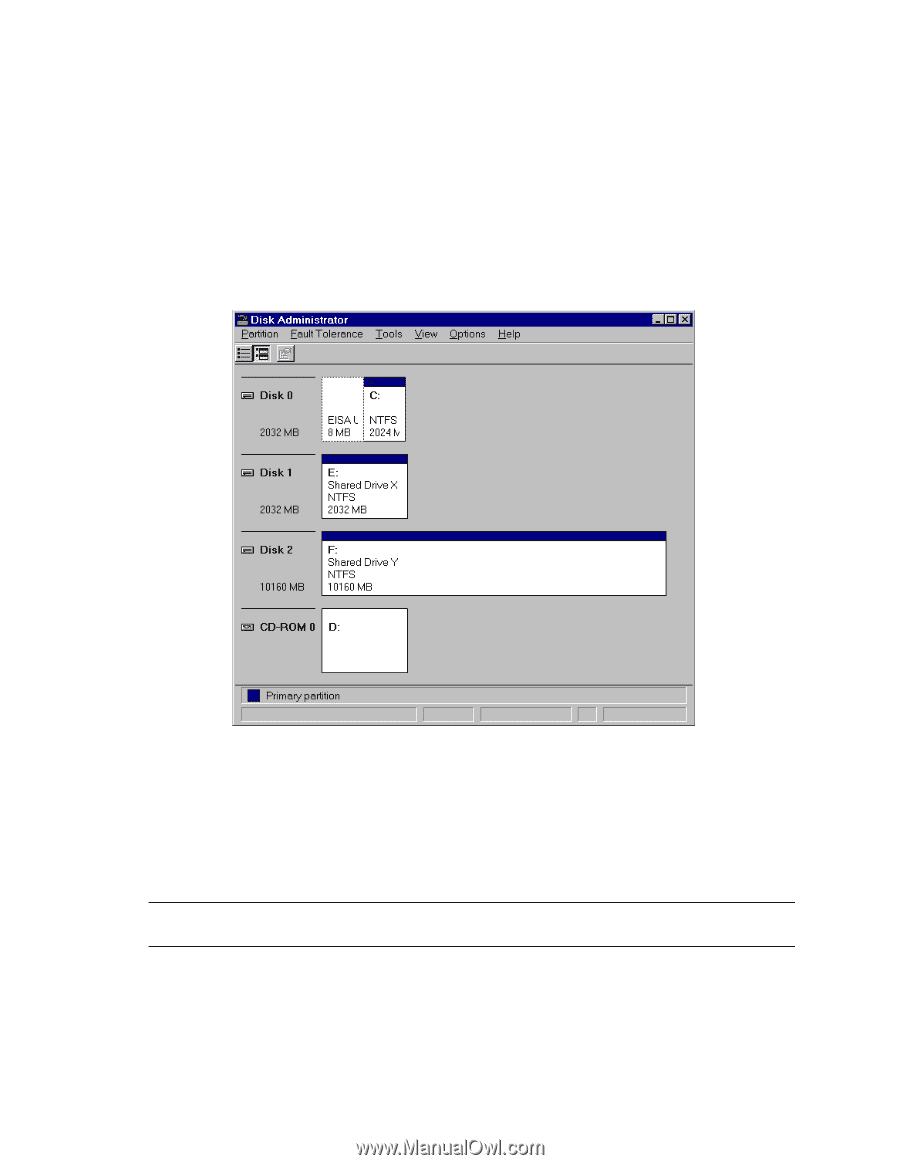
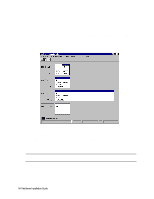
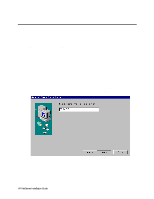
Reboot System B System B has been on hold at the loader prompt. Reboot System B now. Check and Assign Cluster Drive Letters 1. From the Windows NT Start menu, choose Programs, Administrative Tools, and then Disk Administrator. Disk Administrator scans the disk array and displays the shared disks you initialized using System A. The example display shows sequential drive letters E and F were assigned to System B drives. System B will not recognize the X and Y assignments made using System A, but they will have the same Volume Label. Disk Administrator, Scanned Drive Letters using System B 2. Click a disk box to select any disk that includes an array to be shared by the cluster. Disk Administrator highlights the selected disk. 3. Select Tools from the pull-down menu, and choose Assign Drive Letter. 4. If the drive letter for the disk box matches the drive letter assigned with System A, click OK. If the drive letter is different, select or type the drive letter that matches the System A drive letter and click OK. Disk Administrator updates the disk driver letter assignment and makes the assignment permanent. NOTE To make sure you are assigning drive letters to the correct disks compare the Volume Labels (names) you assigned using System A (for example, Shared Drive X). 5. Repeat steps 1-4 to make permanent drive letter assignments for each array initialized with System A. 6. When done, Disk Administrator will show matched drive letter assignments as in the opposite node. Exit Disk Administrator. The arrays are now fully configured for use by the cluster. HP NetServer Installation Guide 34
-
 1
1 -
2
-
3
-
4
-
5
-
6
-
7
-
8
-
9
-
10
-
11
-
12
-
13
-
14
-
15
-
16
-
17
-
18
-
19
-
20
-
21
-
22
-
23
-
24
-
25
-
26
-
27
-
28
-
29
-
30
-
31
-
32
-
33
-
34
-
 35
35 -
 36
36 -
 37
37 -
 38
38 -
 39
39 -
 40
40 -
 41
41 -
 42
42 -
 43
43 -
 44
44 -
 45
45 -
46
-
47
-
48
-
49
-
50
-
51
-
52
-
53
-
54
-
55
-
56
-
57
-
58
-
59
-
60
-
61
-
62
-
63
-
64
-
65
-
66
-
67
-
68
-
69
-
70
-
71
-
72
-
73
-
74
 |
 |