HP LH4r HP Netserver LD Pro Installation Road Map - Page 2
Audience Assumptions, Verify Contents, View the Readme File, Remove the Cover - lan server
 |
View all HP LH4r manuals
Add to My Manuals
Save this manual to your list of manuals |
Page 2 highlights
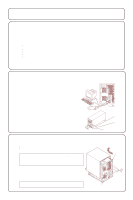
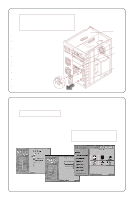
Audience Assumptions This Road Map is for the person who installs, administers, and troubleshoots LAN servers. Hewlett-Packard Company assumes you are qualified in the servicing of computer equipment and trained in recognizing hazards in products with hazardous energy levels. 1 Verify Contents Unpack and verify the contents of the shipping box against the Contents Checklist included with your NetServer. If anything is missing or damaged, call your reseller. HP NetServer Navigator CD Release History To ensure that you have the latest versions of the software, obtain the current Release History. This report describes major software updates to each release of the HP Navigator CD-ROM and instructions for obtaining a current release. Obtain the Release History in one of these ways: ! Fax-Call HP's fax system from your telephone at 800-333-1917 or from your fax machine (and when calling from outside the U.S.) at 208-344-4809. Request the Release History using the Document Number 6005. ! WWW-http://www.hp.com/go/netserver ! FTP-ftp://ftp.netserver.hp.com;logon:anonymous; password: ; cd NSNAVCD; get 6005.txt ! BBS-Call 408-553-3500; download 6005.txt from NSNAVCD library ! CompuServe-GO HPPC; download 6005.txt from the NetServer library To obtain drivers and utilities for non-HP components of your system, follow the appropriate Internet, BBS, or CompuServe procedure specified by the manufacturer of the component or software. 2 View the Readme File 1. Connect the monitor, keyboard and mouse to the HP NetServer. Connect the power cords for the HP NetServer and the monitor. Attach the NetServer power cord to the power cord retainer on the back of the HP NetServer. If you are installing a monochrome monitor, you must change a jumper setting on the system board. See the HP NetServer LD Pro User Guide for information. 2. If you have a UPS, install and turn on the UPS. Use the supplied serial cable to connect the UPS to the HP NetServer. Refer to the user's guide included with the UPS for additional information. 3. Plug the power cords for the HP NetServer and monitor into a power outlet and turn them both on. 4. Insert the HP NetServer Navigator CD-ROM into the CD-ROM drive and press the Reset button on the front of the server. The HP NetServer automatically boots from the HP NetServer Navigator CD-ROM. If an error message appears, ignore it and press the F1 key. If an error message appears in Configuration Assistant, press F10 to continue. 5. Go to the HP NetServer Navigator Main Menu. If the language needs to be changed, select "Set Preferences." 6. Select "Readme File." The Readme file contains the latest information to help you install your HP NetServer. Read it carefully before beginning your installation. 7. If you are installing options, you will need to remove the cover. Go to Step 3: "Remove the Cover." If you are not installing options, go to Step 7: "Configure the HP NetServer and Install Additional ISA Boards." 3 Remove the Cover If you are installing options, you will need to remove the cover. Tools you will need: ! Flat 1/4-inch screwdriver and T15 TORX® driver ! Antistatic service kit (3M® 8501/8502/8505 or equivalent). The kit includes a static-dissipating work surface, chassis clip lead, and wrist strap WARNING Before removing the cover, always disconnect the power cord and unplug telephone cables. Disconnect telephone cables to avoid exposure to shock hazard from telephone ringing voltages. Disconnect the power cord to avoid exposure to high energy levels that may cause burns when parts are short-circuited by metal objects such as tools or jewelry. 1. Turn off the NetServer and disconnect the power cord. 2. Unlock the cover using the key in the key bag. 3. Loosen the five mounting screws on the back of the HP NetServer. 4. Slide the cover forward 2 inches (5 cm) and then lift it straight up. CAUTION Wear a wrist strap and use a static-dissipating work surface connected to the chassis when handling components. Power cord retainer UPS From HP NetServer From Monitor To serial port of HP NetServer Key Lock Key Bag
-
 1
1 -
 2
2 -
 3
3 -
 4
4
 |
 |
