HP LH4r HP Netserver LH 4r Installation Road Map
HP LH4r - NetServer - 256 MB RAM Manual
 |
View all HP LH4r manuals
Add to My Manuals
Save this manual to your list of manuals |
HP LH4r manual content summary:
- HP LH4r | HP Netserver LH 4r Installation Road Map - Page 1
not be liable for errors contained herein or reliability of its software on equipment that is HP NetServer Audience Assumptions This road map is intended for the person who installs, administers, and troubleshoots LAN servers. Hewlett-Packard Company assumes that you are qualified in the servicing - HP LH4r | HP Netserver LH 4r Installation Road Map - Page 2
(or 1-208-344-4809 from your fax machine), and request document number 6005 history from one of the HP NetServer information resources listed ! Internet WWW-http://www.hp.com/netserver/servsup here. ! Internet FTP-ftp://ftp.hp.com/pub/servers ! CompuServe-GO HPPC; download 6005.txt from the - HP LH4r | HP Netserver LH 4r Installation Road Map - Page 3
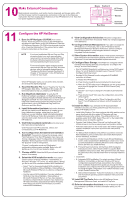
TORX driver, depending HP NetServer and HP Information Assistant or in HP Order Assistant. 1. Remove cover 2. Remove the cover as described in panel 4, "Removing and Replacing the Covers." 2. Open the memory cage cover. Loosen the cover screw. Swing the cover open. Memory Cage Hard its guide, and - HP LH4r | HP Netserver LH 4r Installation Road Map - Page 4
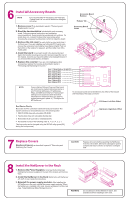
in the following order: 1. IDE CD-ROM drive with a bootable CD-ROM. 2. Flexible disk drive with a bootable flexible disk. 3. Embedded SCSI NetServer in the Rack: Refer to the HP NetServer LH 4/LH 4r User Guide for instructions. 3. Reinstall the power supply modules: After installing the HP NetServer - HP LH4r | HP Netserver LH 4r Installation Road Map - Page 5
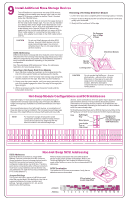
3 and 4, such as a removable hard disk or a tape backup drive. Narrow (50-pin) SCSI devices are supported in the non-hot-swap shelves, but HP NetServer LH 4/LH 4r User Guide for SCSI B channel addresses. NOTE For maximum storage density and to avoid configuration problems, install hot-swap drives - HP LH4r | HP Netserver LH 4r Installation Road Map - Page 6
Remote Management: If you plan to manage the HP NetServer LH 4 remotely, refer to the HP NetServer Server Management Reference Guide for instructions. Select "Configure Remote Management" on the Navigator screen to configure Integrated Remote Assistant. 11. Show System Information: Select "View
-
 1
1 -
 2
2 -
 3
3 -
 4
4 -
 5
5 -
 6
6
 |
 |

Notice
The information contained in this document is subject to change
without notice.
Hewlett-Packard makes no warranty of any kind with
regard to this material, including, but not limited to, the
implied warranties of merchantability and fitness for a
particular purpose. Hewlett-Packard shall not be liable for
errors contained herein or for incidental or consequential
damages in connection with the furnishing, performance, or use
of this material.
Hewlett-Packard assumes no responsibility for the use or
reliability of its software on equipment that is not furnished by
Hewlett-Packard.
This document contains proprietary information that is protected
by copyright. All rights are reserved. No part of this document
may be photocopied, reproduced, or translated to another
language without the prior written consent of Hewlett-Packard
Company.
Hewlett-Packard Company
Network Server Division
P.O. Box 58059, Technical Marketing
Santa Clara, CA 95052-8059 USA
© Copyright 1998, Hewlett-Packard Company
LH 4r
Installation
Road Map
HP NetServer
5967-6608
Printed on recycled paper.
Printed in November 1998
Audience Assumptions
This road map is intended for the person who installs, administers,
and troubleshoots LAN servers. Hewlett-Packard Company assumes
that you are qualified in the servicing of computer equipment and
trained in recognizing hazards in products with hazardous energy
levels.
ESD Warning
Tools Required
This HP NetServer contains sensitive electronic devices that can be
damaged by electrostatic discharge (ESD). ESD hazards are a result
of installation or service personnel failing to ground themselves
properly. To be properly grounded, use a proper ESD wrist strap and
work surface grounded to the HP NetServer chassis.
Installation of some accessories require a
and a T15
TORX or a 1/4-inch flat blade screwdriver, depending on the
T25 TORX
®
®
1. Verify Contents
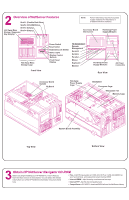
2. Overview of NetServer Features
3. Obtain
Release History
4. Removing and Replacing the Covers
5. Install Additional Memory
6. Install All Accessory Boards
7. Replace Covers
8. Install the NetServer in the Rack
9. Install Additional Mass Storage Devices
10. Make External Connections
11. Configure the HP NetServer
HP NetServer Navigator CD-ROM
NetServer LH 4r Installation Road Map
1
Unpack and verify the contents
of the shipping box against the Contents Checklist included with your HP NetServer. If anything is missing or
damaged, contact your reseller.
Verify Contents