HP LH4r HP Netserver LH Pro Installation Road Map - Page 3
Install Additional Memory, Install Additional EISA Boards, and PCI Boards
 |
View all HP LH4r manuals
Add to My Manuals
Save this manual to your list of manuals |
Page 3 highlights
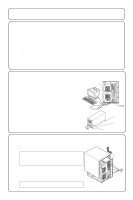
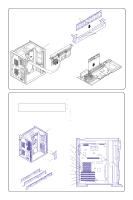
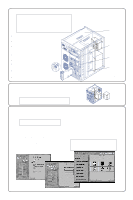
4 Install Additional Memory Use HP DIMMs listed on the Technical Information Label on top of the chassis. 1. Remove the processor board. 2. Align the notches on the DIMM with the keys on the socket. 3. Insert the DIMM until the retaining clips snap into place. 4. Reinstall the board. Technical Information Label with DIMM part numbers Notches Install DIMMS: • in any order • in any socket Keys 5 Install Additional EISA Boards and PCI Boards NOTE Do not install ISA boards until instructed by the Configuration Assistant program in Step 8: Configure the HP NetServer and Install Additional ISA Boards. 1. Read the documentation included with each board. Look for any special instructions and refer to the Accessory Board Installation Recommendations. 2. If necessary, remove the board retainer. 3. Remove the slot cover for each slot used. Technical Information Label Accessory Board Installation Recommendations ! Install the optimal PCI performance board (either Network Interface Card or SCSI controller) in PCI 9. ! Install the EISA SCSI controller in slot 1 to ease the routing of cables. ! Boot device priority order: ! CD-ROM drive with bootable CD-ROM ! Flexible disk drive with bootable flexible disk ! IDE drive ! EISA or ISA controller set to BIOS address C8000 (To boot from an EISA or ISA controller, set the BIOS address to C8000. Other controllers must have BIOS disabled or addresses set at the end of the D0000 range.) ! PCI controller (embedded SCSI A, embedded SCSI B, PCI slots in the following order: 9, 8, 7, 6, and 5. The PCI boot priority order can be changed so that PCI slots precede SCSI A and SCSI B. Set BIOS addresses, disable BIOSes and change PCI boot priority order using the EISA Configuration Utility in Step 8: "Configure the HP NetServer and Install Additional ISA Boards." For a complete description of the boot device priority order, see Information Assistant on the HP NetServer Navigator CD-ROM. Board Retainer Boards can be identified by the shape of their connectors: ISA PCI EISA CPU PCI Bus 0 PCI 9 PCI Bus 1 PCI 8 PCI 7 PCI 6 PCI 5 EISA/ISA Bus E5 E4 E3 E2 E1
-
 1
1 -
 2
2 -
 3
3 -
 4
4
 |
 |
