HP LH4r HP Netserver LP 2000r Installation Sheet
HP LH4r - NetServer - 256 MB RAM Manual
 |
View all HP LH4r manuals
Add to My Manuals
Save this manual to your list of manuals |
HP LH4r manual content summary:
- HP LH4r | HP Netserver LP 2000r Installation Sheet - Page 1
troubleshoots LAN servers. Hewlett-Packard Company assumes you are qualified in the servicing of computer equipment and trained in recognizing hazards in products with hazardous energy levels. The instructions in this document are provided in greater detail in the HP Netserver LP 2000r User Guide - HP LH4r | HP Netserver LP 2000r Installation Sheet - Page 2
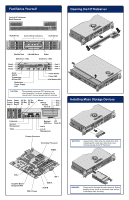
External SCSI Port Lan B Lan A/ Management PCI Slots (3) Primary Processor Secondary Processor DIMMs WARNING Always insert a filler panel into empty drive slots. Operating with empty drive slots could cause thermal damage to the HP Netserver. IDE-2 Daughter Board (Integrated RA) FDD + Power - HP LH4r | HP Netserver LP 2000r Installation Sheet - Page 3
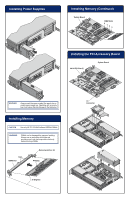
power supply filler panel into an empty power supply bay. Operating with an empty bay could cause thermal damage to the Netserver. Installing Memory CAUTION Use only HP PC133 MHZ buffered SDRAM DIMMs. WARNING DIMMs can be damaged by improper handling. Always use an anti-static wrist strap and - HP LH4r | HP Netserver LP 2000r Installation Sheet - Page 4
Installing the PCI Accessory Board (continued) Installing a Second Processor (continued) Pin-1 Marker Installing a Second Processor ZIF Lever Terminator Processor Socket WARNING Align pin 1 on the processor with pin 1 on the processor socket, or pin damage will occur. Thumb Latch Tab - HP LH4r | HP Netserver LP 2000r Installation Sheet - Page 5
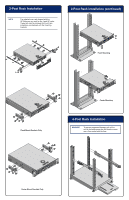
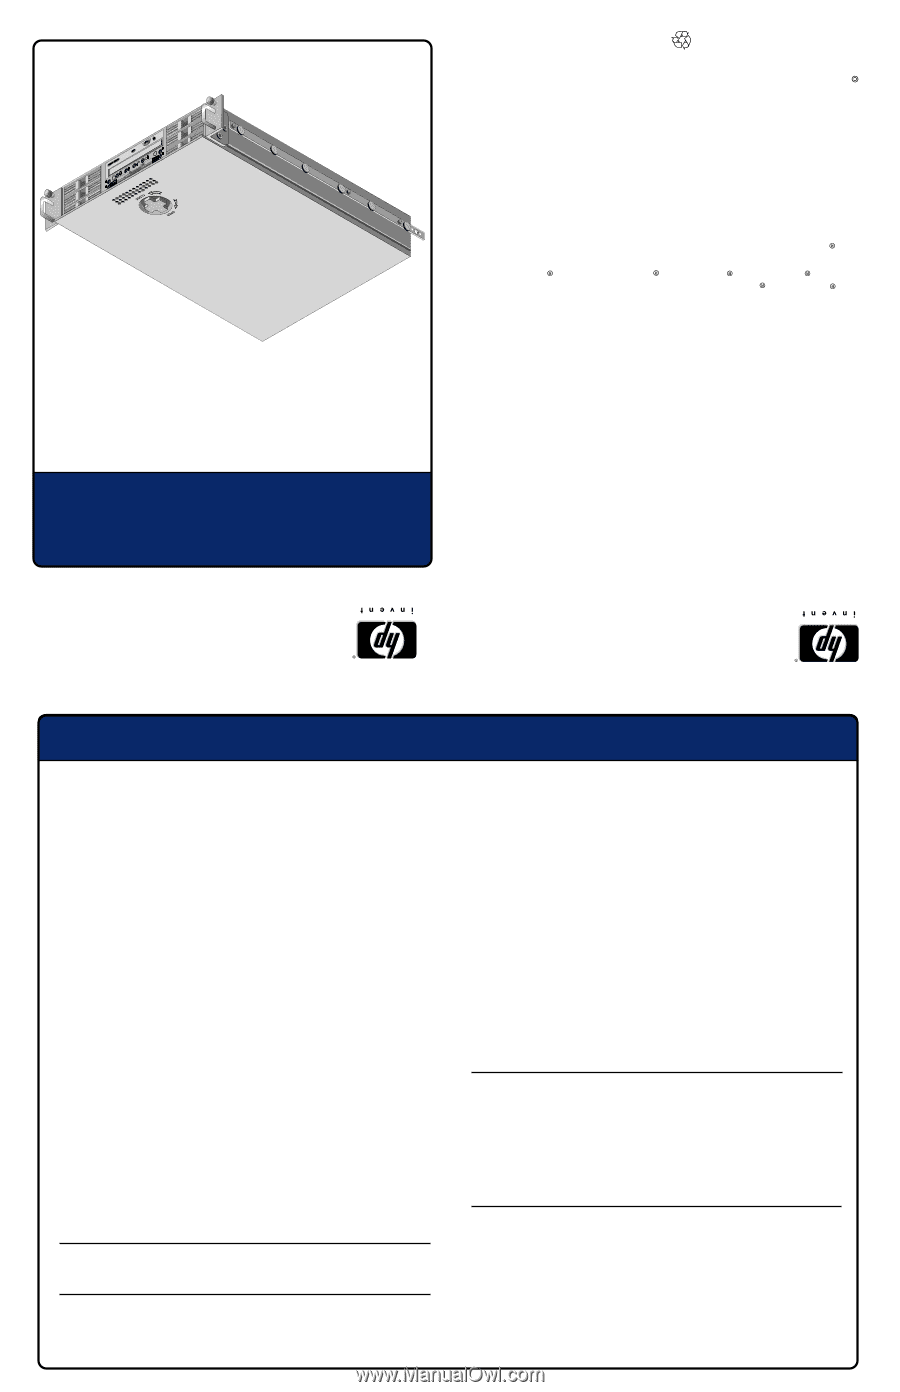
2-Post Rack Installation NOTE ) The installed inner-rails shipped with the HP Netserver are used for the 4-post HP racks. These rails must be removed for 2-post rack installation and replaced with the mounting brackets. 2-Post Rack Installation (continued) Flush Mounting Flush Mount Brackets - HP LH4r | HP Netserver LP 2000r Installation Sheet - Page 6
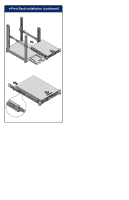
4-Post Rack Installation (continued)
-
 1
1 -
 2
2 -
 3
3 -
 4
4 -
 5
5 -
 6
6
 |
 |
Setting Up the HP Netserver LP 2000r
HP Netserver
Installation Sheet
N•šŒ†ˆ
LP 2000r
The information contained in this document is subject to change
without notice.
Hewlett-Packard makes no warranty of any kind with regard to this
material, including, but not limited to, the implied warranties of
merchantability and fitness for a particular purpose.
Hewlett-Packard shall not be liable for errors contained herein or for
incidental or consequential damages in connection with the
furnishing, performance, or use of this material.
Hewlett-Packard assumes no responsibility for the use or reliability
of its software on equipment that is not furnished by
Hewlett-Packard.
This document contains proprietary information that is protected by
copyright. All rights are reserved. No part of this document may be
photocopied, reproduced, or translated to another language without
the prior written consent of Hewlett-Packard Company.
Intel and Pentium are registered trademarks of Intel Corporation.
Microsoft , Windows NT , Windows 95 and Windows 2000 are
registered trademarks of Microsoft in the U.S. and other countries.
Torx is a registered trademark of CamCar/Textron, Incorporated.
Hewlett-Packard Company
Network Server Division
Technical Communications
10955 Tantau Avenue
Cupertino, California 95014 USA
Copyright 2001, Hewlett-Packard Company.
P1824-90001
Printed in January 2001
Printed on recycled paper
Audience Assumptions
This guide is for the person who installs, administers, and troubleshoots
LAN servers. Hewlett-Packard Company assumes you are qualified in
the servicing of computer equipment and trained in recognizing hazards
in products with hazardous energy levels. The instructions in this
document are provided in greater detail in the HP Netserver LP 2000r
User Guide.
Configuring the HP Netserver
1. Power on the HP Netserver and the monitor:
q
Insert the HP Netserver Navigator CD-ROM in the CD-ROM
drive.
q
The server should boot from the HP Netserver Navigator CD
on its own; if not, turn the power off, wait 10 seconds and turn
the power back on again.
q
If the system fails to boot, follow the instructions on the
screen.
q
Press [
F2
] to enter setup, or
q
Press [
F4
] to accept automatic configuration update (if
prompted to do so).
2. Configure the Netserver and Install the Network Operating
System (NOS):
q
During the configuration process you will be asked to select
the NOS Installation Mode.
q
From the HP Netserver Navigation Main Menu, view the
system
Readme
from the HP Navigator main menu for the
most current installation information.
q
Use the HP Netserver Navigator to configure the Netserver.
If you use Navigator's Guided, Custom, or Replication
modes, you will be prompted through the process.
NOTE
If certain versions of the Microsoft Windows NT Server are used,
a prompt will appear indicating selections of automated or
manual NOS installation.
q
Choose the automated NOS installation mode for first-time
installations of Microsoft Windows 2000 (NT) Server on
factory-configured HP Netserver. You will be guided through
the process by a series of HP display screens.
q
Perform a manual install if you are installing a NOS other
than Microsoft Windows 2000 (NT) Server or if you have
replaced HP components (for example, adding a SCSI
controller board from a third-party). You will need to use
the NOS vendor's installation process.
Before you leave the Navigator and install your NOS,
ensure you view and print the HP-customized NOS
installation instructions and create the driver diskette(s)
for the NOS you are installing.
3. Install or Configure Tape Backup Software:
q
If your Netserver uses a tape backup device, install and/or
configure the tape backup software now.
Refer to the Tape Backup Getting Started Guide for
instructions on installing and configuring the tape backup
software.
4. Refer to the HP Netserver Online Documentation CD-ROM:
q
Use this CD-ROM for updated information about your
HP Netserver and as reference for any additional information
not provided in this Installation Guide.
NOTE
If you plan to use the Integrated Remote Assistant (Integrated RA)
feature to run Netserver utilities remotely, the Utility Partition must
be created using the HP Netserver Navigator. If you choose the
Guide mode of configuration, the partition will be created
automatically. Otherwise, you will need to choose Install/Update
Utility Partition during the custom configuration process. For more
information on the Integrated RA feature, refer to the "Remote
Administrator Guide" found on the HP Netserver Online
Documentation CD-ROM.
5. Run DiagTools (Optional):
q
Create the HP DiagTools diskettes from the Netserver Utilities
(or Diskette Library) on the HP Netserver Navigator
CD-ROM.
q
Run HP DiagTools and after completing all the configuration
topics, save the support ticket to a diskette for future
reference.