HP LH4r HP Netserver LXr 8500 Installation Guide: Gasket Installation
HP LH4r - NetServer - 256 MB RAM Manual
 |
View all HP LH4r manuals
Add to My Manuals
Save this manual to your list of manuals |
HP LH4r manual content summary:
- HP LH4r | HP Netserver LXr 8500 Installation Guide: Gasket Installation - Page 1
the section "Installing the Gaskets" in the Installation Guide with the following section: Tools Required The following tools are required for extending the chassis out of the rack and for cover removal and installation on the HP Netserver: • T-15 Torx® driver - Top Cover and PCI Access Panel l T-25 - HP LH4r | HP Netserver LXr 8500 Installation Guide: Gasket Installation - Page 2
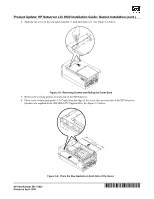
new twenty-inch gasket 1/16th inch from the edge of the cover slots on each side of the HP Netserver. (Gaskets are supplied in the 900 MHz CPU Upgrade Kit.) See Figure 3-9 below. Figure 3-9. Place the New Gaskets on Each Side of the Server HP Part Number 5971-3021 Printed in April 2001 '"&$ ( ' - HP LH4r | HP Netserver LXr 8500 Installation Guide: Gasket Installation - Page 3
Product Update: HP Netserver LXr 8500 Installation Guide: Gasket Installation (cont.) 7. Remove the (short) T-15 Torx® screws holding the access panel to the top for each side of the access cover. See Figure 3-11 on the following page. HP Part Number 5971-3021 Printed in April 2001 '"&$ ( ' - HP LH4r | HP Netserver LXr 8500 Installation Guide: Gasket Installation - Page 4
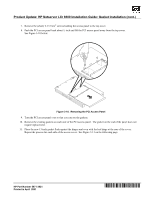
PCI access panel, lower it onto the top cover, about ½ inch to the rear of its normally closed position. See Figure 3-6 in the HP Netserver LXr 8500 Installation Guide. 13. Push the PCI access panel forward until the tabs along its front edge line up with the screw holes on the top cover
-
 1
1 -
 2
2 -
 3
3 -
 4
4
 |
 |
HP Part Number 5971-3021
'"&$±(°²³±'
Printed in April 2001
Product Update: HP Netserver LXr 8500
Installation Guide: Gasket Installation
IMPORTANT
Replace the information provided in the HP Netserver LXr 8500 Installation
Guide with the updated information provided in this Product Update for
each section that is referred.
In Chapter 7, "Installing an Additional Processor," add the section "Installing the Gaskets” in the
Installation Guide with the following section:
Tools Required
The following tools are required for extending the chassis out of the rack and for cover removal and installation on the
HP Netserver:
•
T-15 Torx
®
driver – Top Cover and PCI Access Panel
l
T-25 Torx
®
driver – Rack screws
Installing the Gaskets
Gasket rework is needed when a customer has an HP Netserver LXr 8500 with a slower processor speed than 900
MHz and wishes to upgrade to 900 MHz. When the LXr 8500 processor is upgraded to 900 MHz, the gaskets for the
chassis assembly and the PCI Hot plug cover must be replaced in order that it meets EMI standards.
The gaskets are
included in the 900 MHz CPU Upgrade Kit.
When a new LXr 8500 is purchased, this step is unnecessary as all LXr
8500s have been upgraded at the factories to meet the EMI standards for 900 MHz processors.
CAUTION
Do not operate the HP Netserver LXr 8500 with its top cover removed.
Serious damage to the HP
Netserver could result.
To install the new gaskets, complete the following procedure:
1.
If the HP Netserver is operating, log off all users and, if necessary, back-up files.
Power down the HP
Netserver. Refer to the
HP Netserver LXr 8500 Installation Guide,
Chapter 3, “Opening and Closing the HP
Netserver.”
NOTE
The power supplies will continue to provide standby current to the HP Netserver until the power
cord is disconnected.
WARNING
Always disconnect the power cord before removing the top cover to avoid exposure to high
energy levels that may cause burns when parts are short-circuited by metal objects such as tools or
jewelry. Disconnect any telephone cables to avoid exposure to shock hazard from telephone
ringing voltages.
2.
Pull the HP Netserver out from the rack on its slides.
3.
Remove the two T-15 Torx
®
screws on the top cover, near the front of the chassis.