HP LH4r HP Netserver LXr 8500 Installation Guide: Gasket Installation - Page 4
HP Part Number 5971-3021, Printed in April,
 |
View all HP LH4r manuals
Add to My Manuals
Save this manual to your list of manuals |
Page 4 highlights
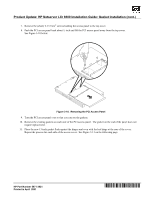
Product Update: HP Netserver LXr 8500 Installation Guide: Gasket Installation (cont.) Figure 3-11. Place the New Gaskets Flush Against the PCI Access Panel Hinges 12. To replace the PCI access panel, lower it onto the top cover, about ½ inch to the rear of its normally closed position. See Figure 3-6 in the HP Netserver LXr 8500 Installation Guide. 13. Push the PCI access panel forward until the tabs along its front edge line up with the screw holes on the top cover. 14. Re-attach the two T-15 Torx® screws to the top cover. Be sure you use the short T-15 Torx® screws. 15. Replace the top cover and reboot the HP Netserver. HP Part Number 5971-3021 Printed in April 2001 '"&$ ( '
-
 1
1 -
 2
2 -
 3
3 -
 4
4
 |
 |

Product Update: HP Netserver LXr 8500 Installation Guide: Gasket Installation (cont.)
HP Part Number 5971-3021
'"&$±(°²³±'
Printed in April
2001
Figure 3-11.
Place the New Gaskets Flush Against the PCI Access Panel Hinges
12.
To replace the PCI access panel, lower it onto the top cover, about ½ inch to the rear of its normally closed
position.
See Figure 3-6 in the
HP Netserver LXr 8500 Installation Guide
.
13.
Push the PCI access panel forward until the tabs along its front edge line up with the screw holes on the top
cover.
14.
Re-attach the two T-15 Torx
®
screws to the top cover. Be sure you use the short T-15 Torx
®
screws.
15.
Replace the top cover and reboot the HP Netserver.