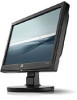
HP LV1561ws User's Guide cq1569, lv1561w, lv1561ws LCD Display - Page 21
Using the Auto-Adjustment Function, Auto/OK
 |
View all HP LV1561ws manuals
Add to My Manuals
Save this manual to your list of manuals |
Page 21 highlights
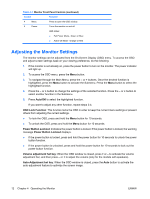
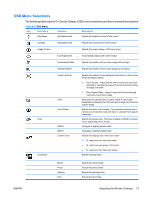
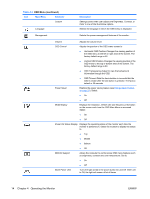
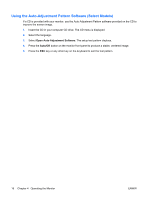
Table 4-2 OSD Menu (continued) Icon Main Menu Submenu Sleep Timer Information Description Provides the timer adjustment menu options: ● Set Current Time-sets the current time in hours and minutes ● Set Sleep Time-sets the time you want to place the monitor in sleep mode ● Set on Time-sets the time you want the monitor to wake up from sleep mode ● Timer-sets the Sleep Timer feature On or Off. The default setting is Off ● Sleep Now-immediately sets the monitor to enter sleep mode Selects and displays important information about the monitor. Factory Reset Current Settings Provides the current input video mode. Recommended Settings Provides the recommended resolution mode and refresh rate for the monitor. Serial Number Reports the serial number of the monitor. The serial number is needed if contacting HP technical support. Version Reports the firmware version of the monitor. Backlight Hours Reports the total hours of backlight operation. Service Support For service support, go to http://www.hp.com/support. Returns settings to factory defaults. Using the Auto-Adjustment Function You can optimize the screen performance for the VGA (analog) input by using the Auto/OK button on the monitor. This procedure can correct the following image quality conditions: ● Fuzzy or unclear focus ● Ghosting, streaking or shadowing effects ● Faint vertical bars ● Thin, horizontal scrolling lines ● An off-center picture To use the auto-adjustment feature: 1. Allow the monitor to warm up for 20 minutes before adjusting. 2. Press the Auto/OK button on the monitor front panel. You can also press the Menu button to open the OSD window, then select the Image Control, followed by Auto-Adjustment. ENWW Adjusting the Monitor Settings 15
-
 1
1 -
2
-
3
-
4
-
5
-
6
-
7
-
8
-
9
-
10
-
11
-
12
-
13
-
14
-
15
-
 16
16 -
 17
17 -
 18
18 -
 19
19 -
 20
20 -
 21
21 -
 22
22 -
 23
23 -
 24
24 -
 25
25 -
 26
26 -
27
-
28
-
29
-
30
-
31
-
32
-
33
 |
 |
