HP LaserJet 8100 HP LaserJet 8100, 8100 N, 8100 DN Printers - Getting Started - Page 29
Installing Windows Printing Software CD, Installing Network Software
 |
View all HP LaserJet 8100 manuals
Add to My Manuals
Save this manual to your list of manuals |
Page 29 highlights
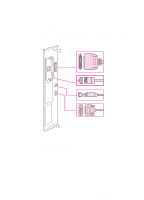
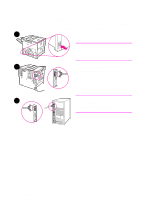
Note EN Installing Windows Printing Software (CD) For Windows 9x and Windows NT 4.0 1 Close all running applications. 2 Insert the compact disc into the CD-ROM drive. (Depending on the computer configuration, the installation program may automatically start.) 3 Click Start. 4 Click Run. 5 Type D:\SETUP (or the appropriate drive directory letter) in the command line box and click OK. 6 Follow the instructions on the computer screen. For Windows 3.1x and Windows 3.11* 1 Close all running applications. 2 Insert the compact disc into the CD-ROM drive. 3 In the Windows Program Manager screen, click the File menu. 4 Click Run. 5 Type D:\SETUP (or the appropriate drive directory letter) in the command line box and click OK. 6 Follow the instructions on the computer screen. Installing Network Software If the printer is to be used on a network, install and configure the network operating system software on the network administrator's system before individual users install the printing software. 1 Select a Custom install to install the printing system software. Be sure to install the HP JetAdmin software. 2 Use HP JetAdmin to configure the HP JetDirect print server and the printer for your network. You also can use HP Web JetAdmin to configure your printer with your web browser. For information on using HP Web JetAdmin, see HP's web site at http:// www.hp.com * Includes only PostScript Level 2 Emulation (or Level 1 Emulation for Windows 3.1x) and FontSmart. Install Printing Software 23
-
 1
1 -
2
-
3
-
4
-
5
-
6
-
7
-
8
-
9
-
10
-
11
-
12
-
13
-
14
-
15
-
16
-
17
-
18
-
19
-
20
-
21
-
22
-
23
-
 24
24 -
 25
25 -
 26
26 -
 27
27 -
 28
28 -
 29
29 -
 30
30 -
 31
31 -
 32
32 -
 33
33 -
 34
34 -
35
-
36
-
37
-
38
-
39
-
40
 |
 |
