HP LaserJet P4510 HP LaserJet P4010 and P4510 Series - User Guide - Page 148
Use HP Web Jetadmin to upgrade the firmware, Upload New Firmware Image
 |
View all HP LaserJet P4510 manuals
Add to My Manuals
Save this manual to your list of manuals |
Page 148 highlights
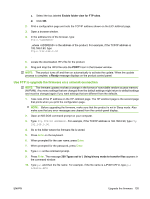
11. The download process begins and the firmware is updated on the product. This can take approximately five minutes. Let the process finish without further interaction with the product or computer. NOTE: The product automatically turns off and then on again after processing the upgrade. 12. At the command prompt, type: bye to exit the ftp command. 13. At the command prompt, type: exit to return to the Windows interface. Use HP Web Jetadmin to upgrade the firmware This procedure requires that you install HP Web Jetadmin Version 7.0 or later on your computer. Complete the following steps to update a single product through HP Web Jetadmin after downloading the .RFU file from the HP Web site. 1. Start HP Web Jetadmin. 2. Open the Device Management folder in the drop-down list in the Navigation panel. Navigate to the Device Lists folder. 3. Expand the Device Lists folder and select All Devices. Locate the product in the list of devices, and then click to select it. If you need to upgrade the firmware for products, select all of them by pressing the Ctrl key as you click the name of each product. 4. Locate the drop-down box for Device Tools in the upper-right corner of the window. Select Update Printer Firmware from the action list. 5. If the name of the .RFU file is not listed in the All Available Images box, click Browse in the Upload New Firmware Image dialog box and navigate to the location of the .RFU file that you downloaded from the Web at the start of this procedure. If the filename is listed, select it. 6. Click Upload to move the .RFU file from your hard drive to the HP Web Jetadmin server. After the upload is complete, the browser window refreshes. 7. Select the .RFU file from the Printer Firmware Update drop-down menu. 8. Click Update Firmware. HP Web Jetadmin sends the selected .RFU file to the product. The control panel shows messages that indicate the progress of the upgrade. At the end of the upgrade process, the control panel shows the Ready message. 136 Chapter 9 Manage and maintain the product ENWW
-
 1
1 -
2
-
3
-
4
-
5
-
6
-
7
-
8
-
9
-
10
-
11
-
12
-
13
-
14
-
15
-
16
-
17
-
18
-
19
-
20
-
21
-
22
-
23
-
24
-
25
-
26
-
27
-
28
-
29
-
30
-
31
-
32
-
33
-
34
-
35
-
36
-
37
-
38
-
39
-
40
-
41
-
42
-
43
-
44
-
45
-
46
-
47
-
48
-
49
-
50
-
51
-
52
-
53
-
54
-
55
-
56
-
57
-
58
-
59
-
60
-
61
-
62
-
63
-
64
-
65
-
66
-
67
-
68
-
69
-
70
-
71
-
72
-
73
-
74
-
75
-
76
-
77
-
78
-
79
-
80
-
81
-
82
-
83
-
84
-
85
-
86
-
87
-
88
-
89
-
90
-
91
-
92
-
93
-
94
-
95
-
96
-
97
-
98
-
99
-
100
-
101
-
102
-
103
-
104
-
105
-
106
-
107
-
108
-
109
-
110
-
111
-
112
-
113
-
114
-
115
-
116
-
117
-
118
-
119
-
120
-
121
-
122
-
123
-
124
-
125
-
126
-
127
-
128
-
129
-
130
-
131
-
132
-
133
-
134
-
135
-
136
-
137
-
138
-
139
-
140
-
141
-
142
-
 143
143 -
 144
144 -
 145
145 -
 146
146 -
 147
147 -
 148
148 -
 149
149 -
 150
150 -
 151
151 -
 152
152 -
 153
153 -
154
-
155
-
156
-
157
-
158
-
159
-
160
-
161
-
162
-
163
-
164
-
165
-
166
-
167
-
168
-
169
-
170
-
171
-
172
-
173
-
174
-
175
-
176
-
177
-
178
-
179
-
180
-
181
-
182
-
183
-
184
-
185
-
186
-
187
-
188
-
189
-
190
-
191
-
192
-
193
-
194
-
195
-
196
-
197
-
198
-
199
-
200
-
201
-
202
-
203
-
204
-
205
-
206
-
207
-
208
-
209
-
210
-
211
-
212
-
213
-
214
-
215
-
216
-
217
-
218
-
219
-
220
-
221
-
222
-
223
-
224
-
225
-
226
-
227
-
228
-
229
-
230
-
231
-
232
-
233
-
234
-
235
-
236
-
237
-
238
-
239
-
240
-
241
-
242
-
243
-
244
-
245
-
246
 |
 |