HP Latex 110 Line Sensor Cleaning - Page 5
Turn on the printer. - printhead
 |
View all HP Latex 110 manuals
Add to My Manuals
Save this manual to your list of manuals |
Page 5 highlights
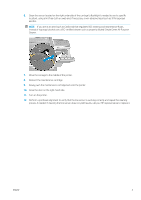
6. Clean the sensor located on the right underside of the carriage (a flashlight is needed to see its specific location), using a lint-free cloth or swab and, if necessary, a non-abrasive liquid such as 91% isopropyl alcohol. NOTE: If you are in an area (such as California) that regulates VOC cleaning and maintenance fluids, instead of isopropyl alcohol use a VOC-certified cleaner such as properly diluted Simple Green All-Purpose Cleaner. 7. Move the carriage to the middle of the printer. 8. Reinsert the maintenance cartridge. 9. Slowly push the maintenance cartridge back into the printer. 10. Close the door on the right-hand side. 11. Turn on the printer. 12. Perform a printhead alignment to verify that the line sensor is working correctly and repeat the cleaning process if needed. If cleaning the line sensor does not yield results, call your HP representative to replace it. ENWW 3
-
 1
1 -
 2
2 -
 3
3 -
 4
4 -
 5
5
 |
 |