HP MSA70 HP StorageWorks MSA60/70 I/O module Installation instructions for dua - Page 2
Installing the I/O module, Verifying I/O module status, Cabling the enclosures, Updating the, rmware - quickspecs
 |
View all HP MSA70 manuals
Add to My Manuals
Save this manual to your list of manuals |
Page 2 highlights
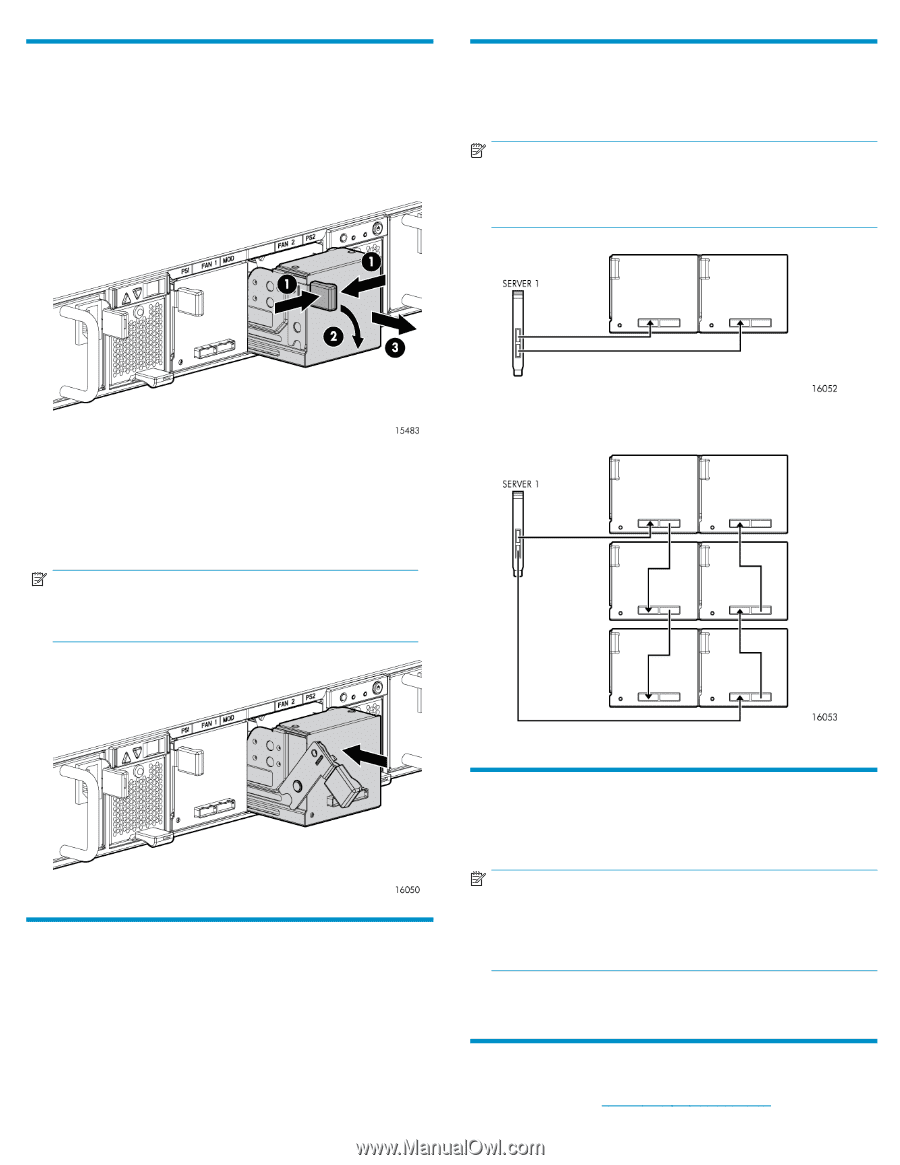
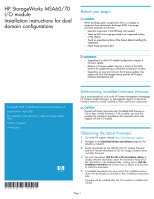
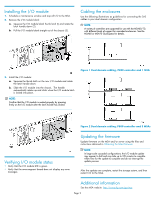
Installing the I/O module 1. Schedule a maintenance window and stop all I/O to the MSA. 2. Remove the I/O module blank: a. Squeeze the I/O module blank thumb latch (1) and rotate the latch handle down (2). b. Pull the I/O module blank straight out of the chassis (3). Cabling the enclosures Use the following illustrations as guidelines for connecting the SAS cables in your dual domain configuration. NOTE: A variety of controllers are supported for use with the MSA60/70, with different levels of support for cascaded enclosures. See the MSA60 or MSA70 QuickSpecs for details. 3. Install the I/O module: a. Squeeze the thumb latch on the new I/O module and rotate the latch handle down. b. Slide the I/O module into the chassis. The handle automatically rotates up and clicks when the I/O module latch is locked into place. NOTE: Confirm that the I/O module is seated properly by pressing firmly on the I/O module after the latch handle has clicked. Figure 1 Dual domain cabling, P800 controller and 1 MSA Figure 2 Dual domain cabling, P800 controller and 3 MSAs Verifying I/O module status • Verify that the I/O module LED is green. • Verify that the seven-segment board does not display any error messages. Updating the firmware Update firmware on the MSA and/or server using the files and instructions obtained in Obtaining the latest firmware. NOTE: In large-scale cascaded configurations, the I/O module update may appear to halt and may take up to 120 minutes to complete. Allow time for the update to complete and do not interrupt the update process. After the updates are complete, restart the storage system, and then restart I/O to the MSA. Additional information See the MSA website: http://www.hp.com/go/msa. Page 2
-
 1
1 -
 2
2
 |
 |