HP Media Center m1200 Creating Disc Labels with LightScribe - Page 5
Creating a LightScribe label
 |
View all HP Media Center m1200 manuals
Add to My Manuals
Save this manual to your list of manuals |
Page 5 highlights
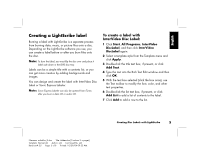
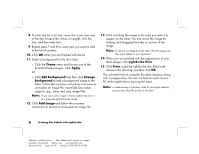
Creating a LightScribe label Burning a label with LightScribe is a separate process from burning data, music, or picture files onto a disc. Depending on the LightScribe software you use, you can create a label before or after you burn files onto the disc. Note: To burn the label, you must flip the disc over and place it label side down in the DVD disc tray. Labels can be a simple title with a contents list, or you can get more creative by adding backgrounds and images. You can design and create the label with InterVideo Disc Label or Sonic Express Labeler. Note: Sonic Express Labeler can also be opened from iTunes after you burn a data CD or audio CD. To create a label with InterVideo Disc Label: 1 Click Start, All Programs, InterVideo DiscLabel, and then click InterVideo DiscLabel again. 2 Select a template style from the Template menu and click Apply. 3 Double-click the title text box, if present, or click Add Text. 4 Type the text into the Rich Text Edit window and then click OK. 5 With the text box selected (click the box once), use the Text toolbar to modify the font, color, and other text properties. 6 Double-click the list text box, if present, or click Add List to add a list of contents to the label. 7 Click Add to add a row to the list. Filename: m4adlisc_K.doc Title: Addendum [3-column 3 + pages] Template: Normal.dot Author: jiml Last Saved By: jiml Revision #: 25 Page: 5 of 8 Printed: 10/29/04 09:32 AM Creating Disc Labels with LightScribe 5
-
 1
1 -
 2
2 -
 3
3 -
 4
4 -
 5
5 -
 6
6 -
 7
7 -
 8
8 -
 9
9 -
 10
10 -
 11
11 -
12
-
13
-
14
-
15
-
16
-
17
-
18
-
19
-
20
-
21
-
22
-
23
-
24
 |
 |
